Download windows 7 for system recovery. Recovering from a Windows backup image created by its backup tool
Backing up is the most important procedure that should be followed by every PC user. Unfortunately, most of us only remember backing up when important data has already been irretrievably lost.
If you store not only entertainment content, but also important documents, work projects or databases on the hard drives of your computer, then you need to think about their safety. Do not forget about system files and parameters, as their damage can deprive you of access to your account, and therefore to data.
Acronis True Image is one of the most widely used and powerful software for backup, recovery and data storage. Akronis can create copies of individual files, folders and entire disks. It also includes an arsenal of tools to improve system security, restore boot, create rescue media, and clone disks.

The user is given space in the cloud on the software developers' server, which, as well as managing the program, can be accessed not only from a desktop machine, but also from a mobile device.
Aomei Backupper Standard
Aomei Backupper Standard is slightly inferior in functionality to Akronis, but it is also a very efficient tool. It includes utilities for cloning and creating bootable disks for Linux and Windows PE, there is a built-in task scheduler and a function to notify the user by e-mail about the results of the next backup.

Macrium Reflect
This is another harvester for creating backups. Macrium Reflect allows you to mount copies of disks and files into the system to view the contents and restore individual elements. The main distinguishing features of the program are the functions of protecting disk images from editing, checking the file system for detecting various failures, as well as integrating into the boot menu of the operating system.

Windows Handy Backup
This program, in addition to backing up files and folders, allows you to synchronize the contents of backups and directories on local and network drives. Windows Handy Backup can also launch selected applications at startup or completion of the backup procedure, send notifications by e-mail, and work through the Windows console.

Windows Repair
Windows Repair is a comprehensive software for restoring the operating system. The program "cures" the system in the event of a firewall failure, errors in update packages, restrictions on access to system files by viruses, and also restores the functionality of some ports. For increased security, there is a flexible disc cleaning function.

All software from the above list is designed to restore the system from the created backups. Only Windows Repair gets out of the picture, since its principle of operation is based on identifying and eliminating errors in the file system and registry.
Most of the programs presented are paid, but the price of important information stored on disks can be higher than the cost of a license, and this is not only about money. Make backups of key files and system partitions in time to protect yourself from unpleasant surprises in the form of disk breakdowns or hooliganism of malicious applications.
When your PC stops booting from its hard drive, you can run into a stalemate - unless you create a bootable rescue disk or device.
The recovery disc doesn't just start the PC, it also includes tools to help fix what's wrong with the system. It takes minutes to create a recovery drive.
Recovery disc options for all versions of Windows
There are various ways to create standalone, rescue, bootable / rescue disks. In the case of Windows 7 and 8, creating good recovery discs is quick and easy. Vista and XP also provide tools for creating recovery discs, but the process is a little more difficult.
There are also numerous third-party boot discs - both paid and free - that work with all versions of Windows. The best ones have recovery and back-to-work capabilities that far outperform Windows' native tools.
You can of course boot your PC using the original Windows installation CDs or DVDs, and they provide some basic recovery tools. But most PCs now come with installation files located in a special partition on your hard drive. Such files will not be available unless you take the time to create an emergency boot disk. In other words, the recovery partition will be useless for you in an emergency in which it will not be possible to boot your PC!
Even if you've bothered to back up your system image, you may still need a rescue disk at hand to restore the most recent image.
In Part 1 (and there are two in total) of this article, I'll cover a long line of rescue discs for XP, Vista, Windows 7, and Windows 8. I'll start with the features of Windows 8 and move back to XP. I'll also start with the built-in Windows tools and then mention some excellent third-party products - most of them free!
Next week, in Part 2, you will learn how to use these discs to boot your PC and how to get to the recovery tools they contain. I'll also share some advanced tips and tricks.
Windows 8: Create a Recovery Drive Tool
Windows 8.0 and 8.1 both include built-in Recovery Media Creator. This tool allows you to easily make a bootable recovery disk from a USB flash drive or external USB device. Windows 8.0 tools can also create bootable CDs or DVDs.
The Windows 8 Standard Recovery Device (or CD / DVD) contains a bootable recovery image — a simplified custom version of Windows 8 — that will start the PC. It also includes tools for repairing and restoring basic Windows 8. It may also include tools for resetting or updating a system based on a system image, such as those provided by computer manufacturers.
If your PC contains a manufacturer-installed recovery image available for use (usually in its own dedicated partition), Recovery Media Creator (RMC) can also add the image to a bootable recovery disc. If necessary, you can completely restore your system solely from the recovery disc. (You can even put a custom recovery image on a recovery drive. I'll cover that in Part Two.)
The Recovery Disc Creation tool is very easy to use. And here's how:
- From the administrator account, click Win + W(Windows flag key and key W) or swipe to open the Charms bar.

Figure 1. Enter "Create ...".
- Enter Creating a recovery disc(recovery drive) in the search box (in Windows 8.0, use the Search, Settings) box, then click the Create a recovery drive icon when it appears. The Recovery Disc tool will open (see Figure 2).
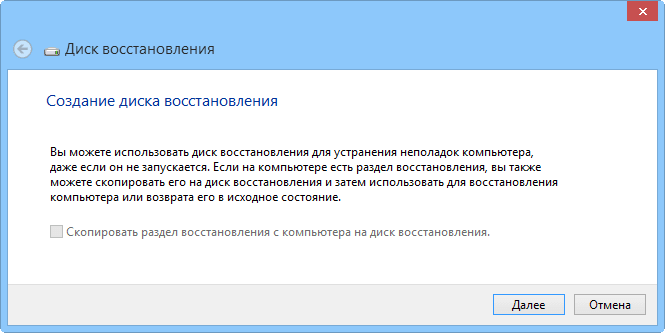
Figure 2. Creating a recovery disc with Windows 8 is a step-by-step wizard that is easy to use.
- If your system has a recovery partition, specify whether you want to include the recovery image in the boot or recovery disk you are creating.
If the checkbox Copy the recovery partition from your computer to the recovery drive(Copy the recovery partition from the PC to the recovery drive) is displayed in black and responds to clicks, you can write the recovery image from the manufacturer of your PC to the recovery disk. Just check the box to enable this option.
If this checkbox is grayed out and unresponsive, then you obviously cannot write the factory image to the recovery drive. However, don't worry, the recovery disc you create will still contain a bootable, stripped-down Windows 8 recovery image, as well as a standard array of recovery tools.
- Then the Create Recovery Disc tool will tell you how much disk space the recovery files and the system image will take if it is checked. Insert a USB device into your PC that is at least as large as you need. Please note that the device can be used only as a bootable recovery disc; everything else on the device will be deleted.
- If you have connected more than one USB device, then RMC will show a list of available devices. Select the one you want to make a recovery disk and click Next. The next dialog will warn you that everything on the selected USB device will be overwritten. When you're ready, click Create.
- The recovery boot image, recovery and repair tools, and the factory system image (if selected) will be copied to the recovery drive. This may take a few minutes.
- If you specified to copy the factory image, RMC will now provide you with the option to remove the OEM recovery partition from the hard drive to free up space. Delete or keep the section - you choose.
- Click Finish.
- Remove the USB device and store it in a safe place.
For more information on the Create Recovery Disc tool included with Windows 8, visit Microsoft's support page -.
Windows 7: Create System Repair Drive Tool
Windows 7 was the first Windows system to come with an automated tool for creating bootable rescue CDs or DVDs. The tool doesn't do as many features as the Windows 8 version - you can't add an OEM recovery image, for example - but it's just as easy to use. Just a few clicks and your recovery disc is ready!
And here's how:
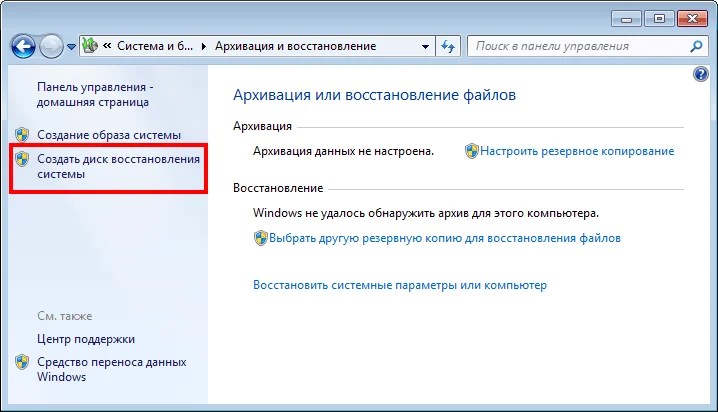
Figure 3. Backup and Restore
- Insert a blank CD or DVD into your PC's optical burner.
- As an administrator, open the Backup and Restore app. Click Start> Control Panel> System and Security> Backup and Restore(Start> Control Panel> System and Security> Backup and Restore).
- On the left side of the window, click Create a system recovery disc(Create a system repair disc).
- Confirm if the optical drive is selected correctly. Click on Create disc(Create disc) (see Figure 4), and follow the suggested steps.
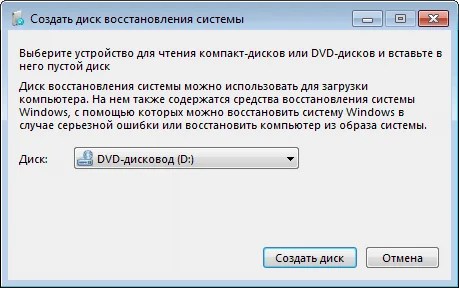
Figure 4. The Create System Repair Disc tool in Windows 7 lets you create a bootable recovery CD or DVD with just a few clicks
Note: If Windows 7 cannot find the files it needs, it will prompt you to insert the Windows installation disc.
For more information, Microsoft offers a video tutorial on its Windows 7 page.
Vista: enabling and using Create Recovery Disk
Vista SP1 beta came with a great utility Create Recovery Disk (Create recovery disc) (recdisc.exe) (see Figure 5). But for reasons known only to Microsoft, the utility has been stripped down in all versions produced. File recdisc.exe still exists in Vista, but it doesn't function!

Figure 5. The remaining recdisc.exe file in Vista does not work by default, but with a little effort it can be made useful.
Nevertheless, enthusiasts liked the working version of the utility. So they prepared the files and made them available for download - along with how-tos. This is not an officially sanctioned solution, but it has been openly discussed and recommended by the Microsoft MVP on the Microsoft Answers forum. For example, see Microsoft Answers "" (Creating a System Repair Disc for Windows Vista).
Receive recdisk.exe not difficult, but the steps are too long to be detailed here. The VistaForums third-party forum thread titled "" (How to Create a Vista Recovery Disc) contains the best how-to instructions I know of. The only thing I would add to the how-to guide is the standard note: before making any system changes, make a backup.
If all of this is beyond your reach, try using a third-party boot disk as described below.
Windows XP: Third Party Tool Required
XP doesn't have a built-in ability to create a bootable rescue disk.
For years, the best alternative has been UBCD4Win(stands for "Ultimate Boot CD for Windows"). But making that bootable disk is a long and complicated process that requires some technical skill and access to a full XP installation CD.
UBCD4Win is still in use, and still free, but I don't recommend it now. There is now a better remedy.
Hiren's BootCD includes an amazing array of free tools - around 100 () in total.
The CD itself is based on Linux, but you don't need to know Linux; in the text view of the application, there are simple menus for choosing the tools that you will run. (See figure 6.)

Figure 6. Hiren's BootCD includes an array of approximately 100 free repair and recovery software tools.
Strangely, Hiren's BootCD also contains a stripped-down "Mini-XP" based on a "gray" system. It is intended as a disaster recovery tool for use by owners of licensed, paid copies of XP — not as a replacement for a purchase of a license or a standard XP installation. Within its limited tasks, it works great. When your regular (licensed and paid) Windows XP system won't boot, MiniXP with Hiren's BootCD can help you start it up again.
You can get Hiren's BootCD on it. But finding a working download link can be tricky - the page contains some distracting alternative download links for unsuitable tools.

Figure 7. Valid download link for Hiren's BootCD
All Windows versions: free recovery discs
If built-in Windows tools aren't available or don't work for you, there are many free bootable recovery discs available for free. Like Hiren's BootCDs, most are Linux-based and come with a wide range of pre-configured maintenance and recovery tools.
Here are four of the best ones:
- Trinity Rescue Kit(free or voluntarily paid) - specially designed for recovery operations on Windows machines, but can also be used for Linux recovery issues. It defaults to a simple keyboard-text menu system, and a command line is also available on Linux.
- Ultimate Boot CD(free;) - contains over 100 easy-to-use recovery and diagnostic tools, keyboard-text menu interface.
- SystemRescueCd(free) - Allows basic recovery tools to be used in a hybrid text / graphics Linux environment.
- Ubuntu Rescue Remix(free;, offers a range of open source data recovery and technical forensic tools. However, this product is almost entirely based on Linux command line work, which can make it difficult for people accustomed to mouse interfaces. ...
Automated Easy Recovery Essentials
Instruments Easy Recovery Essentials from NeoSmart Technologies deserve a separate discussion. They are favorably mentioned in almost every Internet forum dedicated to Windows recovery.
This is partly because the tools are pretty good and can work on all versions of Windows - XP, Vista, Win7, Win8, Windows Server.
But the popularity of these tools grew in part because they were free. While NeoSmart discs are still classified as free in many online discussion forums, they are now actually commercial products. Prices in the US start at $ 20 for the home edition of Easy Recovery Essentials and end at $ 75 for the Server edition. You can find a list of all versions and prices for.
For a really modest price, you get a bootable iso image that you can download and burn to CD, DVD, or USB device. Once launched, Easy Recovery Essentials enables highly automated recovery capabilities. In fact, many complex recovery operations can be started with one simple click, without requiring any further user input.
You can get an idea of how easy it is to use these tools in the NeoSmart demo video. NeoSmart also offers a money back guarantee.
Which recovery tool is right for you?
I suggest you start with the tools available in Windows if possible. They handle most common tasks and maybe everything you need. They provide the usual operations, as well as some unusual ones. Hey, you already paid for them!
If Windows tools don't provide what you need, try the free Linux-based bootable recovery discs. While the Linux environment may be unfamiliar to most Windows users - especially the Linux command line tools - there is usually enough documentation to help you get past any rough edges.
If neither built-in Windows tools nor free Linux-based tools work for you, then commercial tools may be ideal. NeoSmart's Easy Recovery Essentials tools, in particular, work well, are very easy to use, and come with a money-back guarantee.
Next week: you will learn how to use these recovery discs to boot your computer and get to the tools they contain. I will also offer some additional tips and tricks. Stay with us!
Often, users of computers running Windows 7 are faced with problems with the health of the operating system. Problems with a computer usually appear when it slows down a lot and programs do not open. Also, the computer may not start at all or do it every other time.
The reasons causing problems in the operability of the operating system can be very different. For example, if the computer gets virus, it can damage system files. Also, difficulties with a PC may appear during installation low-quality software which can damage the structure of system files. To solve the problem with the health of your computer on Windows 7, you need to roll back to the previous restore point.
To protect the OS, Windows 7 uses restore points that the system periodically creates. Basically, restore points are previous state of Windows 7 system files... To help the Windows 7 PC user, we have prepared a material that will describe a detailed system recovery process in various ways.
Restoration of performance in a loaded seven
If your computer running Windows 7 boots, but the system behaves unstable, then it's time to roll back to the previous restore point. First of all, we need to get into the window in which you can call the system recovery options. To do this, open the program "" by pressing the Win + R key combinations, through which we enter the following command: systempropertiesprotection
A window should open in front of us " System properties"On the" System protection". You can also get to this window in the standard way through the menu " Start"... Further action will be to press the button Recovery….

After clicking, the system restore window will open. It will ask you to restore the system using the recommended access point or select a different one. We will focus on recommended restore point.

This window requires confirmation for the selected restore. Press the Finish button to confirm.

This button will bring up a message warning that after the recovery procedure it will be impossible to return to the previous parameters of the seven... By clicking on the Yes message, we will start Windows 7 System Restore.
If the process of returning to the previous state occurred without errors, a corresponding message will be displayed.

If you cannot roll back to the previous parameters using the recommended point, then you should select the point that was created later than the selected restore point systems Windows 7. I would also like to note that to perform this operation you will need special privileges... That is, when you log in, you must select an account admin and enter a password for it.
We return the performance of the computer at the start of the OS
In case your PC is running a seven at all is not downloading, then you can start the operating system in safe mode... After the BIOS start window appears, press F8 on the keyboard (for laptops, there may be another key, for example, Del or one of the function keys). This action will cause menu of alternatives loading sevens.
In this menu, select the item " Safe mode”And continue by pressing Enter, after which the system will start in safe mode.

If the system has successfully started in safe mode, then start the recovery of the seven, as shown in the previous example. In this mode for maximum safety disabled many functions OS, including the Windows Aero graphical interface. This is how the running program “” with the command “ systempropertiesprotection»On a system running in safe mode.
We return the performance of the computer using an installation disk or a bootable USB flash drive
If the two previous examples do not help you, then you will need to restore the seven installation disk or flash drive... For computers that do not have an optical drive, you need to use a bootable USB flash drive with an OS. A bootable USB flash drive can be created using special utilities. The most popular utilities for this purpose are Windows USB / DVD, Download Tool and Rufus.
Boot from the installation disk or via a USB flash drive. In the start window of the installer, click Next and go to the next window.
In the window that opens, to create an image, indicate the location to save it and click Next.
In the window that appears, it remains only to click the Archive button, which will start the image creation process.
In the window that opens, select the storage " Acronis Cloud».
As you can see, the entire computer is selected as the source for the backups. Therefore, in the schedule we have set, a backup copy of the system will be created in the cloud storage " Acronis Cloud».
For an example of recovery, let's take an archive copy not from the cloud storage "Acronis Cloud", but from the hard disk. If a backup has been created on the computer, then Acronis True Image 2016 he will find it himself.
Therefore, we press the button Repair your computer, after which the program will completely restore the system to the state that was when the backup was created. Also, if you cannot start Windows 7 on your computer, have Acronis True Image 2016 there is a boot image for this that can be written to disk.
From the example you can see that starting the boot disk Acronis True Image 2016 using the desired BIOS mode is not at all difficult.
Summing up
In this article, we have analyzed almost all the methods and parameters. system recovery... We also looked at ways to restore the seven with alternative software and using antivirus. Which method to choose to restore Windows 7, depending on the situation, is up to you.
Summing up, I would like to note that they mainly disrupt the operation of the OS viruses and experimenting with different illegal software... Therefore, so that you do not have to constantly restore the system, use only verified and licensed software, and also use reliable comprehensive anti-virus protection.
I would also like to note that the examples considered in the material will work not only on Windows 7, but also on more modern operating systems, such as Windows 8 and 10 ... And we, in turn, hope that our material will allow you to properly restore the performance of Windows 7 and you can confidently say that I can do a system restore.
Related Videos
How to run Windows 7 System Restore. All Possible Methods
Let's take a look at how to start Windows 7 System Restore.
In the second half of 2017, Microsoft officially ended support for the seventh version of Windows.
In this regard, many users are trying to find options for solving many errors and problems on their own.
According to the latest data from the company, OS updates are released much less frequently, and user support is provided only in really important cases.
The entire focus of the corporation is on improving Windows 10. Insufficient system support leads to bugs and freezes.
Often, user actions are also the reason for the OS to be too slow.
Installing "heavy" games, programs, rebooting the RAM and hard drive - these are the main factors in the breakdown of the system.
If you experience a sharp deterioration in the performance of your computer, you should perform a recovery. After this procedure, all PC functions will be corrected.
There are three basic recovery methods:
- Using the built-in assistant;
- Using system tools (BIOS, command line, and others);
- Through third-party programs.
Standard utility "Recovery"
By default, every copy of Windows 7 periodically creates restore points - this is an archived version of the last successful PC configuration that the user can use to restore.
Each such restore point is stored on your computer's hard drive. To select one of them, you need to use the standard Windows utility.
This option is the simplest and is suitable only if the operating system boots normally and the function of creating archived copies of the OS is not disabled on the computer.
Follow the instructions:
1. Go to the PC control panel and enter "System Restore" in the search text box;
2. In the results tab, select the window of the same name and wait for it to open;
Rice. 2 - standard utility window
3. By clicking the "Next" button, you consent to the processing of your data by the system. During the restore process, only those files and folders will be saved that were created before the date of adding the access point you selected. The configuration settings of the RAM and hard disk are also changed. Also, drivers and other software will be updated, which supports the stable operation of the system. Make sure your computer is connected to the internet;
4. When choosing a restore point, pay attention to the date of its creation. The save date should correspond to the period when Windows 7 was working normally, without crashes;
5. Click on the "Show other points" checkbox to see all the objects in the window. To see what applications the rollback process will work with, select the required point and click on the "Affected programs" button;
6. After you have decided on the choice of the created backup, click "Next";
Rice. 3 - choosing a restore point
7. In the new window, confirm your choice. Do not forget to check the properties of the point and the name of the disk with which it will work (to restore the OS, the system drive C must be indicated in the corresponding column);
Using Safe Mode
After a serious error occurs in Windows 7, the system may not boot normally.
To troubleshoot this problem, you can start in safe mode. It can be used to boot Windows specifically for troubleshooting purposes.
This boot option is missing some standard services and options. Only the basic drivers and components that are required for the system to function are launched.
This option is suitable if you cannot work due to a constantly occurring error that shuts down the computer or causes it to freeze.
In safe mode, such errors will not appear, and you can remove malware or perform a system rollback, as described in the previous paragraph of the article.
Follow the instructions to start Safe Mode:
- Turn on your PC. Then press the power key again;
- Open the startup menu by holding down the F8, F12 or Escape key, depending on your PC model;
- After a few seconds, the Windows 7 boot options window will appear;
Rice. 4 - system boot parameters window
- Select "Safe Mode" by pressing the up and down keys, as shown in the picture above;
- Press Enter to complete the action.
After restarting your PC, you are taken to the Windows 7 desktop, where you can perform an access point restore.
Remember! In this mode, it is not possible to use a WAN connection. If you need Internet access to configure the system to function normally, select "Safe Mode with Networking Components" in the advanced settings window.
Automatic troubleshooting
You can also enable the troubleshooting option using boot options. It allows you to reset all errors in automatic mode.
Also, users have the option to enable the last normal Windows 7 configuration.
After selecting this function, the OS desktop will boot as the last good copy of the settings.
Follow the instructions:
- At the stage of turning on the computer, launch the system menu of the power-on options by holding F8;
- Select "Last Known Good Boot" and try to start Windows 7;
- In case of an unsuccessful attempt to turn on, go back to the system menu and select the "Troubleshooting" item;
- The operating system will launch a utility to automatically fix all errors. After that, Windows 7 should start in a restored form.
Rice. 5 - troubleshoot and start a good Windows 7 configuration
Command line recovery
This option is suitable if you do not have any saved restore points on your computer, but you are able to start Windows 7.
Turn on your PC in safe mode with command line support. This will allow you to open a CMD window and work with basic commands.
Rice. 6 - select the OS launch option
After turning on Windows 7, open the Run window and enter the command below in the box. It will run the line.
Rice. 7 - Run window in Windows 7
In the window that opens, type the command shown in the figure and press Enter. After a few minutes, a message will appear stating that the PC has been restored successfully.
Reboot it to exit safe mode.
Rice. 8 - fix the system using Command Line
Recovery using a flash drive or disk
Due to the occurrence of fatal errors in Windows 7, users are unable to start the system using Safe Mode.
In this case, you can restore Windows using a boot disk or USB flash drive.
Bootable media is a removable device (usually a CD or flash drive) onto which an installation copy of the Windows operating system is downloaded.
You can create such media on another PC using ISO Maker, Live CD, Daemon Tools and other utilities.
If you still have a disc with an official copy of Windows, you can also use it to roll back the system.
Note! The versions of Windows 7 on the boot disk and on the computer must be the same. Otherwise, the recovery will fail.
Before starting to fix the work using removable media, you should configure the download queue of components in the BIOS - the computer should not boot the installed version of Windows 7, but the one that is on the drive:
- Open the BIOS by pressing the F8 or F12 keys immediately after turning on the PC;
- Go to the Boot tab;
- In the window that opens, find the items "Boot Priority" - each of them means a certain order of loading PC components. Put the type of your bootable media in the first place. In our case, the recovery will be carried out from a flash drive, so in the first column "Boot Priority" select "USB Storage". If you are working with a disk, put the “Hard Drive” component first;
Rice. 9 - choosing the order of loading removable media in BIOS
- Now, as a result of starting the computer, you will see the Windows installation window Find the item "System Restore" and click on it;
Rice. 10 - recover from bootable media
- Confirm the action again, as shown in the figure below:
Rice. 11 - select recovery option
- Click on the "Next" button and select an access point, as described in the first section of the article.
Rice. 12 - launching the standard utility
Using the AVZ utility
AVZ is an antivirus software that quickly scans your computer for malware, misconfigurations and Windows errors.
The application is distributed free of charge and does not require installation. Suitable for use in a system of any bit size.
To perform Windows recovery in this program, just open the "File" tab in the main window. Then click on "System Restore".
Fig. 13 - main menu in AVZ
In the window that opens, check all the system options with which the program will work. Click on the "Run" button.
Doing them will increase the likelihood of uninterrupted operation of Windows 7 after the application terminates.
Correcting network, hard drive, search, and startup settings at the same time is the best recovery option for the operating system.
Fig. 14 - selection of system settings in AVZ
Occurrence of error 0 * 000000
Sometimes, during recovery or immediately after the completion of the operation, an error with the code 0 * 000000 may occur.
Its different variations can be supplemented by other identifiers, for example, 0 * c0000034 or 0 * 0000007b.
Fig. 15 - an example of an error
The occurrence of a problem informs the user that the system was unable to access the bootable media read procedure.
Since the error appeared in an already installed system immediately after its recovery, we can say that its cause is a problem with the drivers.
Most likely, after the recovery procedure, the operating mode of the system disk was changed from IDE to AHCI, so the existing drivers were not suitable for loading the OS.
You can solve the problem by disabling AHCI through the BIOS:
- Turn off your computer and open the BIOS menu;
- Go to the CMOS settings tab and select the SATA serial interface configuration item, as shown in the figure below;
- Press Enter and in the pop-up window select the IDE option;
- Save settings, exit BIOS and restart your computer.
Fig. 16 - switching SATA modes in BIOS
When turned on again, the system will complete recovery and operate without interruption.
Thematic videos:
System Restore Windows 7 and XP
In this video tutorial, you will learn how to perform a system restore for Windows 7 and XP, and in what cases you need to roll back the system.
In this video I will show you how the system restore function starts.
Recovery from imagemeans replacing all personal data on your hard disk with files from the image, or in other words, if you created a local disk image (C :) using the Data Archiving tool, then by expanding this image into place, you will replace all your existing files on this disk with data from the image.The article is written as a continuation , where we learned how to create an Image of the Windows 7 operating system in case of a serious malfunction, here we will restore our data to its place, even when our Windows 7 will not boot at all.
Note: If you are interested in the process on DVDs and a USB portable hard drive, as well as on an old IDE hard drive (connected to a laptop via a special adapter), follow the link and read.
Recovering from a Windows backup image created by its backup tool
According to my observations, serious users install Windows 7 and divide the hard drive into two volumes and call them for example (C :) and (D :). On disk (C :) they have the Windows 7 operating system, and on (D :) all personal data. Then they create a disk image (C :) and save it on another partition of the hard drive, that is, on (D :). Disk (D :) is not archived, since, according to users, it is usually rare with it, which happens and this is actually the case. And then there was a problem with Windows 7, the system takes a long time to load, freezes and is unstable, our users in the language of motorists kick the wheels for some time (they use a rollback using restore points), but the car still does not drive, and Windows 7 does not work ok then theyrestore from imagedrive (C :) and a working Windows 7 from the archive replaces an inoperative one, that's all.
- The most serious ones create an image of both the disk (C :) containing the operating system files and the disk (D :) with personal data. You may have noticed that if you have one hard drive, where do you store the image of the two partitions (C :) and (D :)? For this, an additional SATA hard drive or a USB portable hard drive is specially purchased, which must be formatted in the NTFS file system. Restore your data from the image in this case, you need to be careful, together with the faulty Windows 7 located on the disk (C :), you can replace all your files on the disk (D :), so you first need to copy everything you need, for example, to the same the most portable USB hard drive. All this is written and shown in the article Creating a system image, now let's restore.
How Windows 7 is restored from an archived image we created
Windows 7 still works and starts, but with significant errors (below we will consider cases when the operating system does not load at all), a rollback using restore points did not lead to success, and we decide to restore the entire operating system from a disk image (C :).
Start -> Control Panel-> Archiving computer data->
Restore system parameters or computer->

Advanced recovery methods->


in this dialog box, you can select the Archive button and the archiving setting will start, with the help of it, you can create an archive of your data from those disks to which you will deploy the system image, by this you will save them, read in more detail in our article ... If we have copied our data beforehand, click the Skip button.

Restart, the computer will restart and this window for selecting the keyboard layout will appear

Russian

Selecting a user


The second option, you and I cannot boot into a working Windows 7 at all, how then to start recovery from the image
We turn on the computer and, for example, a black screen or a blue screen with a critical error occurs. Launch the Windows 7 Recovery Tool, click on F-8 in the initial phase of the computer boot. A menu opens, select Troubleshooting computer problems.

The third option is the most difficult, but you can handle it: the screen is black, Windows 7 Recovery Tool cannot be launched,Additional download optionsunavailable when the button is pressed F-8 Nothing happens. How to get to the created image with working Windows 7. In this case, only the Windows 7 Recovery Disc, on which the Recovery Environment is located, will help us.
- Note: how to create, as well as how to use a Recovery Disc, you can learn from our article. In this case, the Windows 7 installation disc can also help, it also contains the recovery environment.
So I will show you how to restore Windows 7 from an image using a recovery disc. We insert it into the floppy drive, reboot, the BIOS should be set to boot from the floppy drive, then the System Recovery Options program starts.

Press Enter quickly, otherwise the offer to boot from disk will disappear.

The recovery environment starts, again you need to select the keyboard layout,
Use download the latest system imageand our Windows 7 is restored.The system image is always created with the extension VHD and is in the folder WindowsImageBackup.