Filezilla installation windows 7 setup. How to create an FTP server and open access to it from the Internet. Configuring and Testing FileZilla Server
Introduction
In this tutorial, you will learn how to configure the FileZilla FTP client. After completing this tutorial, you will be able to connect to your FTP server to manage your files. Setting up FileZilla shouldn't take you long. However, it is not only using FTP that you can manage files on Hostinger. You can also use the ‘drag and drop’ File Manager (with easy drag and drop). Many users find File Manager more convenient than FTP:
FileZilla is free open source software source code to help you transfer large files faster and safer. Most web hosts have serious limitations when it comes to uploading files using PHP or scripts. However, such restrictions do not apply to FTP uploads, so the FileZilla client can be a powerful weapon in the hands of a developer.
The FileZilla client has gained popularity due to its simplicity and ease of use for regular user... It supports many operating systems such as Windows, Linux, Mac OS X, BSD, and setting up FileZilla takes less than five minutes. It has been translated into more languages and has many useful features.
What do you need
Before you start this tutorial, check for:
- FileZilla client that you can download.
- FTP credential information.
Configuring FileZilla with Site Manager and connecting to an FTP server.
Step 1 - Collecting FTP data
To connect using the FileZilla client, we need to find your FTP details. At Hostinger, you can find the information you need under Files→ FTP Access.
Here you will find: FTP server, FTP user, FTP password and FTP port required to configure your FileZilla client. In case you forgot or don't know your FTP password, press the button Change account password.

If you need to give FTP access to your friend or developer, you can create an additional account for FTP access in the same section. Files → FTP Accounts.
Step 2 - Configuring FileZilla via Site Manager
The easiest way to add your site to the FileZilla client is to open the FTP client and go to the section Site Manager... You can enter it in two ways: by clicking CTRL + S(on MAC use the keyboard shortcut CMD + S) in the client, or just click on File -> Site Manager, in the newly installed FTP client.

Step 3 - Adding a Site to the Site Manager
After you have found the Site Manager, you need to add your site there. To do this, click “ New website”In the manager window and fill in all the necessary information:
- “Host”- you can find this information from your hosting provider, however, in most cases you can use your domain as a host by entering ftp.yourdomain.ru.
- “Port"Is the port of your FTP server, the default port for FTP is 21, but this field is optional.
- “Protocol”Is a protocol for exchanging files on any network. Select FTP - File Transfer Protocol.
- FTP- FTP stands for File Transfer Protocol. It is a special internet service designed to establish a connection with a specific server (or computer), which allows users to download files to their computer or transfer (upload) their files to a server (computer).
- SFTP- SFTP stands for Secure File Transfer Protocol. SFTP provides secure file transfer using a private and secure data transfer channel. It is the standard data transfer protocol for the SSH2 protocol. SFTP servers use port 22 by default, and FTP in SSL / TLS mode uses 990.
- “Encryption”- select the type of encryption. We recommend using regular FTP (not secure) because other methods require creating certificates and other settings. Please contact your hosting provider for help if you want to use a different encryption method.
- “Login type”- type of authorization, if necessary.
- Anonymous: you cannot enter username and password. In this case, the username is “anonymous”.
- Normal: you need to enter a username and password if necessary.
- Request a password: The FTP client will ask for a password during authorization, it will be remembered throughout the entire session.
- Interactive: The FTP client will ask for a password and will ask for it again every time it connects to the server.
- Account : When selected, activates the "Account" field in the settings. This type of authorization is only suitable for FTP; SFTP is not supported by them.
- User: FTP username to use when connecting.
- Password: FTP user password.
Please select Login type by setting it to Normal and enter your username and password.

IMPORTANT! In case your domain is not directed to your host, the hostname ftp.yourdomain.ru will not work. An alternative would be to use the IP address of the server specified in the FTP settings.
Step 4 - Connecting to FTP Server
Once you have filled in all the required information, click “ Connect" or " OK”And connect to the server. Before that, check the spelling of your password and other data.
If the section Encryption you had an option Use explicit FTP over TLS if available then you should receive a similar message about the TLS certificate validation.

Click the button OK to continue. You can also check the box next to Always accept a certificate in future sessions... This way you don't have to do this every time you connect with FileZilla.
If the FileZilla setup was successful, then you should see a list of your FTP server directories. Did you enter the data correctly, but the connection was unsuccessful? Please consult your hosting provider. Searching for the cause of the error on Google can help, too.

If an error occurs 530 Login incorrect. Unable to connect to server- this means that either your password or FTP username is incorrect. Try resetting your password in the control panel and re-configuring the client with the new data.
If FileZilla client stops connecting in phase Connection established, awaiting invitation ... Initializing TLS ... and does not perform any more actions, then go to the section File -> Site Manager and change the option Encryption on Use regular FTP (insecure).
Conclusion
Congratulations, you have successfully configured FileZilla and connected to your FTP server. Now you can download, upload and manage your files in one place - the FIleZilla client. If you have any difficulties or questions, write them to us in the comments below.
To use FileZilla, you need to configure it by following the steps below, illustrated with images.
1. Launch the FileZilla program, then in the top menu, click File Site manager.
New website.

Host- FTP server address.
Server type- FTP - File Transfer Protocol.
Login type- normal.
User- Username.
Password- password.
Encryption- Use plain FTP.

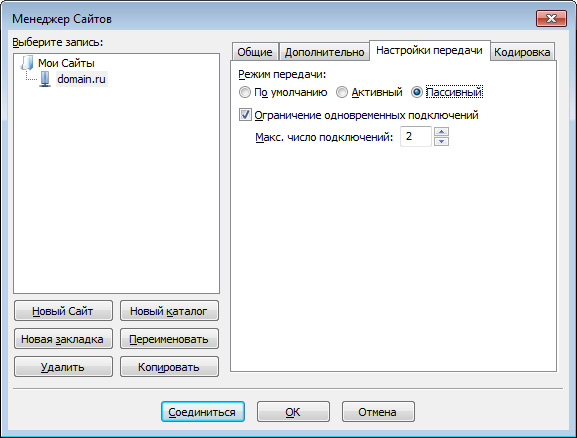
4. Go to the tab Transfer settings, select passive transmission mode, check the box Limitation simultaneous connections and install Maximum number of connections equal to two. Click the button Connect.
Important: The content of your site must be placed in the folder / home / login / your_domain / docs /.

FAR
To use the FAR program, you need to configure it by following the steps illustrated with pictures.
1. Start the FAR program. Determine in which panel you want to make an ftp connection. Let's say on the right. Then press Alt F2 and select the FTP line in the window that appears.

2. Press Shift + F4, a window for entering connection parameters will appear.

3. Fill in the required fields. In field Descripton you can give any name to the custom ftp connection, mark the position Passive mode.

4. After that, press the button Save.

5. On the panel of the FAR program you have chosen, this is the right one for us, a line with the just entered name of the ftp connection will appear. While on this line, press Enter.

6. The connection to the server will be established and you can work in the usual mode of the two-pane file manager.

Total commander
You can download Total Commander at http://www.ghisler.com.
1. Run Total program Commander, then in the top menu, click the item Network, in the menu that opens, select the item Connect to FTP server.

2. In the window that opens, click the button Add.

3. In accordance with the instructions, obtain and specify the connection parameters:
Connection name- come up with a name, for example, "Hosting login".
Server- FTP server address.
Account- Username.
Password- user password.
Set the flag Passive exchange mode (like a web browser).
Then press the button OK.

4.Select the created connection and click the button Connect.

5. A connection to the server will be established, after which you can work in the usual mode of a two-pane file manager.
Important: The content of your site should be placed in the folder / home / login / your_domain / docs /.

Total Commander (version 6.53)
Russified version
1. Start the TotalCommander program, then, in the top menu, click the Configuration item and select the line Setting: FTP

2. In the next window, check for a check mark in the line Use passive mode by default and if it is not there, put it on.

Then press OK and the window will disappear.
3. In the top menu, tap FTP and select the line Connect to FTP server.

4. In the window that appears, click the button Add.

5. A new window will appear, in which you need to set the necessary parameters and put a tick in the line Passive exchange mode.

Then, press the button OK.
6. In the remaining window, click the button Connect.

7. The connection to the server will be established and you can work in the usual mode of the two-pane file manager.

iWeb
After creating the site, an iWeb window with the content of your site will appear on the screen.

In the left part of the window, click on the name of the site you want to publish. V this example the site is called My site.

On the page that opens, enter the parameters required for publishing.
In chapter Publication:
Publish to: FTP
Site name: The name of your site
E-mail for communication: your e-mail

In chapter Options FTP servers :
Server address: ftp.your_login.nichost.ru
User: username (usually your_ftp_login)
Password: your_password
Directory / path: your_site / docs
Protocol: FTP
Port: 21

Enter your website address as the URL.


If unsuccessful, check the correctness of the entered parameters.
After testing has been successfully completed, on the bottom panel, click the button Publish site.

In case of successful publication, a message will appear: "Your site has been published."

Important: By default, iWeb uses UTF-8 text encoding. Our hosting uses Windows-1251 encoding by default. For the correct display of your site, you need to go to the section Web server → Websites → your website and choose from the list Site encoding encoding UTF-8.
CuteFTP (version 7.0)
1. Launch the CuteFTP program, then, in the top menu, click Tools

2. Select the line Site Manager.

3. In the window that appears, select the line Display Site Manager.

4. In the new window, click the button New.

5. Two lines of submenus will appear at the bottom. Select a line FTP Site.

6. A window will appear:

7. Complete the fields in this window.

8. Then, without leaving this window, press the button Type.

9. In the new window, in the section Data Connection Type select line Use PASV- this is a passive mode of data transmission.

10. Then, in the bottom row of buttons, press the button Connect.

11. The connection to the server will be established and you can work in the usual mode of the two-pane file manager.

FlashFXP
You can download the trial version here: http://www.inicom.net/pages/en.ffxp-download.php
After installation, there are several ways to connect to the server: By signing up through the Site Manager and Quick Connection.

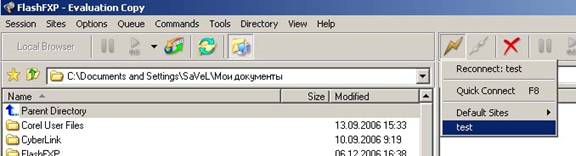
Fast connection.
1. For a quick connection, you need to click on the lightning icon and select the item Quick Connect or press the F8 button.

2. Then, in the opened form:

3. Fill in the fields Server or Url, User Name, Password.

4. This will open your FTP account.

5. After that, you will need to go to the folder with the name of your site and in it to the Docs Folder. After that, on the left side, go to the folder with the files required for the site,
Site Manager.
1. In order to enter the Site Manager you need to go to the bookmark Sites→ Site Manager or press the F4 button


4. Enter the name of the site and click on the button OK... Then fill in the fields IP address, User name, Password

5. Replace test111 with your hosting ID. Then press the button Apply... After that, by clicking on the lightning button in the drop-down menu, select the name of your connection.
6. By clicking on it, you will be taken to your ftp account.

Macromedia Dreamweaver 8
1. When starting the application, a window will open:


3. You will see the site manager window.


6. If everything goes well, then you should see a list of files on the right:
Let's take a look at the basic techniques of working with FTP clients that you most often may need in your work. The principle of operation in most FTP clients, regardless of their manufacturer, will be the same. Therefore, it is important to figure out how everything works for any of the clients, for the rest everything will be the same.
For this post, I'll take the Filezilla FTP client as an example.
For clarity, let's split the work with Filezilla into several steps.
Stage 1. How to log in and connect toFTP server.
Perhaps the biggest difficulty for beginners when working with an FTP client is the stage of connecting to the server. The most important thing here is to enter the correct data so that the program can connect and enter the server.
So what login details do you need?
1) Host address. Represents an IP address (for example, 155.55.55.155) or a domain name (for example, mysite.ru).
2) Username
3) User password(issued when registering a hosting)
Where can I get them? The easiest option is to look into the letter that came to you from the hoster when registering an account. As a rule, you can find all the information you need there.
If this letter is lost, then the easiest way is to write a support request to provide you with this data.
In addition, sometimes this data can be found in the hosting control panel. The section where you can configure FTP connections. There you can create a user for FTP with the necessary rights and find out the host address for the connection.
After you know this information, you will need to open the FTP client and configure the connection parameters.
Let's see how this can be done in the Filezilla client.
The first step is to go to the "Site Manager". To do this, click on the corresponding icon on the toolbar.


Stage 2. Copying files and folders.
After a successful connection to the server, a window will open, which is divided into two parts. One part will contain files that are located on home computer to different files on the remote computer.

As for copying, everything is simple here. The copy operation can be performed by simply dragging and dropping the desired file or folder from one half of the window to the other.
If you want the file to be moved and not copied, then drag-and-drop operation must be performed while holding the Shift key on the keyboard.
In addition, you can download the file by clicking on the desired file right click mouse and selecting download.
Stage 3. Operations with files and folders on the FTP server
By right-clicking on the required file, the basic operations with the file are available in the context menu.
The file can be:
Rename
Edit (item "View / Edit"), if it is a text file.
Delete (item "Delete").
In addition, you can create a new directory through the "Create directory" item.

These are all the main stages of work that you may need, first of all, when working with an FTP client.
By the way, if you want to find out conversions and key indicators (KPI) for your selling site, I can set up web analytics.
Yandex Metrica and Google Analytics. Goals, events, reports.

Hello admin, please explain to me what an FTP server is and can I create it myself on my computer?
In short, I have an ordinary one at home system unit and three laptops, all these machines are connected to the Internet through a router, can I make a real one from a stationary computer FTP server, and download and upload files to it directly from all laptops? Just installed on a regular computer HDD by 3 TB and it turns out that no one uses it, all relatives prefer laptops on which disk space is already running out.
Hello friends! Our Ro8 wrote a cool article for you on this topic, read it.
At first, FTP is a client-server file transfer protocol over the Internet, and An FTP server is a file storage on the Internet, that is, an ordinary computer with installed Windows 7, 8.1 or Windows Server 2012 and multiple large hard drives that can hold any of your files. There is a program installed on this computer, for example - FileZilla Server, anyone else can connect to this computer using: command line , Windows explorer and various programs, we will consider two in our article:FileZilla Client, and Total commander... After connecting to You can upload any files (movies, music, etc.) to the FTP server and also download them.
ControlThe FTP server will be performed by the administrator who installed the program - FileZilla Server. It is here that you can assign different access rights to each user. (the ability to change files on the server): Append (the ability to modify files), Read (read only), Write (write), Delete (delete). Naturally, most of the users can not be given the Delete permission.
- Note: From almost any computer or laptop (even with one hard disk) can be done FTP server and connect other computers to it to receive files and it is not at all necessary that all computers be connected to one router,An FTP server can be created on the Internet and made available to hundreds and thousands of users.
How is the work going
As a software implementation of an FTP server, the article will consider the FileZilla Server program, which will be installed on a machine with Windows Server 2012
Also, a computer with preinstalled Windows 8.1 Enterprise (x64)
In order for a machine with Windows 8.1 to be able to connect to the FTP server, the FileZilla Client program will be installed on it (one of the connection methods using this program)
Go to https://filezilla-project.org and download FileZilla Server and FileZilla Client
Downloaded file Run FileZilla Server on a Windows Server 2012 machine, a FileZilla Client file on Windows 8.1 machine... Both programs are installed the same way. First of all, we will install the FileZilla Server program.

Installing FileZilla Server
After launching the downloaded FileZilla Server file on Windows Server 2012, click next

Click Install


Install

FileZilla Server installation process

Installation completed

After installation, this window will open, in which we enter the local address of the FTP server and click OK

After entering the local address of the FTP server, the main window of FileZilla Server will appear

Let's make some settings by selecting Edit-Users

On the General tab, to add a new user, click on the Add button

Enter the username. OK

Opposite Password, put a tick and enter the password of the added user

Go to the Shared Folders tab. On this tab, add the FTP01 folder, which will be available to the created user Ro8. Click Add

We indicate the previously created folder FTP01. OK

Select the added folder and specify access rights for it: - Read (read only), Write (write), Delete (delete), Append (the ability to change files in this folder)

Determine the ip address of the machine with Windows Server 2012 (192.168.1.4)

Installing FileZilla Client
We switch to a machine with Windows 8.1 and install the FileZilla Client program
We accept the license agreement


Installation


Installation completed

We have a network shown in the diagram

Let's connect to the FTP server in different ways.
Connect to FTP server using command line
On a Windows 8.1 machine, start the command line.
We indicate the username (Ro8) and enter the password. Password is not displayed when typing
Logged on means that we have logged into the FTP server

Let's create a folder My_Backup_win8.1 on the FTP server - by entering the command mkdir My_Backup_win8.1

Let's see the list of folders on the FTP server - by entering the ls command
As you can see, there is a folder My_Backup_win8.1 on the FTP server.

Close the connection to the FTP server by entering the bye command

Connecting to an FTP server using the T program otal Commander
Let's run it on a Windows 8.1 machine file manager Total Commander. To set up a connection to an FTP server, click on the button indicated in the screenshot

Click Add

Specify the connection name (optional), server and port (the server is the ip address of the FTP server, the port is 21). We also indicate the username and password. OK

Select the created FTP connection and click Connect

FTP server connection established


To disconnect from the FTP server, click Disconnect

Disconnected from FTP server

Connecting to an FTP server using the program FileZilla Client
Let's start the FileZilla Client program

The main program window will open

This section will briefly review the history and technical details of the FTP protocol. To receive detailed information see specifications.
Historical background
Against the backdrop of the rapidly developing Internet, the FTP protocol looks not only old, but really archaic. Early draft specifications for the protocol date back to 1971, with the current specification being drafted in 1985. Over the past two decades, the protocol has remained largely unchanged.
In those days, the Internet was used mainly by universities and research centers. The user community was small, most of them knew each other and all worked together. The internet was a friendly network, and there was no security issue as such.
Those days have passed and a lot has changed. Technological progress was faster than anyone imagined, and a new generation of users grew at the same time. The Internet is now a ubiquitous phenomenon, thanks to which millions of people communicate with each other in many different ways... Major tangible change: The Internet has become hostile. The availability and openness of the web has attracted malicious users, actively exploiting the mistakes and inexperience of others.
A side effect of this development of events was the following phenomena:
- NAT routers. Most of the network uses IPv4, which has a limited address space (IPv6 is designed to solve this problem). With NAT routers, systems with a large number of devices can share the same IP address.
- Personal firewalls to protect users from flaws in operating systems and applications.
In most cases, these phenomena conflict with the operation of the protocol. The situation is aggravated by flaws in the routers and firewalls themselves.
However, with correct setting FTP offers a reliable and proven way to transfer files.
Technical details
The main difference between FTP and other protocols is the use of secondary connections for file transfer. When connecting to an FTP server, a so-called. test connection, through which protocol commands and responses to these commands are transmitted. In order to transfer a file or directory listing, the client must send commands through a control connection, after which a data connection.
There are two ways to create this connection: active and passive modes.
In passive mode, which is recommended, the client sends a PASV command to the server, to which the server responds with an address. The client then sends a command to transfer a file or directory listing and creates a secondary connection to the address it received from the server.
In active mode, the client opens a socket on the local device and sends the socket address to the server using the PORT command. After sending a file transfer or listing command, the server creates a connection at the specified address that was specified by the client.
In both cases, the file / listing will be transferred over the data connection.
Making outgoing connections requires fewer parameters for routers / firewalls than making incoming connections. In passive mode, the connection is outbound from the client and inbound to the server. In active mode, the client and server switch roles - an inbound connection for the client and an outbound connection for the server.
Please note that the difference is only in the order of the connection, after creating the data connection, the data can both be loaded and unloaded.
A typical network configuration might look like this:
Thus, in passive mode, the router and firewall on the server side must be configured to accept and forward incoming connections. In turn, only outgoing connections should be allowed on the server side, and in most cases outgoing connections are allowed.
Similarly, in active mode, the router and firewall on the client side must be configured to accept and forward incoming connections. Obviously, only outgoing connections should be allowed on the server side.
Because the server usually serves many clients, it is much easier to configure the server side router and firewall once for passive mode than it is to configure the client router / firewall for each client in active mode. This is why passive mode is recommended.
NAT routers
Most broadband users have a NAT router between their computer and the network. It can be a stand-alone device (possibly a wireless router), or a built-in router in a DSL or cable modem. In a NAT environment, all devices behind the router are local area network(LAN), each of the devices on the network has a local IP address (four small numbers separated by dots). A NAT router, in turn, has its own local IP address, as well as an external IP address for identification in the global network. Local addresses are valid only within the LAN, they have no meaning for the remote device. Example:

Let's assume the server is behind a NAT router. Let's simulate a situation in which the client connects in passive mode, but the server is not provided with the external IP address of the router. In this case, the server sends its local address to the client, after which two things can happen:
- If the client is not located inside NAT, the connection will be dropped because the server address is not valid.
- If the client is located inside NAT, the server address can be the same as the device address on the client's own network.
Obviously, in both cases the passive mode will not work.
Thus, if the server is behind a NAT router, it must be provided with the IP address of the router for passive mode to work. In both cases, the server sends the external address of the router to the client. The client creates a connection with a router, which in turn transfers the connection to the server.
Firewalls
Purpose personal firewall is to protect the user from security vulnerabilities operating system or the applications you are using. Malicious applications such as worms often exploit these vulnerabilities to infect your system over the network. Firewalls help to avoid such cases.
Especially when using FTP, firewall users may receive messages like this:
Trojan Netbus blocked on port 12345, which is used by the FileZilla.exe process
In almost all cases, such a message is - false alarm... Any application can choose any port for Internet communication. It may happen that FileZilla chooses a port that is accidentally the default port for a Trojan or other malware. The FileZilla distribution downloaded from the official site does not contain viruses.
Smart routers, firewalls, and data sabotage
Some routers or firewalls are smart enough. They analyze connections and when an FTP connection is detected, they silently replace the data transmitted between the client and the server. This behavior is data sabotage and can be troublesome if the user does not explicitly allow this behavior.
Let's give an example. Suppose the client is behind a NAT router and is trying to connect to the server. Let's also assume that the client is not aware that it is behind NAT and is using active mode. The client sends a PORT command with its local, non-routable IP address to the server:
PORT 10,0,0,1,12,34
This command tells the server to connect at 10.0.0.1 on port 12 * 256 + 34 = 3106
After that, the NAT router silently replaces the command, including the external IP address, and also creates a temporary port for forwarding the FTP session, possibly even on a different port:
PORT 123,123,123,123,24,55
This command tells the server to connect to 123.123.123.123 on port 24 * 256 + 55 = 6199
This behavior allows a NAT router to allow a misconfigured client to use wake-up mode.
Why is this behavior not acceptable? If this feature is used by default, without user consent, there are many problems that follow. An FTP connection will basically work, but once the trivial use cases have been exhausted, the transfer will be aborted, leaving no specific means of diagnosing the problem.
- A NAT router blindly assumes that some connections belong to FTP based on data such as target ports or server responses:
- There is no guarantee regarding the protocol used, despite the automatic detection (such cases are called false alarm). While unlikely, it is entirely possible that the syntax of the PORT command may change in future versions of FTP. A NAT router, by modifying the PORT command, changes parameters that it does not support without the user's knowledge, which will cause the connection to be terminated.
- The protocol detected by the router may not recognize FTP. Suppose the router only monitors the target port, and if this port is the 21st, it will be recognized as FTP. Active mode connections from a misconfigured client to a server on port 21 will work, but connections to other servers on non-standard ports will not.
- Obviously, a NAT router will not be able to modify the connection if the FTP session is encrypted, leaving the user confused because only unencrypted connections will work.
- Suppose a client behind a NAT router sends "PORT 10,0,0,1,12,34". How does the NAT router know that the client is not configured correctly? It is also possible the case with a properly configured client that initiates an FXP (server-to-server) transfer between the server to which it is connected and the device that is in local network server.
As we can see, the protocol-specific features enabled by default on a NAT router can cause a lot of problems. A good NAT router always and completely works with the protocol without knowing the protocol itself. An exception may be the case when the user has explicitly used this feature and is aware of all the possible consequences.
In this subsection, we looked at combining a client-side NAT router in active mode, and the same reasoning applies to a server behind NAT and replies to the PASV command.
Configuring the FileZilla client
Obviously, in order to connect to any server, your firewall must allow this for FileZilla. Most common FTP servers use port 21, SFTP servers use 22, and FTP over SSL / TLS (implicit mode) is 990 by default. Port numbers are not hardcoded, so it is best to allow outgoing connections to any port.
Because On the Internet, there are enough incorrectly configured servers, or servers that do not support both transmission modes, you are recommended to use both transmission modes on your side.
Passive mode
The client cannot tell the server to select a port for data transmission in passive mode, so to use passive mode, you need to allow outgoing connections on any port on your computer.
Active mode
In active mode, the client opens a socket and waits for a transmission connection from the server.
By default, the FileZilla client asks the operating system for an IP address and a free port number. This configuration will work only in the case of a direct connection to the Internet without NAT routers, and your firewall should also allow creating connections on all ports above 1024.
If you have a NAT router, you need to provide FileZilla with an external IP address, otherwise active mode connections will not work for servers outside your local network:
- A static IP address can be specified in the FileZilla configuration dialog.
- If your IP address is dynamic, you have the option to allow FileZilla to receive an external IP address on a dedicated site automatically each time you start it. No information will be transferred from you to this site other than the version of the FileZilla client you are using.
If you do not want to allow incoming connections on all ports, or your computer is located behind a NAT router, tell FileZilla to use a specific port range for active mode connections. This range will also need to be opened for your firewall. If you have a NAT router, you need to forward these ports to local computer where FileZilla is installed. You can bounce the port range, or each port separately, it depends on the model of your router.
TCP

Configuring and Testing FileZilla Server
The server setup is largely the same as the client setup, the main difference is that in the case of the server, the active and passive modes are reversed.
It is important to note that the check of the server operation in most cases occurs in an erroneous way, especially often the owners of NAT routers make this mistake. Once inside the local network, you will only be able to test the server using the local IP address. Using an external address inside the local network in most cases will not work for one of the following reasons:
- The router will block access to its external address from inside the local network as a possible attack
- The router will forward the connection to your ISP, which will block it as a possible attack.
Even if you managed to connect, you have no guarantee that a user from the external network will be able to do this and, moreover, upload files to your server. The only reliable means of verifying server operation is a connection from outside your local network.
Active mode
Make sure the FileZilla server is allowed to make outbound connections on any port, since in this mode, the client determines the port for the connection.
On the local side of the connection, the FileZilla server tries to use a port that is one lower than the port for the control connection (for example, port 20 if the server accepts connections on port 21). However, this is not always possible, so you should not always rely on this feature.
Passive mode
In this case, the server setting practically repeats the client setting in the active mode.
In passive mode, the server opens a socket and waits for a connection from the client.
By default, the FileZilla server asks the operating system for the computer's IP address and free port. This configuration is working only if the computer is directly connected to the Internet without NAT routers and the permission for incoming connections on all ports above 1024 is set for the firewall.
If you have a NAT router, you need to tell the FileZilla server your external IP address, otherwise connections in passive mode will only work within the local network:
- A static IP address can be specified in the FileZilla Server Settings dialog.
- If your IP address is dynamic, you have the option to allow FileZilla's server to receive an external IP address on a dedicated site automatically on every launch. No information will be transferred from you to this site other than the version of the FileZilla server you are using.
If you are unsure of your choice, use the second option.
If you do not want to allow incoming connections on all ports, or your computer is located behind a NAT router, tell the FileZilla server to use a specific port range for active mode connections. This range will also need to be opened for your firewall. If you have a NAT router, you need to forward these ports to the local computer where the FileZilla server is installed. You can bounce the port range, or each port separately, it depends on the model of your router.
Available ports range from 1 to 65535, ports below 1024 are reserved for other protocols. For active FTP mode, the best choice is a port number equal to or higher than 50000. In connection with a TCP device (a protocol that is below the FTP layer and is used for data transfer), the port cannot be reused immediately after each connection. Thus, the port range should not be too narrow, otherwise you will not be able to transfer many small files. In most cases, a range of 50 ports is sufficient.

Problem solving
Unfortunately, many personal firewalls and custom routers have their own flaws or, in some cases, can even sabotage FTP (for example, SMC Barricade v1.2).
Use the latest stable versions software, including firewall and router firmware.
If that doesn't work, you have the option to try delete your firewall to analyze the situation. Simply disabling the firewall does not always help. some firewalls cannot be completely disabled.
If possible, try connecting to the internet directly without a router.
If you are trying to configure the server and it works fine inside your local network, but is not available outside of it, try changing the connection port. Some ISPs do not allow their clients to host servers and block ports below 1024.
Another reason possible problem it might be using the 21st default port for your FTP server. There may be a firewall on your ISP's side that can unexpectedly change the port for the PASV command. Try using a port other than the default port for your FTP server.
If from time to time you see the message "unable to open data connection", i.e. The FTP client is able to connect to the FTP server a sufficient number of times without any problems until you receive this message, a possible obstacle may be the antivirus on the client PC, configured to block outgoing connections on a certain range of ports. When the server is running in passive mode, the outgoing ports of the client are determined randomly, and when you select ports that fall into the blocked range, you will receive an error message. For accurate diagnostics, you should view the antivirus logs on the client's machine, which receives given error... In general, any software capable of blocking a range of outgoing ports can cause problems of this kind.
Timeouts when transferring large files
If the transfer is not large files happens without problems, but downloading large files is interrupted by timeout, the reason for this is an incorrectly configured router and / or firewall located between the client and the server.
As mentioned above, FTP uses two TCP connections: a control connection to send commands and receive responses to commands, and also a data connection. By the way FTP works, the control connection is not used during file transfers.
The TCP specification does not specify a time limit to keep an unused connection. The connection is expected to persist indefinitely until it is explicitly closed. However, most routers and firewalls automatically close free connections after a certain amount of time. Moreover, in most cases, the connection is terminated without notifying its participants. In the case of prolonged data transfer via FTP, this means that the control connection may be terminated, but neither the client nor the server will be notified of this. Thus, after all the data has been transferred, the server still expects that the control connection can be used and sends a confirmation of the transfer through it to the client. Likewise, the client is ready to use a control connection and is waiting for a response from the server. But since the control connection was dropped, this response will never be delivered, resulting in a timeout.
To address this problem, the TCP specification provides a way to send packets to support an unused connection, signaling the peers to keep the connection for future use. However, the TCP specification explicitly states that such packets can only be sent once every two hours. For this, providing for network delays, the lifetime of an unused connection is set by the specification at 2 hours and 4 minutes.
The obstacle to this is that many routers and firewalls drop connections that have not been used for less than 2 and 4 minutes. This behavior violates the TCP protocol specification, RFC 5382 makes it clear enough. In other words, routers and firewalls that break the connection before the right moment cannot be considered working, because they cannot be used for long-term FTP transfers. Unfortunately, consumer router manufacturers and firewall vendors do not care about compliance with specifications.
To solve this problem, you need to remove such firewalls and replace the malfunctioning router with a quality one.
Configuring FileZilla Server under Windows Firewall
If you are having trouble configuring the FileZilla server while Windows Firewall is running (especially if a client connecting to such a server receives an "Unable to get directory listing" error), you need to add the FileZilla server to the list Windows exceptions Firewall. To do this, you need to do the following steps:
- Open Windows Firewall from Control Panel
- If you are using Vista, click "Change Settings"
- Select the "Exceptions" tab
- Click "Add Program .."
- DO NOT select "FileZilla Server Interface" from the list, you need to click on "View ..."
- Find the FileZilla Server installation directory (usually "C: \ Program Files \ FileZilla Server \")
- Select "FileZilla server.exe" and click open (repeat again, DO NOT SELECT "FileZilla Server Interface.exe")
- Select "FileZilla server.exe" from the list and click "Ok"
- Make sure "FileZilla server.exe" is in the list of exclusions and check the appropriate box
- Click "Ok" to close the window
This ensures that the passive mode works. If after that you still experience connection problems (inside or outside the network), check the settings of your router or try adding the port number in the Windows Firewall settings in the "Exceptions" tab.
Please refer to KB 931130 from Microsoft on how FileZilla works with Routing and remote access"or" Application Layer Gateway ".