How to activate Windows Remote Management using Group Policy. Executing console commands on remote computers over the Winrm network command line
10/17/2011 Don Jones
I realized that the creators of PowerShell were somewhat lazy, which is a good thing. They didn't want to code the -ComputerName parameter for every command, so they created common system called "remote interaction". Essentially, this system will activate any command to run on the remote computer. You can even run different commands that exist on the remote computer but are not present on yours. This means you don't have to constantly install every command on your workstation. This remote system very efficient and offers a number of interesting administrative options
When I started using PowerShell, I got carried away with the Get-Service command and noticed that it had a -ComputerName parameter. Does this mean that you can connect to the service from other computers? After doing a series of experiments, I found that this is exactly what is written. I got interested and started looking for -ComputerName parameters from other commands. And I was upset when I found out that there were only a few of them.
PowerShell provides two types of remoting: one-to-one remoting (1: 1) and one-to-many remoting (1: n). Before I talk about them, I want to clarify some of the basics.
Remote PowerShell Basics
PowerShell remoting works much like Telnet and other old technologies remote control... When you run a command, it actually runs on the remote computer. Anything that is returned to your computer is the result of this command. Unlike Telnet or Secure Shell (SSH), PowerShell uses a new communications protocol called Web Services for Management (WS-Management). The protocol runs on top of HTTP or HTTP Secure (HTTPS), making it easier to route through firewalls if necessary, since the protocol uses only one port to establish communications. Microsoft's implementation of WS-Management comes in the form of a background service called Windows Remote Management. WinRM is installed with PowerShell 2.0 and runs by default on servers like Windows Server 2008 R2. On Windows 7, it is installed by default, but not activated. You need to activate WinRM on the computers to which you want to send the command. The computer you are physically behind does not need to start the WinRM service.
All PowerShell commands produce objects as output. When you run a command remotely, its output needs to be wrapped in a form that can be easily transmitted over the network using HTTP or HTTPS. For example, PowerShell automatically converts output objects to XML files that are transmitted over the network. Once they reach your computer, they are converted back to objects that PowerShell can work with. However, these converted objects are actually snapshots. They cannot renew themselves every minute. Thus, if you have to get to objects that are processes running on a remote computer, then the result obtained will be correct only for a specific period of time during which these objects were generated. Values such as memory and cpu usage will not change. Moreover, you cannot force the converted objects to do anything. For example, you cannot tell an object to stop itself. This is a major limitation of remoting, but it won't stop you from working and performing interesting tasks.
There are only a few basic requirements for using a remoting system.
- How your computer (aka local computer) and one of those to which you want to send a command (aka remote computer) should work with Windows PowerShell 2.0? Windows XP is outdated Windows version on which you can install PowerShell 2.0. Thus, old version can also take part in a remote session.
- Ideally, the local and remote computers should be members of the same domain or members of trusted / trusting domains. You can work with the remoting system outside the domain, but it is difficult, and I will not talk about it here. To learn more about this scenario, see the PowerShell Help topic about Remote_Troubleshooting.
WinRM overview
Now let's move on to WinRM, since you need to configure this service to start remoting. Again, you just need to configure WinRM and PowerShell remoting settings on the remote computer. In most environments I have worked in, administrators have enabled remoting on every computer running XP or newer. This makes it possible to sneak into desktops and laptops unnoticed, which can be very useful (meaning that users of such computers will not know what you are doing).
This is not to say that WinRM is something special to PowerShell. WinRM can route traffic to multiple administrative applications. Essentially, WinRM acts like a dispatcher. When traffic comes in, WinRM decides which application should interact with it and tags it with the name of the destination application. The receiving application must register with WinRM so that WinRM can listen on incoming traffic on its behalf. In other words, you not only need to activate WinRM, but also register Power Shell as an endpoint for WinRM.
The most in a simple way accomplishing both tasks is to run PowerShell as an administrator and run the Enable-PSRemoting command. You can see the manual for another command called Set-WSManQuickConfig. There is no need to run the command. Enable-PSRemoting does this for you, and it also takes a few more steps to get remoting up and running. In essence, the Enable-PSRemoting command starts the WinRM service, configures it to start automatically, registers PowerShell as an endpoint, and even sets Windows Firewall exceptions to allow inbound WinRM traffic.
If you don't want to bypass all computers to activate remoting, you can use the object group policy Group Policy Object (GPO). The required GPO settings are built into Windows Server 2008 R2 domain controllers. Just open the GPO and follow the Computer Configuration \ route
Administrative Templates \ Windows Components. At the bottom of the list, you will find both Remote Shell and Windows Remote Management (WRM) that need to be configured. The Help section on Remote_Troubleshooting problems will give you detailed instructions on how to do this. Review the How to Enable Remoting in an Enterprise and How to Enable Listeners by Using a Group Policy sections in the Help.
WinRM 2.0 (which PowerShell uses) defaults to TCP port 5985 for HTTP and port 5986 for HTTPS. This ensures that WinRM does not conflict with locally installed web servers that are configured to listen on ports 80 and 443. You can configure WinRM to use alternate ports, but I do not recommend doing this. If you leave these ports, all commands remote access PowerShell will work fine. If you change these ports, you will have to always specify an alternate port when running the remote command. This means you have to type more. If you desperately need to change the port, you can enter the command:
Winrm set winrm / config / listener? Address = * + Transport = HTTP @ (Port = "1234")
The numbers 1234 represent the port you need. Here this command is written on multiple lines, but you need to enter it on one line. The same goes for all the other commands described in the article. If you need to use HTTPS instead of http, you can modify this command to customize new port HTTPS. I must admit that there is a way to configure WinRM settings on local computers in order to use the alternate default ports. This way, you don't have to constantly define an alternate port when you run a remote command. But let's work with Microsoft's default settings.
If you dig into the GPO settings in the Remote Shell, you will notice that you can control, for example, how long a remote session will remain inactive before the server terminates it; how many concurrent users can access the remote server at one time; how much memory and processes each remote shell can use; the maximum number of remote shells that users can open at one time. These settings will help ensure that your servers are not overwhelmed by forgetful administrators. However, by default, you need to be an administrator to use remoting, so you don't have to worry about regular users clogging up your servers.
Remote communication 1: 1
With 1: 1 remoting, you essentially have command line access on a single remote computer. Any commands you give run directly on the remote computer, and you see the results in a command prompt window. This is somewhat similar to using Remote Desktop Connection, except that you are limited to the PowerShell command line environment. PowerShell remoting uses some of the resources that Remote Desktop requires, so it has much less impact on your servers.
In order to establish a 1: 1 connection with a remote computer named Server-R2, you need to run
Enter-PSSession -Computername Server-R2
Assuming you have activated remoting on the remote device, the computer is in the same domain, and your network is working fine, you will get the connection you want. PowerShell lets you know that you've achieved your goal by changing the command line prompt to
PS C: \>
The part informs you that everything you do is happening on Server-R2. After that, you can run any commands you want. You can even import any modules and add PowerShell extensions (PSSnapins) that will reside on the remote computer.
Even the permissions will remain the same. Your copy of PowerShell will work with the same security token it was launched with. PowerShell does this using Kerberos, so it does not transmit the user's name and password over the network. Any command you run on a remote computer will run under your credentials, so whatever you have permission to do, you can do. It's like registering directly from the computer console and using a copy of PowerShell this computer... This is almost the case. Here are some of the differences.
- If you have a PowerShell script for your profile on a remote computer, it will not run when you connect using Remote Access. In simple terms, profiles are a package of commands that are automatically launched every time you open a command prompt window. They are used to automatically load extensions, modules and the like.
- You are limited by the Execution Policy of the remote computer. Let's say your computer policy is set to RemoteSigned so that you can run local unsigned scripts. If the Remote Computer Policy is set to Restricted (the default setting), it will not allow any scripts to run when you are communicating remotely.
Many PowerShell commands come in pairs, one doing something and the other doing the opposite. In our case, Enter-PSSession connects you to the remote computer, and Exit-PSSession closes this connection. Exit-PSSession doesn't need any parameters. Once started, the remote connection is closed and your command prompt window prompt is reverted back to normal. What if you forget to run Exit-PSSession? Do not worry. PowerShell and WinRM are able to figure out what you did and close the remote connection if necessary.
I would like to give one piece of advice. When you connect to a remote computer, do not run Enter-PSSession on it until you are fully aware of what you are doing. For example, you work for ComputerA. You are connecting to Server-R2. In the PowerShell prompt, you run
PS C: \> Enter-PSSession Server-DC4
Server-R2 now contains an open connection to Server-DC4. This creates a "remoting chain" that is difficult to trace. In addition, your servers are unnecessarily overloaded. There may be times when you have to do this (for example, Server-DC4 is behind a firewall and you cannot directly access it, so you need to use Server-R2 as an intermediary). but general rule is this: try to avoid chains of remoting.
Remote communication 1: n
One of the most interesting things about PowerShell is 1: n remoting. It allows you to send commands to multiple remote computers at the same time - full-blown distributed computing. Each computer will individually execute the command and send you the results. Everything is done using the Invoke-Command command in this form:
Invoke-Command -ComputerName Server-R2, Server-DC4, Server12 -Command (Get-EventLog Security -Newest 200 | Where ($ _. EventID -eq 1212))
The command in outer curly braces is sent to all three remote computers. By default, PowerShell can talk to 32 computers at once. If you define more than 32 computers, they will be queued. Then, when one computer shuts down, the next one executes the command. If you have a really fast network and powerful computers, you can increase their number using the command's ThrottleLimit parameter. You can read about how to use this parameter in Invoke-Command on the Help page.
The only parameter that you will not see on the Help page of this command is the Command parameter. It works great, as I have already shown. The Command parameter is an alias or short name for the ScriptBlock parameter that is specified on the Help page. It's easier for me to use Command, so I tend to use it instead of ScriptBlock, however they work the same way.
If you read the Help page for Invoke-Command carefully, you also noticed an option that allows you to specify a script file rather than a command. The FilePath parameter allows you to send the script to remote computers; this means that you can automate some complex tasks, and each computer will do its share of the work.
Now let's focus on the Computer Name parameter. In the Invoke-Command example code, I had a comma separated list of computer names. If you have many computers, you may not want to print their names every time you connect to them. Instead, you can create a text file that contains one computer name on one line, no commas, quotes, or anything else. For example, if your text file was named webservers.txt, you would use code like this:
Invoke-Command -Command (dir) -ComputerName (Get-Content webservers.txt)
The parentheses tell PowerShell to execute the Get-Content command first, which is similar to how parentheses work in mathematics. The Get-Content results are then nested in the -ComputerName parameter.
It is also possible to query the computer name in Active Directory but this is more difficult. You can use the Get-ADComputer command to find the computer, but you don't put the command in parentheses like you did in Get-Content. Why not? Get-Content produces simple text strings, while Get-ADComputer produces computer objects. The -ComputerName parameter expects strings. If he were to receive computer objects, he would not know what to do with them. Therefore, if you want to use Get-ADComputer, you need to get the values from the Name property of the computer objects. Like this:
Invoke-Command -Command (dir) -ComputerName (Get-ADComputer -Filter * -SearchBase "ou = Sales, dc = company, dc = pri" | Select-Object -Expand Name)
In parentheses, computer objects are passed to the Select-Object command, and the -Expand parameter is used to find out the Name property of those computer objects. The result of the parenthesized expression is a set of computer names, not computer objects. Computer names are exactly what the -Computer Name parameter needs.
If you are not familiar with Get-ADComputer, let's see what this command does. The -Filter parameter specifies that all computers should be included in the results, and the -Search Base parameter instructs PowerShell to start searching for computers in the Sales (OU) organizational group in the company.pri domain. The Get-ADComputer command is only available on Windows Server 2008 R2 and on Windows 7 after installing the Remote Server Administration Tools. In these operating systems oh you run
Import-Module ActiveDirectory
in order to load the commands for the directory service into a command shell so that they can be used.
There is more!
All of these examples have been given for peer-to-peer remoting sessions. If you are going to reconnect to the same computers (or computer) multiple times in a short amount of time, you can create reusable, persistent sessions. This is very useful if the connection requires alternate credentials, a non-default port number, or something else that requires additional parameters.
To create persistent sessions, use the New-PSSession command, then store them in a variable for easy access. For example, the following code creates a remoting session with three computers and stores them in the $ sessions variable:
$ sessions = New-PSSession -ComputerName One, Two, Three -Port 5555 -Credential DOMAIN \ Administrator
Remoting sessions are closed automatically when you close the command shell, but until then they can consume memory and load the processor a little on local and remote systems. To close them exactly, you can use the Remove-PSSession command:
$ sessions | Remove-PSSession
When you need to reopen sessions, you can use the Invoke-Command:
Invoke-Command -Command (dir) -Session $ sessions
Or you can use Enter-PSSession:
Enter-PSSession -Session $ session
Note that in the Enter-PSSession code, only one remoting session is reopened. The index variable 1 tells PowerShell to reopen a session with the computer named Two (the index is zero-based).
As we can see, the benefits of PowerShell remoting are many. If you use it, you will see how much it expands your horizons.
Don Jones ( [email protected]) - PowerShell Technical Instructor (www.windowsitpro.com/go/DonJonesPowerShell), author of over 35 books. Microsoft MVP
There are times when you need to execute some command on the server locally (for example, configure the iSCSI Initiator). Connecting to this via Remote Desktop and running cmd is inconvenient, using Telnet is unsafe, putting the ssh daemon on the server is not ...
Especially for these advanced cases, Microsoft, starting with Windows Server 2003 R2, provided administrators with a new management tool - Windows Remote Management (WinRM), which allows you to remotely execute commands using standard means OS, while ensuring the proper level of security.
You don't even have to install additional programs and components - everything that is called is included:
Configuring WinRM
As an example, I will consider the process of configuring WinRM on Windows Server 2008. This procedure does not differ in any way from configuring WinRM, for example, on Windows Vista or Hyper-V Server.
The easiest way to configure WinRM is using the quick configuration mode by typing in CMD:
winrm quickconfig
and answering in the affirmative (" y") to the question of creating a new listener object" a that listens on TCP port 80 and uses the HTTP protocol for client-server communication.

And that's all, the server can be controlled remotely using the command:
winrs -r: <ИМЯ_СЕРВЕРА> <КОМАНДА>
,where <ИМЯ_СЕРВЕРА> - the name or IP address of the server to which the connection is made;
<КОМАНДА> is the remote command to be executed.

If the client and server are not members of the same domain, you will need to additionally specify the username under which the command will be run and its password:
winrs -r: <ИМЯ_СЕРВЕРА> -u: <ИМЯ_ПОЛЬЗОВАТЕЛЯ> -p: <ПАРОЛЬ> <КОМАНДА>

And at the same time, as the message that appears advises, add the server to the list of trusted sites, or use a more reliable protocol for communication (HTTPS).
To add a host to the list of trusted ones, run on the client from which you plan to connect:
winrm set winrm / config / client @ (TrustedHosts = " <ИМЯ_УЗЛА1>
[,<ИМЯ_УЗЛА2>
]"}

Once configured, you can get information about the existing listeners with the command:
winrm enumerate winrm / config / listener

You can remove the existing listener as follows:
winrm delete winrm / config / listener? Address = * + Transport = HTTPS

Configuring WinRM using HTTPS
In some cases, you may need to create a reliable channel to securely send commands between the client and the server. You can use HTTPS for this.
However, to create a listener with HTTPS support, you need a digital certificate, which can be requested from a trusted Certificate Authority, or you can use various utilities for creating self-signed (self-signed) certificates, for example, Makecert, included in the Windows SDK. You can download Makecert separately from here ...
Run the following command to create a self-signed certificate:
makecert -a sha1 -r -pe -n "CN = <ИМЯ_СЕРВЕРА>
"-eku 1.3.6.1.5.5.7.3.1 -ss my -sr localmachine -sky exchange -sp" Microsoft RSA SChannel Cryptographic Provider "-sy 12 -m 12 <ФАЙЛ_СЕРТИФИКАТА>
, where <ИМЯ_СЕРВЕРА>
matches the name that the client will use when connecting to the server;
<ФАЙЛ_СЕРТИФИКАТА>
- path to the file where the certificate with the public key will be saved.

A private key certificate will be generated and placed in the certificate store local computer... Add it to the trusted root certificates:
certutil -addstore root cert.cer

Now browse the certificate store, find the required certificate there and write it down Thumbprint (Cert Hash):
certutil -store my

Finally, you can start creating the HTTPS listener. Enter the command:
winrm create winrm / config / Listener? Address = * + Transport = HTTPS @ (Hostname = " <ИМЯ_УЗЛА> "; CertificateThumbprint =" <ХЭШ_СЕРТИФИКАТА> "; Port =" <ПОРТ> "}
,where <ИМЯ_УЗЛА> - the name that is specified when accessing the server
<ХЭШ_СЕРТИФИКАТА>- Thumbprint that you learned in the previous step (no spaces).
<ПОРТ> - the port to which the client will connect (TCP 443 by default).

If Windows Firewall is enabled on the server, don't forget to add the rule:
netsh advfirewall firewall add rule name = "allow WinRM on 4443" protocol = TCP dir = in localport = 4443 action = allow
When using self-signed certificates, you will have to add it to the trusted root certificates on the client.
After completing all the steps, you will finally be able to execute commands remotely.
In this article, I will try to tell you how you can centrally activate and configure windows service Remote Management (WinRM) on all target computers using Group Policy. Let me remind you that Windows Remote Management is a special service that allows administrators to remotely access and manage Windows client and server operating systems (and I think if you have previously used the set of Microsoft Sysinternals utilities, then you should like WRM).
Let's take a regular PC with, and on which it is not activated Windows function Remote Management. On the command line, enter the following command:

, you should receive the following error message indicating that WRM is not installed:
WSMan Fault. The client cannot connect to the destination specified in the request. Error number: - 2144108526 0x80338012
If you need to configure WinRM manually on a separate system, just type the command:
Winrm quickconfig
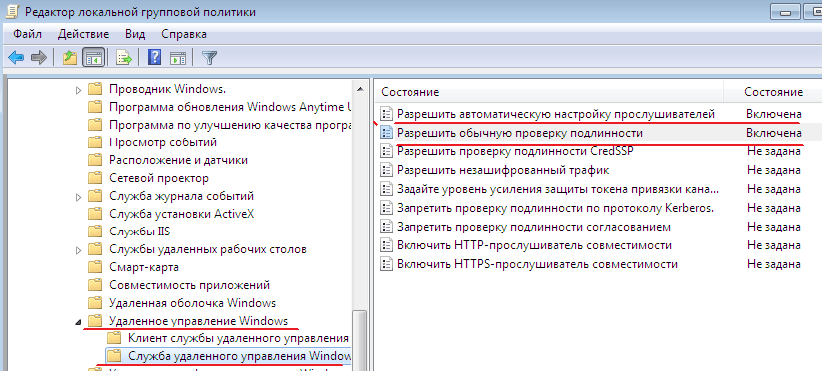
If you need to configure WinRM on a group of computers, you can use special Group Policy settings. The policy we are interested in is in the section: Computer Configuration -> Policies -> Windows Components -> Windows Remote Management (WinRM) -> WinRM Service. The following parameters need to be activated:
Allow automatic configuration of listeners
Allow Basic Authentication

In the IPv4 filter section, we will indicate *, which means that the computer can accept connections (and therefore control commands) from anywhere, this means that listeners on the computer will accept requests on all IP interfaces. 
Then, in the Computer Configuration -> Policies -> Windows Components -> Windows Remote Shell section, activate the item:
Allow Remote Shell Access 
Finally, you need to set the startup type for the Windows Remote Service to Automatically. Let me remind you that you can control how services are started from the following section of Group Policies: Computer Configuration -> Windows Settings -> Security Settings -> System Services. 
After activating WinRM using Group Policy, check the service status on the client system using the familiar command:

Make sure that the startup type of the WinRM service is set to automatic. Although, in fact, the startup type is "automatic with a delay"; By default, the WinRM service has a startup delay (parameter DelayedAutoStart = 1 in the HKEY_LOCAL_MACHINE \ SYSTEM \ CurrentControlSet \ services \ WinRM branch).

Now, after activating WinRM using Group Policy, this system can be controlled remotely using WinRS commands. The following command will open a command prompt running on the remote system:
Winrs –r: computer01 cmd
After the command prompt window appears, you can execute and see the result of executing any commands on the remote computer, as if you were working with it locally. Note that WinRM must also be activated on your host computer.

Setting up remoting in PowerShell (part 1)
To enable remoting using PowerShell, some configuration needs to be done. The number of these settings depends on the operating system, network environment, security requirements (and God knows what else). Since there are quite a few settings, I will try to tell you about the most important ones. Let's go…
Enabling remote control
In order to control a remote computer, it is necessary to allow remote communication on this computer. The exception is Windows Server 2012, where all remote management features are enabled by default. For all other operating systems, you need:
1. Start the WinRM service and put it on autorun;
2. Create a listener that will listen for control requests;
3. Enable a rule on the firewall to allow WS-Management traffic.
The easiest way to configure a single computer is to use the Enable-PSRemoting cmdlet. It will perform all the necessary actions, as well as register the default session configurations. To suppress confirmation prompts, you can add the -force parameter. The console must be started with administrator rights, otherwise an error will be generated.
In a domain environment, you can use Group Policy to configure PS Remoting.
In the Computer Configuration \ Policies \ Windows Settings \ System Services section, enable the Windows Remote Management (WS-Management) policy. It sets the startup mode for the WinRM service.

In the Computer Configuration \ Administrative Templates \ Windows Components \ Windows Remote Management (WinRM) \ WinRM Service section, enable the "Allow automatic configuration of listeners" policy, which creates a listener on port 5985 (the default HTTP port). Additionally, you can specify from which IP you can accept connections. If there is no need for filtering by IP, just put the * sign, which means accepting connections from any address.

Then go to Computer Configuration \ Windows Settings \ Security Settings \ Windows Firewall with Advanced Security \ Inbound Rules and create a new rule. Select Predefined and select Windows Remote Management from the list.

Note that there are two modes of operation to choose from - Standard and Compatible. In the first case, port 5985 will be opened, which is used by WinRM by default, in the second - port 80 (for compatibility with older versions of WinRM). Both are selected by default.

Configuring Trust Between Computers
At remote connection PowerShell uses mutual authentication between computers. This means that the remote machine must authenticate itself before establishing a connection. Simply put, if you connect to a computer named SRV1, then before establishing a connection, it (SRV1) must prove to you that it really is it, otherwise the connection will not be established.
If the computers are members of the same domain, or are located in different but trusting domains, then mutual authentication will be performed by the domain services. The main thing is that the computer name resolves to an IP address and matches the computer name in Active Directory.
Attention: when connecting, you must provide valid computer names, i.e. as they are listed in Active Directory. If the computer belongs to a local domain, then you can simply specify the computer name, for example SRV1... To specify a computer name from another domain, you must specify the fully qualified domain name (FQDN) - SRV1.contoso.com... If you specify an IP address, or some other DNS name (for example, a CNAME alias), then mutual authentication will not work.
If one or both computers do not belong to the domain, then there are two options for mutual authentication: add the remote machine to the list of trusted hosts (Trusted Hosts) or use SSL.
Trusted Hosts
Adding a computer to Trusted Hosts is simpler, but less secure. For computers in Trusted Hosts, mutual authentication is actually disabled. Therefore, it is worth using this method with great care.
You can add a computer to trusted hosts using PowerShell, so to create a list of trusted hosts and add computer SRV1 to it, use the command:
Set-Item WSMan: \ localhost \ Client \ TrustedHosts -Value SRV1.contoso.com
When adding multiple computers, their names can be separated by commas. It is allowed to indicate not only the name, but the IP address of the computer. Wildcards are also supported. For example, you can add all computers from the contoso.com domain to the trusted hosts by specifying * .contoso.com, or all of them without exception:
Set-Item WSMan: \ localhost \ Client \ TrustedHosts -Value *
To add the computer name to an existing list of trusted sites, you must first store the current value in a variable and then assign the value to a comma-separated list that includes the current and new values. For example, to add computer SRV2 to the existing list of trusted sites, use the following command:
$ curr = (Get-Item WSMan: \ localhost \ Client \ TrustedHosts) .value
Set-Item WSMan: \ localhost \ Client \ TrustedHosts -Value ″ $ curr, SRV2.contoso.com ″
Well, you can see the list of trusted nodes with the command:
Get-Item WSMan: \ localhost \ Client \ TrustedHosts

Also, to add to TrustedHosts, you can use group policy... In the Computer Configuration \ Administrative Templates \ Windows Components \ Windows Remote Management (WinRM) \ WinRM Client section, enable the "Trusted Hosts" policy and add names or IP addresses of computers separated by commas. Wildcards are supported.

Note: if TrustedHosts are configured via GPO, they cannot be changed from PS. The same goes for all other PS Remoting settings.
Connecting using SSL is the most secure remote communication option, but compared to other methods, it is rather difficult to set up, so it will take a little tinkering.
First, to use this method, we need a digital SSL certificate for the machine we are going to connect to. Obtaining a certificate is a separate topic, we will not dwell on it. In a test environment, I'll use the Makecert utility included with the Windows SDK and create a self-signed certificate:
makecert -a sha1 -r -pe -n ″ CN = wks8 ″ -eku 1.3.6.1.5.5.7.3.1 -ss my -sr localmachine -sky exchange -sp ″ Microsoft RSA SChannel Cryptographic Provider ″ -sy 12 -m 12 ″ C: \ myssl.cer ″
This command will generate a one year SSL certificate and place it in the local computer's certificate store. Please note that the certificate must be issued for the same name that you will specify in the connection command.

Once received, the certificate must be added to the Trusted Root Authority. To do this, open the certificate and click on the "Install certificate" button.

The Certificate Import Wizard starts. We indicate the location of the "Local computer" storage.

Select Trusted Root Certification Authorities as the storage.

Our certificate is now trusted. Open it again, and on the "Composition" tab we find the certificate thumbprint (CertificateThumbprint). We copy it to the clipboard.

Now you can create a listener for HTTPS. Open the PowerShell console and enter the command:
New-WSManInstance winrm / config / listener -SelectorSet @ (Address = ′ * ′; Transport = ′ HTTPS ′) -ValueSet @ (HostName = ′ wks8 ′; CertificateThumbrint = ′ xxx ′)
In the CertificateThumbrint field, insert the thumbprint of the certificate copied in the previous paragraph.

Windows Firewall exceptions (if enabled) for the new listener must be manually configured, they will not be created automatically. Therefore, let's create a new rule for incoming traffic on TCP ports 5986 and 443:
New-NetFirewallRule -DisplayName ″ Windows Remote Management (HTTPS) ″ -Direct Inbound -Protocol TCP -LocalPort 5986,443 -Action Allow -Enabled True
You can also use the graphical snap-in or the netsh command line utility to create a rule, whichever you prefer.

Next, go to the computer SRV1, from which we will connect. Since I am using a self-signed certificate, it will have to be added to the trusted root certificates and on the client. Copy the certificate file myssl.cer to SRV1 and install it with the command:
certutil -addstore root C: \ myssl.cer
That's it, the setup is complete. Now you can connect. Let's open an interactive session on wks8 with the command:
Enter-PSSession -ComputerName wks8 -Credential wks8 \ kirill -UseSSL
Please note that when connecting via SSL, you must enter your credentials and also specify the type of connection. Then everything is as usual.

Disable check
When connecting via SSL, it is verified that the certificate was issued by a trusted certification authority and was issued specifically for this machine. In simple terms, the name in the certificate must match the name specified in the connect command, and the issuer of the certificate must be in the list of trusted root CAs. If the check finds a discrepancy with these conditions, then the connection will not take place.
In principle, this is correct, but if necessary, the checks can be canceled. To do this, there are two parameters in the session properties:
SkipCACheck - cancels verification of the issuer of the certificate;
-SkipCNCheck - cancels computer name matching.
You can create a new session using these parameters for example like this:
$option = New-PSSessionOption -SkipCACheck -SkipCNCheck
Enter-PSSession -ComputerName wks8 -SessionOption $ option -Credential wks8 \ kirill -UseSSL
However, in this case, the meaning of SSL certificates is lost, and then it is easier to use Thrusted Hosts. But there is such a possibility, and you need to know about it.
Additional settings
Starting with the second version, WinRM listens by default on port 5985 for HTTP and 5986 for HTTPS. For compatibility with older versions (or to avoid opening additional ports on the firewall), you can additionally enable listeners on traditional ports 80 and 443. For HTTP:
Set-Item WSMan: \ localhost \ Service \ EnableCompatibilityHttpListener $ true
And for HTTPS:
Set-Item WSMan: \ localhost \ Service \ EnableCompatibilityHttpsListener $ true

The same can be done using group policies. To do this, enable the "Turn On Compatibility HTTP Listener" and "Turn On Compatibility HTTPS Listener" policies in the Computer Configuration \ Administrative Templates \ Windows Components \ Windows Remote Management (WinRM) \ WinRM Service section.

You can change the default ports and specify to listen to any non-standard port, for example, port 8080:
Set-Item WSMan: \ localhost \ listener \ listener * \ port -Value 8080

Note: installing listeners on non-standard ports will slightly increase security. However, keep in mind that by changing the default port, you will have to specify it manually each time you connect.
That's all. In the article, we will consider the configurations of remote sessions, the creation of endpoints, and something else on the little things 🙂
Read: 839
I will describe the process how you can centrally activate and configure the Windows Remote Management (WinRM) service on all target computers using GroupSecurityPolicy... Windows Remote Management is a dedicated service that allows administrators to remotely access and manage Windows client and server operating systems.
Let's take a regular PC withWindows7, which is included in the domain, and on which the function is not activatedWindowsRemoteManagement... On the command line, enter the following command:
Let's start the command line with administrator rights.
You should receive the following error message indicating that WRM is not installed:
WSMan Fault. The client cannot connect to the destination specified in the request. Error number: - 2144108526 0? 80338012
If you need to configure WinRM manually on a separate system, just type the command:
winrm quickconfig
 This I considered the option of installing on a single workstation.
If you need to configure WinRM on a group of computers, you can use special Group Policy settings. Let's create a group policy for the container where the workstations are located. Computer configuration- Politicians - Administrative Templates-> Windows Components - Windows remote control... We activate the following parameters:
Remote service client Windows management.
Windows Remote Management Service
 In the IPv4 filter section indicate *, which means that the computer can accept connections (and thus control commands) from anywhere.

Further in the section Computer configuration- Politicians - Administrative Templates - Windows Components - Windows Remote Shell
We activate the item:
Allow Remote Shell Access - Enabled
 You can control how services start from the following section of Group Policies: Computer Configuration - Policies - Windows Configuration - Security Settings - System Services.
 Open the Windows Remote Management Service (WM-Management) and configure the settings below, see the screenshot.
 All is ready. We reboot the workstation and after activating WinRM using Group Policy, check the status of the service on the client system using the familiar command:
WinRM enumerate winrm / config / listener
 Make sure that the startup type of the WinRM service is set to automatic. Although, in fact, the startup type is "automatic with a delay"; By default, the WinRM service has a startup delay (parameter DelayedAutoStart = 1 in the HKEY_LOCAL_MACHINE \ SYSTEM \ CurrentControlSet \ services \ WinRM branch).
After applying Group Policy, this system can be controlled remotely using WinRS commands. The following command will open a command prompt running on the remote system:
winrs –r:<имя_компьютера>cmd
After the command prompt window appears, you can execute and see the result of executing any commands on the remote computer, as if you were working with it locally. Note that WinRM must also be activated on your host computer.
In my case, the test machine is called alektest4
winrs -r: alektest4 cmd

Post navigation
Use a proxy ((blocked by Roskomnadzor, use vpn or proxy)) when using the Telegram client.