When installing windows 7 freezes at the logo
Despite the fact that Microsoft has released and is successfully promoting new versions of the operating Windows systems, it is Windows 7 Ultimate that can be considered the most successful and popular among users. Therefore, all the problems associated with the installation of the system remain very urgent.
It happens that Windows 7 is not installed or the computer freezes during the installation of Windows 7
Reasons for slow loading of Windows and freezes
If happens long installation Windows 7 or the initial installation window does not appear, then in most cases it makes sense to change individual BIOS settings... This self-powered solid state storage device is a set of firmware. Very often, when the computer freezes when loading Windows 7, this is due precisely to incorrect work BIOS.
It often happens that the boot window appears 5-10 minutes after the device accesses the boot disk. There are hardware methods that can significantly speed up the boot process.
Windows 7 takes a long time to load, for various reasons, but you need to start with the BIOS. If Windows 7, then there are many reasons why the computer boots slowly. To speed up the operation of a personal device, you can do the following:
- Defragment your hard drive
- Defragmenting and cleaning the registry
- Removing unnecessary programs
- Optimization of the startup list
Changing BIOS settings
Depending on the motherboard and chipset, the entrance to the Basic system is carried out by multiple pressing a specific key, immediately after turning on the device. The most commonly used keys or their combinations are:
- Delete
- F1, F2, F3, F10, F11
- Ctrl + Alt + Esc
- Ctrl + Alt + Ins
- Ctrl + Alt + Del
V modern computers, external drives are connected via the SATA (SerialATA) serial interface. This standard supports command-sequencing and hot-pluggable devices. To use all the features of this interface, you must enable AHCI mode. When working with Windows 7, before enabling this mode in BIOS, you need to activate the AHCI driver by changing the registry parameter. The login is performed at the following address: HKEY_LOCAL_MACHINE \ System \ CurrentControlSet \ Services \ msahci and the value of the "start" parameter is changed from 3 or 4 to 0. Then you need to enter the BIOS to perform further actions there.
fig. 1. If the login to BIOS was successful, the following picture appears on the screenBy moving the arrows, it is necessary to open the "INTEGRATEDPERIPHERALS" window. In this window there are SATA controller settings with the ability to change them. The first line indicates that the controller is enabled, this is evidenced by the value "Enabled" - enabled.
fig. 2. V next line, the value "NativeIDE" needs to be replaced with AHCIIn some cases, if the disk is not detected, you can try to set the value to RAID (group connection). Then you should disconnect the floppy disk drive, which has not been used for a long time and is not part of modern peripherals. personal devices... This line looks like this: DriveAFloppy 3 modeSupport 1.44M 3.5 ". Next, you need to set the parameter" none "in parentheses, indicating to the system that this device is absent.
fig. 3. The result is the followingThe device is missing and in addition it is turned off. Pressing the F10 key saves the new settings. Now you need to go to the line "Save & ExitSetup", which means "Save changes and exit". After restarting the computer, the new parameters will be installed. All of the above operations should be performed if the Windows 7 computer freezes or the laptop freezes when installing Windows 7.
If Windows is not installed, then the cause may be a virus infection of the device. Some software downloaded from the Internet can slow down very much, therefore, when a reinstallation is planned on Windows 7 operating system, before starting the process, it is recommended to scan the device with antivirus utilities. The new OS should be installed on a computer completely cleaned of various "dirt".
More options for what to do if Windows 7 installation hangs
Often users complain - "I can not." The fact is that many try to download a program from the Internet, and this is a very unreliable business due to the large number of viruses on sites with free software. Therefore, it is best to use licensed software for optical discs, or, as a last resort, a good pirated copy with an activator. In the process of work, various situations may arise associated with a decrease in the speed of the device or with freezing when performing some operations.
If the installation hangs Windows updates 7, then you can wait a while and if after a while the installation of updates does not continue, then turn off the power and restart the computer.
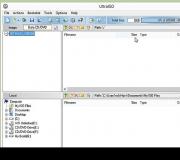
There is a situation when Windows 7 is not installed from a USB flash drive. The main percentage of failures when installing from a solid state drive occurs due to incorrect BIOS settings. The elimination of the reasons stated above is to disconnect the floppy disk and install AHCI mode... Sometimes the program cannot be read because it was written incorrectly. For proper formatting and writing a disk image to a flash drive, you can use the very convenient UltraISO utility, which supports over 30 formats.
In some cases, when unpacking Windows files 7 stuck at 0%. There can be two main reasons:
- Hardware overclocking
- Many broken sectors on the hard drive
In general, when you change the frequency to overclock the processor, many software products stop installing correctly, but after returning the settings to their original state, the correct operation is restored. An old hard drive can also freeze when installing an operating system. Need to check HDD using the "Victoria" program and, if necessary, replace it with a new drive.
WATCH THE VIDEO
Now you know what to do if Windows 7 installation hangs.
When installing the Windows 7 operating system, a nuisance may arise - a hang during installation. When the Windows 7 installation hangs at the Starting Windows logo stage, the problem may be caused by a malfunction of the computer components: hard disk, motherboard, RAM. In the event of a device breakdown, actions with the system will not help - it remains to seek help from the repair specialists. If everything is in order with the hardware, but the Windows 7 installation window does not appear, then the problem can be solved in just a few steps, which we will describe in this manual.
The reason for the system freezing at the logo is the installation not through the BIOS. A BIOS installation is also called a "clean" installation, since you format all data on the computer and accordingly delete information about previous system... How to install the OS via BIOS?
Step 1. We insert the boot disk with the system () into the computer. We turn on or restart the PC.

Step 2. When the first inscriptions appear, quickly press the "Delete" key. The appearance of your BIOS depends on the specific manufacturer.
Note! The design of the interface does not matter, since on modern computers the basic BIOS settings are the same.
Step 3. If you managed to press "Delete" while booting the computer, the BIOS window appears.

Step 4. Moving through the points is carried out using the arrows on the keyboard. Press the "right" arrow until the "Boot" item opens.

Step 5."Boot" is responsible for booting the computer from a specific device. By default, the computer boots from the hard drive. But now we need to install the system, which is located on a USB flash drive (or CD). Press the down arrow and.

Select the item "Boot Device Priority" - press "Enter"
Step 6. A small menu opens, where we will select the device from which the computer will boot. In our example, this is a DVD.

In your case, it may be the name of a flash drive or CD-carrier. We chose the device - press "Enter".

Select the item "Boot Device Priority" - press "Enter"
Step 7. Exit the "Boot" tab - Esc key. This will save the changes and take effect after the reboot. In the pop-up window, select "OK" and press "Enter".

The computer will automatically restart. Problem solved - Windows will start " clean install"Without freezes and crashing errors. It is with the help of working with BIOS that problems are solved in the spirit of “no wines installed 7 !! vis at the start of installation ".
Windows 7 freezes during installation and installs slowly - what to do
Computer freezes while installing Windows 7? We find a way to solve the problem.
The first thing to do is to search for the reasons for the slow installation of Windows 7. Let's deal with common sources of problems:

How to solve the problem of slow installation of Windows 7
For a successful installation, you need to fix two critical parameters:
- Serial ATA (SATA) Mode - switch to "AHCI". This is a more modern type of data transfer. It will help not only in solving the installation problem, but also generally speed up the operation of the OS.
- Cut off the floppy drive. Despite the fact that floppy disks - last century and you may not even have this device, we recommend disabling its use in the BIOS.
Disable floppy disk
Step 1. Open the BIOS, press the "Delete" key.
Step 2. Go to the "Advanced" tab.

Step 3. Select the item "OnBoard Floppy Controller" and press the button "+". Disabled should be displayed next to the line.

Step 4. We save the settings.
Change the mode to "AHCI"

About Windows operating systems
OS of the Windows family are the most popular. Microsoft has been holding a monopoly on the market for over twenty years. For ordinary users the windowed interface has become familiar and convenient. But the main advantage software product Microsoft - Support for a huge amount of software. Professionals, from graphic designers to programmers, prefer Windows, since the programs they need to work simply do not exist on other operating systems. The vast majority of video games are supported by Windows, which neither Linux nor Mac OS can boast of. The abundance of drivers for any component makes the system universal and facilitates its use. By purchasing a device, you will always be sure that it will work on Windows without any problems. Consider the history of significant versions of a popular OS.

- Windows 95. Served as a starting point for the development of windowing systems. By combining the principles of MS-DOS and the Windows family, the 95th system became the main product for desktop computers... Thanks to the simplicity of the windowed interface, Microsoft has managed to occupy the niche of graphical operating systems and gain a foothold in the market. The Start menu, long filenames, and Plug and Play drag-and-drop functionality became the foundation and style of all subsequent Windows systems;

- Windows XP. Released in 2001, the system made a splash among PC users. Prior to the release of the "seven", XP remained the main operating system. Simple, easy to install and use. Takes up a minimum of disk space. Today Windows XP is not supported by the company, which affects the resistance to virus attacks... Nevertheless, the owners of low-power PCs and laptops install the system on their devices: it is not demanding on technology and works properly without taking up a lot of RAM and without loading the processor. The only significant disadvantage of the system is its vulnerability to viruses due to the lack of updates. However, the problem is solved by installing latest version any reliable anti-virus (Avast, Avira, Dr.Web);

- Windows Vista. Released in 2007. Was coolly received by the community. Visually beautiful, but requiring a powerful computer and weak in terms of security, the system turned out to be a failure. Performance problems, poor driver support, and reduced capabilities turned out to be the main OS flaws. Nice graphical interface, as one of the few advantages, will go to the next OS of the company - Windows 7;

- Windows 7. The product was released at the end of 2009. "Seven" was in the top in terms of installations for 8 years. The most reliable, simple and convenient system of all. It takes the best of XP and is more powerful. After the unsuccessful Vista, the G7 was greeted warmly. Great customization options, support for a huge number of drivers, ease and speed of installation helped the system to capture the market. In 2018, it is still installed on computers, despite the end of official support and the lack of updates from Microsoft;

- Windows 8. It just so happens that Microsoft does it "every other time". Metro's revolutionary flat interface was met with disbelief and criticism. Exactly appearance affected the failure of the system. Ordinary functions: personalization, uninstall programs, shutdown and restart have changed significantly compared to Windows 7. For inexperienced user it became difficult to find them, and therefore, together, in order to get to work, it took a long time to delve into and study the new interface. But the company made the right conclusions, modernizing the stability and appearance of the system, preparing an excellent release - Windows 10;

- Windows 10. Basically, the system takes the best of Windows 7 and 8. Decent performance, additional settings for gamers to improve performance, shop free apps and extremely easy setup parameters - the main advantages allocated by users. After the release, the system remained free for several months - for the first time in the history of Windows. Windows 10 is installed on new laptops by default. So when buying a fresh device, you don't have to pay extra money for buying a license. An additional advantage of the system is its versatility. Windows 10 can be installed both on a computer and on mobile devices: smartphones, tablets, and even Xbox. Multi-platform provides synchronization of settings and data with a single account user. All the innovations and improvements have helped the top ten to overtake Windows 7 in popularity and become a universal operating system for personal computers.

Video - Starting Windows Freezes While Installing Windows 7
Hello dear friends! This weekend I got a computer on which I needed to install Windows 7. But there was a problem that I encountered for the first time. When I started the Windows 7 installation, the installation window did not appear (first window, language selection). And then the seven was installed for a very long time. If you have the same problem when Windows 7 takes a long time to install, and installation window does not appear, now I will write how to solve it. At least I'll tell you how I solved this problem.
Perhaps I'll start from the beginning. They called me and asked to come and see the computer, otherwise: the Internet does not work (there is Intertelecom), the antivirus shows some window all the time, nothing starts, etc. In short full set all sorts of different breakdowns. And I have already dealt with this computer, such a powerful “machine”, new, only Windows XP is installed there, not that it’s bad, it just surprised me. And when I asked the owners why Windows XP was worth, they said that they had it installed in the store. I said that it would not be bad to put a seven, after all, it is newer, and on such hardware.
I came a second time, turned it on, and there was something incomprehensible. Tolley, it was a virus that worked like that, or children :), but there Avast stuck in some kind of warning, there were almost no icons on the notification panel, the Internet did not react to an attempt to open a connection, the theme was changed, and it was not possible to return the standard one. And many more different unpleasant moments.
I looked and decided that it would be easier to demolish everything, format the C drive and. After explaining everything to the owner of the computer, we decided that we will do so.
Everything is fine, the computer rebooted and started booting from the installation disk. The file download bar went off when installing Windows 7, and when a window with a choice of language should appear, nothing happened. The window did not appear, there was only a splash screen (well, such as when installing the seven) and a cursor. I waited three minutes and rebooted my computer. Realized that something was wrong. I decided to go into BIOS again and see the settings. Now it is clear why Windows XP was installed in the store, most likely it did not work to install the seven.
I immediately threw away the problems with my installation disk, installed it more than once. Yes, and I had an exact copy, with which the Windows 7 installation window also did not appear. I did not see anything strange in BIOS, and. It did not help, Windows 7 was not installed, the language selection window did not appear. I decided to open more system unit and see how and what is connected there. I saw nothing interesting there. By SATA interface a hard drive and optical drive were connected.
I tried to run the installation again. I started it the same way, only the background, but there is no window with a choice of language. I decided to wait. After about 5 minutes, a window appeared with a choice of language, well, at least something, I thought. I pressed further, an inscription appeared "Starting installation ..." and that's it. The computer “thought”, I understood this from the fact that the cursor was spinning (something was loading), I decided to wait a bit.
After about 10 minutes, a window appeared in which I selected a clean installation of the system, again waited 5 minutes, formatted the partition for Windows 7 and started copying the files. They were copied longer than it should be, it seemed to me so. In short, with grief in half, I installed Windows 7. Then I realized what a long installation of Windows 7 :).
Slowly but established
The computer worked as befits such hardware, very smart. It remains only to configure. But I did not have a driver for the modem, so they decided to take the system unit to me and pick it up the next day.
Finding the reasons for the slow installation of Windows 7
At home, I set everything up, and decided to torment the computer a little more and find out why it took so long to install Windows 7, I was interested. Moreover, I did not find a specific answer to this question on the Internet, only guesses.
Configuring SATA hard drive in BIOS
First, I opened the system unit and changed connect hard disk and drive. I connected the hard drive from SATA 0 to SATA 1. A CD / DVD drive to SATA 3.
Then he got into BIOS again. I was interested in the SATA controller settings. Chapter .
Against OnChip SATA Controller the parameter was Enabled. Well, then we see the item, I have the Native IDE parameter. This is not very good for a SATA hard drive, it does not seem to show all its capabilities.
Changed the parameter value to AHCI (the best option for SATA drives). I tried to turn on the computer. The drive was not detected at all, and as soon as Windows 7 started to boot, it blinked blue screen and the computer rebooted.
I decided to put RAID in the parameter instead of AHCI (combines disks into an array), nothing happened (I knew it was useless, but decided to try), everything is the same as with AHCI.
Installed back Native IDE... All these experiments did not help. Although it is very strange why AHCI didn’t work, I didn’t get it.
Disable Drive A
I also saw that opposite the Drive A table the parameter “1.44MB, 3.5”. It's a floppy drive, and this computer doesn't have one. So I set it to “None” to tell the system that it is missing.
Saved the settings by pressing F10. Set installation disc with Windows 7 and tried to run the installation again in order to check how the seven will be installed, just as slowly or faster.
And to my surprise, everything worked as expected, a window with a choice of language quickly appeared, and so on, I quickly got to formatting the disk. Of course, I did not format it, since the computer was already configured, and it should have already been taken away.
How to solve the problem of slow installation of Windows 7?
Let's summarize, otherwise I dashed off a lot of text :). There was a problem with the installation of Windows 7, it was installed for a very long time, and I had to wait a lot until a window with a choice of language appeared, and then hung for a long time "Start of installation ..."... If you have such a problem, then you can just wait and everything will be installed. It was installed for me.
If you want to try to solve this problem, then:
- Try to put AHCI in the BIOS in front of the item (most likely it did not help me).
- Change SATA connectors for hard drive and drive.
- Disable Drive A.
I did the last two points, and the Windows 7 installation went quickly. I can’t say with 100% certainty that this is what helped bring back the normal speed of Windows 7 installation. But in any case, you need to try.
Sorry for so much text, I just wanted to describe everything in as much detail as possible. I hope that my experience was useful to you, if you managed to solve this problem, this, or in some other way, write about it in the comments, it will be interesting and useful. Good luck friends!
At some point in time, no matter what, you wanted to install / reinstall the operating system on your computer. We got a distribution kit, set the settings in BIOS and, most importantly, prepared ourselves mentally for the boot-installation process. But it was not there. When installing Windows 7, the computer unexpectedly freezes without showing the slightest sign of life. Miracles, and nothing more. However, before grabbing your head, running after validol, or rushing to write an angry letter to Bill Gates, you should think about why the problem still happened in the system.
In this case, the reasons will directly tell us the effect and, accordingly, all possible ways solutions to the problem why Windows 7 takes so long to install.
Malfunction options and their causes
Symptoms of such a "disease" in an operating system installation can be different:

At the same time, the reasons for the PC freezing in each of these cases are the same. In particular, the system can take a very long time to load due to:
- malfunctions of the hard drive;
- a problem with RAM or power supply unit;
- lack of contact with motherboard;
- a short circuit in the USB connector or a malfunction in the drive;
- incorrect BIOS settings;
- errors in the OS image on the distribution;
- damage to the boot disk (flash media).
Thus, the reasons that the computer freezes at the beginning, middle or at the end of the installation of the operating system can be divided into internal (1-5), directly related to the operation of the PC, and external (6-7). Based on this, the options for solving the problem will also differ among themselves.
Troubleshooting options
1. Waiting for a response
As trite as it sounds, for a start, you can try just to wait for the Windows installation to finish. There are frequent cases when, after 10-45 minutes of waiting, the system responded and was subsequently installed without failures and freezes. How can this be explained? It will not be possible to find an unambiguous, especially an official answer to this question. However, as practice shows, very often a similar problem accompanies the installation of Windows on a computer with AMD processor and a Gigabyte motherboard.
2. Replacing the Windows 7 distribution kit
If waiting for the system response did not help and the PC still freezes, it is worth trying to replace or test it on another computer. If the reason was in it or in the image recorded on it, the problem with slowing down the computer, of course, will disappear with the replacement of the distribution kit.
Here, we note that the problem may not be in the boot disk(USB flash drive), and in the drive (USB connector), with which it boots. It is not difficult to identify such a problem with the PC. It is enough to test the drive (USB-connector) for operability using any other disk (flash drive).
3. Reconfiguring BIOS
There are definitely two parameters in the BIOS that can affect the speed of the computer, namely:
- SATA Mode (OnChip SATA Type);
- Floppy Drive / Drive A.
It is best to correct the work of each of them. In the first case, you will need to enter the Integrated Peripherals section and select AHCI for SATA Mode or OnChip SATA Type:

In the second case, you will have to completely deactivate Floppy Drive (Drive A). This can be done by entering the Advanced section in the BIOS:

In addition, you can try resetting the computer boot parameters that were set before starting the Windows 7 installation process.
4. External device evaluation
If none of the above methods helped, it is very likely that the cause of the problem lies in the "stuffing" of the computer. To begin with, it is worth assessing the external condition of the devices. To do this, we take a screwdriver in our hands, unscrew the bolts from the system unit and one by one we check if there are streaks, a burning smell and other malfunctions:
- power supply unit;
- motherboard;
- hard drive;
- RAM, etc.
It is clear that if the result turns out to be positive, the solution will turn out to be very simple - we change damaged device and forget about the problem. If visual inspection did not give anything, we undertake to test the hard disk and the work of the RAM.
5. Testing the hard drive and RAM
You can test the hard disk for bad sectors and other malfunctions with different programs, for example, utilities such as.
The same article explains in detail:
How to prepare a bootable UEFI Windows 7 64-bit USB stick.
How to properly configure the UEFI BIOS to boot from a USB flash drive and then install Windows 7 on a GPT disk.
How to convert a hard drive to GPT in Windows 7 Setup and finally install an operating system.
- Note: Friends, I want to tell you this, Windows 7 installed on a GPT disk works a little faster, but of course not as fast as if you were!
- All the difference between new GPT disks and old MBRs is described in our article.
- Today's article describes a rather difficult way for beginners to create a bootable UEFI flash drive with Windows 7, there is a much simpler method and it is described in our other article -.
- Today we will install Windows 7 with you on GPT disk computer with motherboard ASUS board, but if you have a GIGABYTE motherboard, read another article
Connect the boot USB flash drive 7 to USB port 2.0 (black), when connecting a flash drive to a USB 3.0 port (blue), an error may occur, since the Windows 7 installer does not have USB 3.0 drivers.
As usual, at the beginning of the article, we publish a letter from the reader of our site.
Hello admin, I ask for your advice! I bought a powerful system unit. BIOS on a new computer, you guessed it - UEFI. I installed the Windows 7 64-bit operating system myself, but ran into a problem. My hard drive is 3 TB and after installing the operating system, 745 GB remained unallocated on it. After a short search for information on the Internet, I realized that this is due to the fact that my hard disk has the most common and already outdated type of MBR partition tables, which does not see all the space on a hard disk with a volume of more than 2 TB. This means that my hard drive needs to be converted to new format placement of GPT partition tables, which, by the way, has many other advantages over MBR. This is where my adventures began, judging by the numerous posts on the Internet, I'm not the only one.
On one very authoritative resource, I was offered a helping hand with such a “hopeful” message “ None of Windows editions 7, unlike Windows 8, does not support installation on drives with a GPT table of contents". In my case, you just need to buy an SSD solid-state drive and install the Windows 7 64-bit operating system on it, then convert my second 3 TB hard drive to GPT and use it for file storage.
Administrator's note: This can be done only if all sections are deleted on it and, accordingly, there is no information.
Have you edited it?

Now we run the following command:
xcopy I: \ *. * F: \ / e / f / h (where I is the drive letter of the mounted Windows 7 ISO image, and F is the drive letter of the flash drive). Copying in progress installation files Windows 7 on a USB flash drive, which takes 3-5 minutes.

There are a few commands left:
xcopy F: \ efi \ microsoft \ *. * / e / f / h F: \ efi \
xcopy C: \ Windows \ boot \ efi \ bootmgfw.efi F: \ efi \ boot \ bootx64.efi(where F is the drive letter of the flash drive)
answer the question by pressing on the keyboard (F).
And the last one:
bootsect / nt60 F: (where F is the drive letter of the flash drive) (the file is located F: \ boot \ bootsect)
Our bootable USB drive UEFI Windows 7 64-bit ready!
Note: If you enter the command bootsect / nt60 an error like this will come out "bootsect" is not an internal or external command, an executable program, or batch file
then change the command to this I: \ Boot \ bootsect.exe / nt60 F:(where I is the drive letter of the mounted Windows 7 ISO image, and F is the drive letter of the flash drive).

BIOS UEFI
To install Windows 7 to a GPT disk, we need to properly configure our UEFI BIOS.
When loading, press Delete or F2 and enter the UEFI BIOS. Click Advanced (F7).


Then we go to the menu CSM (Compatibility Support Module)

and set the Start CSM position to Enabled.

Boot device parameters- put Only UEFI


Click on the arrow and exit the menu - set the parameter Windows UEFI mode and exit back.


Boot priority
Download parameter # 1 - choose our flash drive

Boot parameter # 2 - select our hard drive.

That's all the settings. Press F10, with this we save the changes we made to the UEFI BIOS.


In general, in the UEFI BIOS, you can change the boot priority in the initial window. In the initial phase of the computer boot, press Delete or F2, enter the UEFI BIOS, select the boot menu (F8),

then we select our USB flash drive, there is a download from the flash drive.

Boot into the Windows 7 setup program. Everything is as usual. Further.

Install. We accept the license agreement. Full installation (advanced options).

In this window, we do not pay attention to the existing sections.

We call the command line, in it we convert our hard disk to the GPT standard, all partitions and data on the disk will be deleted. Press Shift + F10 on the keyboard. V command line sequentially enter the commands:
diskpartsel dis 0
clean
convert gpt
exit
exit

click Update.


The usual process of installing Windows 7 takes place. Who does not know how to install the seven on a computer, read our article.
After installing the Windows 7 operating system, go to Disk Management, right-click on our disk and select Properties,