Installing windows xp home edition. Beginner's Guide: Installing Windows XP in Detail. Configuring Your Computer to Boot from CD
Windows XP remains one of the most popular operating systems today. Users appreciate its reliability and ability to run on weak old hardware. The step-by-step installation of Windows XP is quick and easy. Below is a detailed description of it.
Preparing the computer for installing a new OS
The easiest way that Windows XP can be installed is with installation disk... If, instead of reading data from it, the system started loading the old OS or a black screen appeared that did not respond to button presses, then you just need to go into the BIOS and make the appropriate settings:
- Open the section Advansed BIOS Features or BIOS / Boot Device Priority;
- Select the First Boot Devise item;
- In the list that opens, select the CDROM value or the name of your drive;
- Save the result by pressing the F10 key and restart your PC.
 Note that there are a lot of BIOS versions for laptops today, so the described steps in the case of installing the OS on a laptop may be slightly different.
We go directly to the installation
 The first window is blue screen... It is at this stage that step by step installation software for installing Windows XP on a SCSI (high speed disk) or RAID array. To do this, you need to press F6, after which the installation of the corresponding drivers will begin. But in most cases, users install the system on a regular hard disk, for which no intervention in the installation process is required at this stage, you just need to wait for the next welcome screen.
- Install Windows XP. The standard choice in most cases is to install the system "from scratch" or restore the old one. A convenient graphical interface is used.
- System recovery using the console. This is the choice of professional users and craftsmen - recovery is performed from command line using DOS commands. In this case, a complete reinstallation of the system is not performed.
 Then the system proceeds to search for previously installed OS versions. If any were found, the list will be displayed on this screen below, the menu will offer options for subsequent actions:
- restore old windows XP;
- install a fresh copy of the OS.
 In the first case, you will be able to use earlier installed applications... Only system files, the installation will be completed completely. The second option involves a complete rearrangement of the system.
No list will appear not only if Windows XP is installed on an "empty" computer, but also if the previously installed system has a different edition or service pack.
The most crucial moment of installation
The next installation point is perhaps the most important, and it should be done thoughtfully and carefully. You will need to define the system partition and allocate disk space in such a way that the virtual disk allocated for the system has enough space for it to function.
Of course, both the system and your personal data can use the same partition equal to the entire hard disk space, but such an organization is guaranteed to create many problems in the future.
Divide the disk into partitions
If you are installing Windows XP on a completely new disc, then you will have to distribute the sections yourself, since this step-by-step procedure has never been done before. The window that appears will indicate the size of the unallocated area - it will match the size of the entire hard disk. 
Here you need to create a so-called. the system partition is the one where the OS will be installed. To do this, you need to specify its size in megabytes (1 GB is equal to 1024 MB) and press "Enter" on the keyboard. After that, you will again return to the window in which the partition of the hard disk is carried out. The created section will already be displayed in separate line with the assignment of a Latin letter (usually C). 
On size system partition you should not save - the stability of the system will depend on it. The minimum space for installing Windows XP is 20 GB, but it is better to allocate it not 20, but 40, or even all of 60 GB.
In a similar way, we create other sections for personal data from the remaining unallocated area, however, you should not get carried away with the quantity - in this case, large files and folders will be distributed less efficiently, and navigation through the sections will become more confusing.
Formatting the system partition
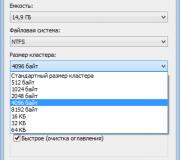
Next, you will need to select a partition for installing the system (in our case, drive C) and press the "Enter" key. A window will open prompting you to format the partition.  Choose fast formatting in NFTS system (FAT is obsolete). After completing the formatting, the process of installing the system files will start.
  The most difficult stage of the installation has been completed.
By the way, if the disk that you partitioned is not formatted, then you can carry out this procedure with each of the created partitions for personal data even after the installation of Windows XP is completed using standard means.
If you are rearranging the system and the disk is already partitioned, then you just need to select the partition with the system to be reinstalled, format it and start the installation process. If you decide to format the rest of the sections, then all information on them will be lost.
Finishing installation
After the system files have been copied, the computer will restart and the installation will continue.
Determine the initial parameters:

As everyone knows, to work with a computer, we need operating system, which eventually becomes "unusable" due to viruses, "garbage" and other factors. Many people think that it is better to contact a professional for reinstallation, but I suggest you step by step instructions Windows XP installation. After studying which you will have no doubt that you can install Windows XP yourself.
Why do I have to reinstall Windows?
According to statistics, even having good protection computer from viruses and careful handling every three years you still have to reinstall Windows xp. "Garbage" that accumulates in the system is sometimes the remnants of uninstalling programs and games, which contain settings, configuration files and other system files of the old application. Many programs make entries in the registry, and after deletion, the entry remains "live" in the system. It also happens that the computer hangs and it is not possible to "revive" it and the conclusion suggests itself: you need to install new windows xp.
Configuring your computer to boot from disc.
Usually, when the computer boots up, a splash screen appears for a moment. motherboard, then the post check is in progress and we see the "Windows XP" greeting. To install, we do not need to run Windows itself, but we need to start the disk with our windows way xp. To do this, you need to go to Bios. To enter Bios, press the DEL or F1 key when turning on the computer. (On laptops, F1, F2, F3, DEL, Ctrl + Alt + Esc are used. If more than one combination does not fit, then you need to look at the office site how to enter bios).
Most often, there are only two types of bios:

1. Phoenix AwardBIOS.
If you have exactly this version, then you need to do the following: enter the Advanced BIOS Features section, select the First Boot Device item in it and assign the CD-ROM value. Then press the F10 key (to save the settings and exit) and in the dialog box that appears, select Yes.

2. American Megatrends BIOS.
In this version, the background will be gray and the sections will be written in the line at the top. First you need to enter the Boot section, then the Boot Device Priority subsection and select your CD-ROM drive in the 1st Boot Device item. And just like in Phoenix AwardBIOS, press the F10 key and confirm Yes.
This completes the computer setup.

Launch windows installer.
The first step is to insert the Windows disc into the drive and restart the computer. On the dark screen, we will see the inscription "Press any key to boot from CD", which means - press any key to boot the disc, which we do. This inscription is displayed for no more than five seconds, so you need to immediately press any key. If you do not have time, then you should restart the computer and press the key again.

On the monitor, we will see that the installation of windows has gone. Don't get involved unless you want to install a special RAID or SCSI driver. In this case, press the F6 key.


We press Enter and the license agreement appears, to agree and continue the installation press F8. Next, you need to select partition hard the disk on which the installation will be performed. If the disk is new and there is only an unallocated area on it, you need to create a partition (key C), specify the required size in it.

We will also be offered formatting hard disk is fast and normal. Formatting is best done as normal with the ntfs filesystem. After all, the long-awaited installation of windows xp will finally go, upon completion the computer will reboot itself and a window will appear with the inscription "Press any key to boot from CD", this time we do not press anything!

A window will appear in which nothing needs to be changed, but in the next one we must enter the Name and Organization.


The password is set at the request of the user. We leave the date, time and time zone as it is or, if necessary, correct it.

If the driver network card was built into this assembly Windows then you will see the network parameters setting in which you need to select "Normal parameters" and click "Next".

When choosing a workgroup or domain, it is worth checking the first item with the WORKGROUP value.

Well, here we see the Microsoft logo and the latest windows configuration settings.
Welcome with login and desktop loading.
In contact with
This article tells how to make Windows XP Professional from Windows XP Home or how to remove a number of functional restrictions imposed on the operating system.
With this article, you can:
- remove the limitation on the quantity simultaneous connections in XP Home version;
- connect a computer with an operating system Windows XP Home to the domain;
- get access to editing the snap-in in Windows XP Home, which can significantly simplify the administration of user groups;
- disable simple file sharing in Windows XP Home. The ability to disable simple sharing in Windows XP Professional allows you to more flexibly configure access to network resources on your computer (to allow access to network resources for specific users);
- customize and get remote access to the desktop of the computer on which the operating room is located Windows system XP Home;
- enable support for multiprocessor systems in Windows XP Home;
All these restrictions can be easily removed, since the operating systems Windows XP Home and Windows XP Professional are built on the same kernel - NT 5.1. And this easily allows you to turn Windows XP Home into Windows XP Professional.
In Russia, there are many organizations that, under the yoke of Microsoft, acquired at one time a large number of OEM licenses for Windows Home Edition operating systems, chasing a lower price in comparison with the Professional version. The heads of enterprises probably did not think about the possibility of its further use.
For system administrator, which is designed to administer and maintain the computer park of such an organization, this is a significant problem. The Windows Home operating system has a number of limitations that may not be relevant for home users, but are critical to deploying a flexible, secure local area network. Nobody will buy new licenses instead of already purchased licenses for Home. In Russia, that's for sure.
All the actions described below you do at your own peril and risk. Any changes to which Windows is subjected will revoke your license for the right to further use. Microsoft product... But most often the check for licensing begins and ends with the recount of stickers and computers.
The Windows system is made in such a way that the system registry contains information about the type of operating system. When the system boots, it reads this data and uses it in the future when defining the functionality.
The main registry parameters that are responsible for the type of Windows operating system are a string parameter "ProductType" and multi-string parameter "ProductSuite", section ... Below is a comparative table (Table 1) of these two parameters for different Windows operating systems. Choose the ones that are right for you.
Table # 1 - comparison table parameters "ProductType" and "ProductSuite" for different operating systems of the Windows family.
To change the operating system type you need to change the corresponding parameters in the registry. If you just change the values of these two parameters in the branch "HKEY_LOCAL_MACHINE \ SYSTEM \ CurrentControlSet \ Control \ ProductOptions", then you will not see the proper effect after the restart, since these parameters are locked in the Windows system.
This blocking can be bypassed by changing the parameter values not of the current configuration, but the configuration of the last successful Windows boot... This registry branch is open for editing.
Changing the type of operating system (how to make Windows XP Professional from Windows XP Home):
- Launch Registry Editor regedit(START \ Run \ regedit).
- Open the registry branch:
"HKEY_LOCAL_MASHINE \ SYSTEM \"
- In this thread, after the section "CurrentControlSet", there are several more sections like "ControlSet" with numbers at the end. We need the most recent section. We open it.
- Next, open
"... \ Control \ ProductOptions"
We find the parameters there "ProductType" and "ProductSuite" and change them in accordance with the above table (table no. 1).
- We reboot the computer.
- At the next system boot, press F8. In the boot menu, select Last Known Good Configuration.
- After this shamanism, additional functions of the "selected OS" appear in the installed operating system.
After removing the restrictions, we will start using the functions that have appeared:
- Removal of restrictions on the number of simultaneous connections in XP Home versions. Starts working immediately after reworking the operating system type.
- The ability to connect a computer running Windows XP Home to a domain. You can connect to the domain immediately after reworking the operating system type.
- Gaining access to edit a snap Local users and groups in Windows XP Home. You can start working with this snap-in immediately after reworking the operating system type.
- Disable Basic File Sharing in Windows XP Home. The standard way to disable simple file sharing, as in Windows XP Professional, will fail. Disabled via Registry Editor. In the "HKEY_LOCAL_MASHINE \ SYSTEM \ ControlSet00_number of our profile \ Control \ Lsa" branch, the dword parameter "forceguest" must be set to 0.
- Access to the remote desktop of the computer running the Windows XP Home operating system.
- Support for multiprocessor systems in Windows XP Home. Starts working immediately after reworking the operating system type.
Random 7 articles:
Comments (1)
- Roastbeef
April 2, 21:47Ay-ay, how is it all ... ..lawful)) UBEP you say?)
-
[email protected]
April 3, 03:37Life is like that. I am for licensed software, or for free :-)
- Denis
June 20, 06:51How to connect to a remote worker Windows desktop Home?
- Gagarin
21 November, 11:54A question about Vista or, say, sevens, is it possible to implement it there?
-
[email protected]
22 November, 06:54I think something like that should be, but something different. Unfortunately, this method only works with XP
- name
December 10, 14:21this only works with XP server pack 2
at 3m - it won't work -
[email protected]
10 December, 15:58> name
Perhaps you `re right. I haven't tried this on SP3 - Zed
December 25, 23:40name: this only works with XP server pack 2x3m - it will not work
Passed - via Regedit PE with infraCD 5.5
-
george
10 August, 00:52Indeed, is something like that possible in the seven?
Many are faced with the problem of transition to subsequent releases of this OS! ” -
[email protected]
11 August, 15:48george: Indeed, is something like that possible in the seven? Many are faced with the problem of transition to subsequent releases of this OS! ”
I can't say about the seven, since it's not at hand, but something similar should be
- Evgeniy
August 29, 02:56Is it possible on the contrary? That is, from Windows X Professional to make Windows XP Home?
-
[email protected]
31 August, 19:18Yes, of course, you can specify any of the above parameters.
-
Levik
October 26, 19:39 -
[email protected]
October 27, 16:22Levik: Thanks for the information. I suspect this will be considered a violation Windows licenses? (However, in case of official proceedings it will not take long to "roll back" to Home - that is, it is almost "legal" to use Win XP Pro)
Do you think correctly
- Mitrich
5 November, 08:58after these manipulations in the system properties, he writes that I have Win XP Pro, but the Remote use item is completely gone. It's a pity. That's why I wanted to make an elephant out of a fly. Looks like no luck.
This section describes in more detail all steps on Windows installation XP Professional. Windows XP installation procedure Home Edition is a process similar to the procedure for performing tasks - Professional Edition. Starting with Windows XP Pro is a more advanced operating system, looking at it, we can demonstrate the installation procedure, but in a different way.
The most optimal and the right decision Windows XP installation will be in the case when the previous operating system is completely "removed" and all files and folders are deleted. It is not difficult to accomplish clean install, some recommendations should be followed. Namely, you have to check the Windows XP compatibility list to make sure your hardware is supported by XP. It is possible to check network compatibility to download drivers for Windows XP. Be sure to save any required drivers to floppy disks or CD before starting the installation.
Windows xp can also be installed with usb drive(flash drives). To do this, you need to prepare the usb itself (flash drive). How to do this was described here:. This is necessary when you have a netbook or a broken floppy drive. The installation procedure itself is the same as installing from disk. Except for setting the boot priority in the BIOS. In our case, we will install from the disk.
So, all are saved Windows versions XP from a bootable CD. To boot from CD / DVD-ROM you need to set boot sequences. Look for the boot sequence in the BOOT tab, according to your BIOS settings, and check that the device comes first - from the CD / DVD-ROM drive. Only now, you can proceed to the following lists in order:
Guide how to install Windows XP on a netbook and computer
Step 1- Start your computer and place the Windows XP CD in your CD / DVD-ROM drive. The computer will automatically detect the CD and you will receive the following message: Press any key to boot from CD. This is fine. Now, as soon as the computer starts booting from your disk, the following window will be displayed:
Step 2- Now you have to press F6 in order to install further drivers: SCSI or Raid. If you are using IDE HDD, then you do not need to press the F6 key. If you are using a SCSI or SATA hard drive, then you must press the F6 key otherwise Windows will not recognize the hard drive during installation. Be sure to check that the Raid drivers are on the floppy disk. Drivers are usually supplied on a CD that you can copy to a floppy disk ready for installation.
Step 3- Click "S" to indicate that you want to install an additional device.
Step 4- You will be asked to insert a Raid diskette or SCSI drivers. You need to continue to follow the instructions displayed by the installation system. Click the enter key after inserting the disc.
Step 5- Here is a list of Raid drivers for your HDD. Now you need to select the correct and correct driver for your device, and click the enter key (enter).
Step 6- After that, you will get Windows XP Professional installation on the screen. You have the option to install new components of your PC, repair a previous installation, or choose - quit (to complete the process). Since we decided to perform the installation new and completely, just click enter (Enter) to continue.

Step 7- A window about acceptance will open for you licensed version and your consent. Press the "F8" button to accept the terms and proceed with the installation:

Step 8 —This action perform carefully! This is where the partition will be created, and this is where Windows will be installed. If you have a new unformatted disk that you received before this procedure, similar to the one shown below. In our case, the size of the disk is 10237MB. Here you can make a choice to install Windows on the disk without creating a partition, that is, the entire disk space will be used. If this step seems right to you, just go ahead and hit enter, Windows will automatically partition and format the drive as one large disk space.
However, for this demo, I will be creating two sections. The size of the first partition can be 6001MB (drive C :) and the second partition will be slightly smaller - 4228MB (drive E :). We can create two sections, having one that stores Windows applications and another that stores our data. So in the future, if something goes wrong with our Windows installations, such as a virus or spyware, we can reinstall Windows on the C: drive and our data on the E: drive won't be damaged. Please note that you have the opportunity to choose any size of the section, as it is convenient for you. Let's say if you have a 320GB hard drive that you can divide it into 2 160GB partitions.
Click "C" to create a section.

Step 8- Windows will display information about the total size hard disk and ask you how much you want to allocate for the section you are about to create. I will choose 6001MB. The screen shown below will appear. Notice this shows "C:" is partition 1 and then the size is 6001 MB. This means the section has been created. We still have 4236MB of unallocated space. Now select the unallocated space by clicking the arrow key. Press "C:" to create a new partition. You will see the shared space available for the new partition. Just choose, in our case 4236MB.

Step 9- Now you will see that both sections are listed. Partition 1 (Drive C :) 6001MB and Partition 2 (Drive E :) 4228MB. You will also have 8MB of unallocated space. Do not worry about it. Just leave it. Typically, Windows has some unallocated space. You might wonder what happened to the D: drive. Windows is automatically allocated to the D: drive, on the CD / DVD-ROM.
Select Partition 1 (Drive C :), and press Enter.

Step 10- Choose to format the partition using file NTFS systems file - for this procedure it is recommended to use file system... If the hard drive was formatted before starting work, then you can choose the fast NTFS formatting... We chose NTFS because it offers many security features, works with large size disk, and has a wide variety of safe formatting functions.

Now, Windows will start formatting the "C:" drive and copy the installer files, as shown in the two photos below:
Step 11- At the end of the installation, copying all the necessary files to the computer, there will be a warning about restarting your PC. Never remove the CD from XP. After turning on the PC, a label will be displayed, but this time DO NOT press any key when the message "Press any key to boot from CD" etc. appears. After a few seconds, the installation program will continue. The Windows XP Setup wizard walks through the installation process to collect information about your computer.
Step 12- Choose your region and language.

Step 13- Enter the desired name and the name of the organization.

Step 14... Enter your product key.
Step 15- Computer name and enter the Administrator password (it is possible without it, if only you are the user of this PC). Remember to write down the Administrator password.

Step 16- Enter the correct date, time and choose your time zone.

Step 17- To configure the network, select normal and click "next"

Step 18- Select a workgroup or domain name. If you are not a member of the domain, then leave the default settings and click "next". Windows will restart again and the display will now be configured

Step 19- As a result, Windows will start and display a welcome screen. Press the "Next" key to continue.

Step 20- Select "help protect my computer, turn on automatic update and click Next.

Step 21- Next, you need to choose how you will connect to the Internet. If you are connected to a router or local network, then select: “Yes, this computer will be connected to the Internet via local area network or home network". If you have a dial-up modem choose: "No, this computer will connect directly to the Internet." Then click the "Next" button.

Step 22- Done, now what you need for Windows activation? We choose "yes" if you want to activate Windows over the Internet. We choose "no", if you want, leave the activation at a later time.

Step 23- Add users who will be subscribed to this computer and click "continue".

Step 24-Your PC system will display a window similar to "Thank you", you should confirm the end of the installation. Click the "Finish" button.

Step 25... Now it follows, forcibly restarting the computer and entering, let's say, "into a clean OS system" again.

Step 26- You should now check in Device Manager and make sure all drivers have been loaded or if there are any conflicts. From the Start menu select Start -> Settings -> Control Panel. Click on the System icon, and then from the System Properties window, select the Hardware tab, then click on Device Manager.

You will see a yellow exclamation mark "!" opposite to any of the listed devices, this means that you have not found any drivers or not correctly loaded drivers. In our case, we have a Video Controller (VGA-compatible) with no drivers installed.
To install the driver manually, use the following procedure:
(a) From the device manager, double-click on the device containing the exclamation mark.
(b) This will open the device properties window.
(c) Click on the Driver tab.
(d) Click the "Update Driver" button.
You now get several solutions. The first solution provides automatic search desired driver. The second parameter allows you to specify the location of the driver. If you do not know the location of the driver choose automatic search, which can find the required driver from the manufacturer on the supplied CD-ROM or Floppy disk. Windows will install the necessary drivers and may ask you to restart your computer for the changes to take effect. Use this procedure to install drivers for all devices that contain an exclamation mark. Windows will be fully installed and ready to go when there are no more exclamation marks in Device Manager.