How to set up the built-in microphone in a laptop. How to set up a microphone on a laptop How to set up a microphone on a netbook
Almost all lenovo, asus, acer, hp, hp pavilion dv6 or toshiba laptops today have built-in microphones. It's convenient - you can take notes and talk.
But in order to take advantage of this convenience, you need to know not only where the microphone is in the laptop, but also how to configure and turn it on.
Everyone has a microphone in the same place. Setting up and enabling is also the same - it depends more on the installed operating system than on the laptop model.
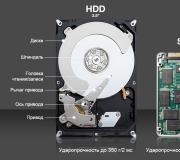
Below in the figure you can see where the microphone is located in the laptop. It is located at the very top of the screen in the center.
This is a very short tutorial. You will find detailed instructions with pictures on how to turn on and configure, increase the sensitivity,.
Where to set up a microphone on a laptop
Here I will describe briefly about setting up a microphone. If it does not work, there you will find detailed instructions with dirks - what to do in this case.
The setup itself comes down to very simple steps available to everyone.
Log into the control panel of your lenovo, asus, acer, hp, hp pavilion dv6 or toshiba laptop and click on the "sound" section.
Yes, I almost forgot - everything that will be written here applies to vista, windows 7, and windows 8, in XP a little differently.
Under Sound, select Record. Find the "properties" option there.
All settings are performed in the parameters "Levels", "Improvements", "Advanced"
Where does the microphone turn on on a laptop
To enable recording devices in a lenovo, asus, msi, acer, hp, hp pavilion dv6, dell or toshiba laptop, right-click on the "speaker" icon in the tray.
A menu will open. Click on the line "recording devices". Now we select the inscription "parameters" and go to "properties".
There you will see pictures of recording devices. Click on the one you need with the left mouse button and below "OK". After that, you will have it "by default"
Then click on the selected microphone with the right mouse. A menu will appear, and in it the line "enable" - click. That's all. Good luck.
Almost all modern laptop models are equipped with built-in microphones. Of course, no one forbids the user to connect an additional microphone or headset through a special connector if the built-in one is broken or has insufficient performance. But most laptop owners only use the built-in microphone, since it is more than enough for Skype, voice input, or voice commands. This article is about him.
How to enable the built-in microphone on a laptop
The built-in microphone on a laptop can be turned on or off with a special key on the keyboard or programmatically. Sometimes the user does not notice himself how he turns off the microphone (or a cat can do it by walking on the keyboard), and then it seems that the microphone or laptop is broken. Therefore, the first thing to do if the microphone is not working on a laptop is to check if it is muted.
Most often, accidental disconnection of the microphone occurs precisely due to the touching of the corresponding function key, which will also help turn the microphone back on. If pressing the key with the corresponding icon (the image of the microphone or the inscription mic) does not work, try again, this time holding down Fn. If that doesn't work, then skip to the tips below.
How to set up a microphone on a laptop with Windows 7 operating system:
- In the lower right corner of the screen on the taskbar, find an icon that looks like a speaker and right-click on it, and then left-click on the "Recorders" item in the context menu that appears.
- In the opened microphone settings window, select the desired device and right-click on it. Click on the "Enable" item in the context menu that appears.
How to set up a microphone on a laptop with Windows XP operating system:
- Turn on the laptop, wait for the operating system to load.
- Go to the menu item Start-> All Programs-> Accessories-> Entertainment-> Volume.
- In the window that opens, find the "Recorders" tab, then "Options" and "Properties". Select the desired device and click on it with the left mouse button, then check the box next to it. Then click on the desired microphone with the right mouse button and select the "Enable" item in the context menu that appears.
You can also try to turn on the microphone through the control panel. In Windows XP, the section is called Sound, Speech, and Audio Devices, and in Windows 7 and Vista, it is called Hardware and Sound. Through the control panel, you can not only enable or disable the microphone, but also adjust the level of its sensitivity. But the maximum fine tuning of the microphone is provided by special utilities (the most popular of them is Realtek Dispatcher).
If the microphone still doesn't work, the problem might be with outdated sound card drivers. In this case, you need to download the latest driver from the official website of your laptop manufacturer, install it (driver) and restart your computer.
7 291A built-in microphone and a webcam are now on every modern one. Because of this, after buying a laptop, many users who have not dealt with a microphone before ask how to set up a microphone on a laptop. If you are also interested in this issue, then we suggest that you familiarize yourself with our article.
How to access microphone settings on a laptop
In order to on a laptop, you must first open a window with its settings. To do this, right-click on the speaker icon on the taskbar and select the "Recording Devices" item in the window that opens.
In addition, the microphone settings on a laptop can be accessed through the "Taskbar". To do this, go to the "Hardware and Sound - Sound" section. After the "Sound" window appears on the screen, you will only have to go to the "Record" tab.
As a result of the above actions, the "Sound" window should appear in front of you, open on the "Recording" tab. This window allows you to change the basic settings for your microphone.

Below we describe which ones on a laptop can be changed using this window.
How to mute or unmute a microphone on a laptop
The first and simplest thing to do in the Sound window is to turn on or. In order to access this setting, you need to right-click on the icon of your microphone and select the appropriate item in the menu that appears.

How to choose a default microphone
Also here you can specify which microphone should be used by default. This setting will be useful if several microphones are connected to your computer at once.

How to enable audio output from the microphone to the speakers
In order to enable the sound output from the microphone to the speakers, as well as to access the rest on the laptop, you need to select the microphone and click on the "Properties" button.

This will open the "Microphone Properties" window. Here you need to go to the "Listen" tab and enable the "Listen from this device" function there.

How to increase the microphone volume on a laptop
To do this on a laptop, in the "Microphone Properties" window, go to the "Levels" tab. Two functions will be available here: "Microphone" and "Microphone Gain". By increasing the value of these functions, you can increase the volume of the microphone sound on your laptop.

How to turn on noise cancellation on the microphone
To enable noise reduction on the microphone, as well as other sound enhancements, in the microphone properties go to the "Enhancements" tab. It should be noted that these functions are not always present in this tab. Their availability depends on the one used on your laptop.

How to change the sample rate and bit depth settings
You can change the sample rate and bit depth settings for your microphone as needed. This can be done in the microphone properties window on the "Advanced" tab.


How to test a microphone on a laptop
If you have already adjusted all the microphone settings, you can make a recording to check the result. To do this, go to "Start", select "All Programs", then among the "Standard" find "Sound Recorder". Any recorded message will be saved to the folder you specified. Listen to it and make sure the sound quality meets your requirements. If this is still not the case, return to the settings menu and try changing them. You can also check the quality of communication via Skype.
Our step-by-step tips have shown you how to set up the built-in microphone in your laptop, but if you still have difficulties, it's best to contact the experts. They will help you get your laptop working properly.

The microphone is basically. In general, now 99% of laptops are produced with a built-in microphone, but there will be no unnecessary verification. To do this, inspect the laptop case and read the data sheet. The documents for your laptop will definitely indicate whether it has a built-in microphone or not. Be aware that if your laptop has a webcam, then there is a microphone for sure. The microphone can also be seen through Device Manager.
Check the presence and settings of the microphone through the Control Panel of your laptop. In the Control Panel, open the "Sound" section, the "Recording" tab - if the microphone is built into your computer, it will be displayed there. Click the Properties button. Check if it is enabled, device settings in the tabs "Levels", "Improvements", "Advanced".
If the microphone as a device is present in the Control Panel, but you still cannot hear it, it may be that it is configured for a very quiet sound transmission. In this case, it is necessary to increase the sensitivity of the device. Go to the Control Panel again and open the "Sound" section. Open the "Properties" menu item for the Microphone device. In the "Advanced" tab, check the box next to "Allow applications to use the device in exclusive mode" and "Give priority to applications in exclusive mode". Then set it to the highest bit and sample rate. Then try testing the microphone. If everything is in order, your voice is clearly audible, it means that you have configured the device correctly. If you still can't hear you, try changing the bit depth and frequency again. Please note that the problem may also be in the audio gain, which is adjusted in the "Enhancements" tab.
Poor sound or poor sound quality is often work-related microphone connected to or built into the computer. Microphone problems are not always related to a factory defect. Most often, it is necessary to change some software settings on the computer, and thereby increase sensitivity device.
Instructions
Start Windows Mixer. Its speaker icon is in the lower right corner. If there is no mixer icon, it may be displayed
Modern laptops have a built-in microphone. This is actually a very handy device! There is no need to make complex connection of a microphone to a laptop, as it is necessary to do on personal computers. For a PC, there are models of external microphones, it can be a headset or a simple microphone, respectively, it needs to be connected to a computer, configured, and then checked.
You can spend a lot of time on all of the above procedures, but since mobile computers have a built-in microphone, everything is much easier. Today you will learn how to set up a microphone on a laptop. Let's look at some simple methods.
Support
Before you start configuring the microphone, you will definitely need to find out if this component is present on your device. Of course, nowadays, almost all modern laptops are equipped with a microphone, but we recommend that you still make sure that you have a microphone on yours. In order to do this, you just need to take the documentation from your device and read it carefully.
If you do not have documents on hand, then you can find out about the presence of a microphone in another way. To do this, you just need to go to the "Device Manager" menu. You can also check if there is a microphone or not through the "Control Panel".
If you are already in this folder, you should find the "Sound" category, and in the new window that opens, select "Record". In the menu that opens, you can find information regarding whether you have a built-in microphone or not. If it is, then it will certainly be displayed in the menu.
If your laptop microphone does not work, then most likely the drivers are incorrectly installed on it. Or the device does not have them at all.
Choice
 So, if in the menu you find that you have not one device displayed, but several at once, then you should determine which device is a microphone. It is very easy to understand which device is a microphone! To do this, you just need to knock on the housing where the microphone output is located.
Where the device icon is installed, you will be able to notice green stripes. When you knock, you will see fluctuations on this icon. So we decided - it is this device that we will need! Let's go further.
Instructions
 Now let's move on to the most basic question - the question of how to set up a microphone on a laptop.
If your operating system is "Windows XP", then the setup should start with checking the drivers for the sound card. It also happens when the drivers are installed, but the microphone still does not want to work. In this case, you may need to reinstall the drivers, or you will need to look for the problem elsewhere.
You can download a driver for a microphone for a laptop on the official website of the manufacturer, and if you have a disk that came with your laptop, then we recommend using it.
If the drivers that were installed from the disk still do not allow the microphone to work, then most likely they will need to be updated. You will need to go to the "Control Panel" menu through the "Start" menu, and then find the "Sounds and Audio Devices" tab.
In the "Audio" tab, select the sound recording function, then install the device, which is the microphone. Now we go to the "Volume" mode and there we select the "Advanced" tab. Now open a new window by clicking the "Options" link, then select "Properties". After completing these procedures, you will notice the inscription "Microphone", where you will need to check the box, and then be sure to save the settings.
Parameters
When all of the above settings are in place, you should be able to see the volume slider. Now you need to configure it yourself. If you did everything correctly, then the question of how to set up the microphone on your laptop will be resolved. As you can see, there is nothing difficult in this, the main thing is to do everything in stages. There may be differences in the settings on different operating systems, but in reality they differ slightly.
Conclusion
 It is important to know that if you plan to use additional programs for working with a microphone (for example, it can be Skype), then you will also need to make additional settings already in the program itself.
Accordingly, the settings may be different in each program. In order to do everything right, the easiest way is to go to the "Instructions" or "Help" section and follow the prompts.
Now you know how to set up a microphone on a laptop. Even if you have a different operating system, you can make the settings according to the instructions recorded by us, or simply use specialized programs to work with the microphone.
Nowadays, a laptop has become an integral part of the life of a modern person, because in terms of power they are already comparable to stationary computers. Even things like a webcam and microphone are already built into it, which saves you from additional waste of money. But sometimes it is difficult to figure out how to set up the microphone on a laptop. Today we will walk you through the microphone setup step by step on the most popular systems.
If a laptop for you is a new acquisition that you have not previously worked with, then most likely it will have windows 8 installed on it. Using this system as an example, we will consider how to set up a microphone on a laptop. .
First, check if the driver for your microphone is installed by opening the "Control Panel", and in it "Device Manager". Next, open the "Sound, video and game controllers" tab. It should contain the line "Realtek High Definition Audio" or another, depending on which company you have a sound card. If it is, then everything is in order and you can continue. Otherwise, go to the official Realtek website and download the latest version of this driver.
If everything is in order with the drivers, then open the same "Control Panel" and then select "Hardware and Sound". In the open window, go to the "Recording" tab. Here you should see a microphone device, which is labeled "High Definition Audio device." Right-click on it and click on the lines "Use as default" and "Use communication device as default". If everything is done correctly, a green circle with a checkbox will appear on the microphone icon.

A scale will appear to the right of the icon and label, which will blink green with each sound. This means that the microphone setup on the laptop is complete!
How to test the microphone on a laptop?
Use the built-in Sound Recorder or any other audio recording software and try recording, for example, the sound of your voice. Then play back the recorded.
Is the microphone on the laptop quiet?
This means that the setting is not complete. Follow again to "Control Panel" and then to "Hardware and Sound". The "Recording" tab and right-click on the picture of your microphone, then select "Properties". This window will open:

Here you can see in the properties if the driver is working correctly. If everything is in order, then we continue. If not, then it is recommended to reinstall it.
Follow the "Levels" tab. There you can adjust the recording level of the microphone (the "Microphone" slider) and, if this is not enough for you, then even increase its level (the "Microphone gain" slider). In the "Advanced" tab, you can adjust the recording quality by choosing the bit depth and sampling rate.
Setting up a microphone on a laptop with windows 7 operating system should not cause any particular difficulties, because windows 7 and windows 8 are very similar in their interfaces. Perhaps the only difference is that on windows 7 there is an "Improvements" tab, in which you can enable the echo suppression mode and the automatic signal level control mode.

Windows 8 owners are encouraged to search for these settings directly in the program that accompanies the installed driver.
If, after all the ordeals, the sound still does not appear, then you should check the following things:
- Whether the sound level of the system or player is at zero or in the “Mute” state.
- Try using the troubleshooting wizard. The path to it is as follows: "Control Panel" - "Troubleshoot" - "Troubleshoot audio playback problems"
- And of course, try updating your driver again.
This question is very often asked by inexperienced users, although in fact you do not need to have special knowledge to give a comprehensive answer to this question.
How to find out if a microphone is built into a laptop
1. Modern laptops in 99% of cases have a built-in microphone, but in order to be sure of this, it is enough to examine the laptop case.
2. In addition, the specification of the laptop must contain such information. It is worth taking into account the presence of a built-in webcam in the laptop. If it takes place, then there is certainly a microphone in such a laptop, otherwise it would be impossible and simply not logical to conduct, for example, an online conference, without purchasing a separate microphone.
3. Data on the presence of a microphone in a laptop can also be viewed through the "Device Manager".
4. If any sound recording utility is installed on the laptop, then by opening it you can see the program settings, which usually indicate the microphone model and its sensitivity. If the settings are active, they can be changed, then there is a microphone.
5. Finally, the easiest and most commonplace way to find out if your laptop has a microphone is to look into the properties of the speakers.