Transfer Windows 7 to another disk. Transferring the system without losing data to another computer. Special Situation: Moving Windows from IDE or SATA to SSD Drive
Purchasing a new SSD or HDD doesn't have to have a consequence Windows installation from scratch. On new HDD, if the old one is still connected to the computer, Windows with all its settings and installed software can be transferred using special software. This process is called operating system migration. It provides for cloning the system partition (drive C and boot sector) to another hard drive. Such operations can be carried out Acronis program True Image, various assemblies of software from Paragon, including the Paragon Migrate OS to SSD utility specially designed for this purpose, as well as products from the developer AOMEI. But while products from Acronis and Paragon can only be used on a paid basis, software from AOMEI is available completely free of charge.
The ability to transfer Windows to another hard drive is contained in two AOMEI products - the program for Reserve copy AOMEI Backupper Professional and in the AOMEI Partition Assistant disk manager. You can use the free Windows migration feature in AOMEI Backupper Professional for only a month, until the fully functional trial version expires. But using the free Standard edition of the AOMEI Partition Assistant disk manager, transfer Windows from one hard disk on the other, you can permanently. But not only this moment makes AOMEI Partition Assistant a profitable solution for transferring Windows to another hard drive. This program is, in fact, a single tool for migrating the operating system, and for allocating space on a new hard drive for specific user needs. Today we'll take a look at how AOMEI Partition Assistant migrates Windows to another empty hard drive.
1. Specificity of the operation: must be read
Windows migration method described below does not preserve partition structure and data target hard disk (the one to which the operating system will be transferred). Therefore, this method is only suitable for cases when nothing should be saved on the target SSD or HDD. For example, if you purchase a new device with unallocated space. Or when connecting a used device, the data of which is of no value. AOMEI Partition Assistant can port Windows to separate system partition target hard disk while preserving the structure of the latter and data stored on other partitions. In this case, the migration method will differ from the one below. If the target hard disk contains important data, you cannot use the instructions below.
2. Download and run the program
AOMEI Partition Assistant can be downloaded from the official website of the creators. In the list of editions of the program, you can select the free Standard. Its capabilities will be enough to transfer Windows to another hard drive and to create partitions on it (if necessary).
After launching the program, in the center of the window, we will see a picture of all connected disks and their partitions - in a tabular version at the top and in a visual format at the bottom. If the target SSD or HDD is new, its space will be unallocated as shown in the screenshot.
In this case, we remember its serial number - Disk 1, Disk 2, etc. - and immediately proceed to paragraph 4 of the article.
3. Removing partitions on the target hard disk with existing partitioning
Before starting the Windows transfer operation, the target hard drives with the existing partitioning must be removed from the partitions by deleting them. The operation to delete partitions requires special care. If there are several connected hard drives with a similar structure of sections, their properties window will help you figure out where the target one to which you need to transfer Windows to. To find out which of the hard disks is displayed as Disk 1, as Disk 2, etc., click on it (on the block of the entire disk, as shown in the screenshot), call the context menu and select Properties.

In the properties window, in the first column, we will see the brand and model of the hard disk.

Make sure that is selected necessary tough disk, and in turn delete its partitions. On each of the sections, we call the context menu and select "Delete section".

For each of the sections, we confirm the deletion without changing the preset option "Quickly delete a section".

When the entire target hard disk is displayed as unallocated space, click the button at the top of the "Apply" program window.


Once again we confirm the decision to delete the sections.

At the end of the operation, click "OK".

4. Transfer (migration) Windows to another hard drive
Well, on the target SSD or HDD disk space is not allocated, now we can proceed directly to the process of transferring Windows to it, which is located on the original hard disk and in this moment works. In the AOMEI Partition Assistant window, click the "Master" menu and select "Transfer OS SSD or HDD".


Then we click on the target disk with unallocated space. Click "Next".

In the next window, the size of the future system partition on the target disk is configured. AOMEI Partition Assistant sets the C drive and Windows boot sector to the same size by default as the original hard drive. If the target disk is not a 60 GB SSD, but a medium with a lot of space, the slider of the system partition can be pulled back to 70-100 GB. This is the current optimal size for Windows 7, 8.1 and 10. The remaining space of the target disk will later be allocated to non-system partitions for data storage. Click "Next".

The work of the wizard is completed - we press "End".

Returning to the main window of the program, press the button "Apply" at the top.


Then we will see another dialog box with a warning that the operation will be carried out in pre-boot mode. We save the files open on the computer, close other active programs and click "Yes" in the AOMEI Partition Assistant window.

The computer will reboot, and on the screen we will observe the progress of the Windows transfer operation.

5. Checking the target hard drive
Upon completion of the operation, the system will boot from the original hard drive. You need to reboot the computer again in order to configure the BIOS to boot from the target hard disk and check the functionality of the transferred Windows.
For cases of transferring Windows to a single system SSD partition, the process is dead.
6. Creating non-system partitions on the target hard disk
AOMEI Partition Assistant moved to the target hard drive along with Windows. Having booted the computer from the target disk, we can use the program to create non-system partitions. We make a click on unallocated space after section C, call the context menu (or use the "Section" program menu) and select "Create Section".

In the window that appears, by dragging the slider on the visual block, select all the available space or only a part of it for the section being created. Click "Ok".

If the disk space is divided into several partitions, we do this operation the required number of times. Upon completion of the formation of partitions, we apply the planned operations.

We confirm their launch.

Click "Ok".

Disk partitioning is complete.
Have a great day!
Hi admin, bought recently new computer with a quad-core processor and a two-gig video card and now I want to transfer Windows 7 along with hard disk from the old computer to the new one. The only thing that bothers you is that the old and new computers are different motherboards and different processors, even in my Windows 7 there are two users, that is, two accounts - mine and my younger brother. And my brother and I have a lot of installed programs, I would like transfer Windows 7 to another computer along with existing accounts, installed programs and personal files.
I read your article and I'm thinking of using this method for Windows 7, since the sysprep utility is present in both Windows 7 and Windows 8. I think everything will work out, but I'm worried - will the Windows and the installed software be transferred, after all, the motherboards are different!
And another question - what if I need to transfer Windows 7 completely to another computer with a different hard drive. How to proceed in this case?
How to transfer Windows 7 to another computer
Hello, friends! This is very easy to do and does not depend on how many accounts you have in the system. For the migration, we will use the Windows 7 built-in sysprep utility, designed specifically to prepare a customized windows image together with installed programs for transfer to another computer (preferably with a similar architecture). For those who want to completely transfer the configured operating system to another computer, there is also information in this article.
- Note : If you are interested in the article, visit the special section where are collected from one hard drive to another.
- If you have a laptop, then perhaps articles will be useful to you.
For example, let's move Windows 7 from my old work computer to a new one with a quad-core processor. My old and new computers also have different motherboards and different processors. Will Windows be transferred? Let's hope most of the time this way works even if a completely different hardware is installed on the computer to which we want to transfer Windows 7.
My Windows 7 also has two accounts "Alex" (administrator) and "Andrey" (simple account) and they both should function successfully after transferring the system to another computer. Almost all installed programs start up and work. Note: before starting the Windows 7 migration process, I recommend that you play it safe and if something goes wrong, you can recover from this image.
And yet, if you have DAEMON Tools, Alcohol 120%, or UltraISO programs installed, I recommend uninstalling them, it would not be superfluous to remove the antivirus, because if you do not do this, the error “Windows could not complete the system setup. To resume the configuration, restart the computer »In some cases, it is worth restarting the computer again (sometimes several times) and the error will disappear.

So, run the command line as administrator and enter the slmgr / dlv command,

A window appears, in which we can see the remaining amount of Windows transfer to other computers.

System preparation program window.

We expose everything as on the screenshot and click OK.

1. Putting the system into OOBE mode - the operating system transfer mode is activated the next time the system is started.
2. Preparation for use - all data will be deleted from the system that should not be copied along with the image (security identifiers (SID), activation information, and so on), but the installed programs should be transferred without much difficulty.
Windows 7 prepares to be transferred to another computer for a few minutes, then the computer shuts down.

Note: then you can successfully deploy this distribution of sevens to other computers, the only thing you need to do after installation is to enter license key systems or Windows will only work for 30 days and will ask for activation (all honestly).
We dismantle our hard drive from the old computer and connect it to the new computer. We turn on the computer. Windows 7 operating system updates registry configuration settings,

Starts services,

Sometimes at this stage of the transfer Windows 7 may receive the error " Windows was unable to complete system setup. To resume setup, restart your computer»In some cases, it is worth rebooting the computer again (sometimes several times) and the error will disappear. Sometimes this error appears due to installed antivirus or DAEMON programs Tools, Alcohol 120%, UltraISO, I recommend removing them before transferring the system.
binding to new equipment is carried out, devices are installed,

system configuration settings are applied

the computer is being prepared for first use. Reboot.
Hello friends! All topics related to personal data, files and settings are always very relevant. Just as relevant are the ways to save, transfer and restore them. Therefore, today I want to write about how to transfer settings, accounts, program settings and files from one computer to another running the Windows operating system, in this article we will consider an example on Windows 7.
To transfer data, we will use a standard utility. In operating rooms Windows systems Vista and Windows 7 this utility is already built-in, and for Windows XP it can be downloaded from the Microsoft website http://www.microsoft.com/ru-ru/download/details.aspx?id=7349.
How can I transfer data to another computer?
Well, let's get started.
We launch the utility, for this we go to “Start”, "All programs", "Standard", "Service" and run.
 The utility will start, and on home page you can read what she can transfer. Click “Next” to continue.

Now we need to choose how we will transfer and receive data to a new computer. There are three ways:
- Using a data transfer cable. To be honest, I still did not understand which cable in question... It seems to be not about the network, because the next point is data transfer using the network. As far as I know, two computers cannot be connected via USB. Well, okay, let's skip this method and move on.
- Second way. it is the transfer of data using the network. If you have both computers connected to the network, then you can try this method.
- Well, as an example, we will use the third method. It seems to me the simplest and accessible to everyone. It consists in saving files and settings in one archive, with the ability to recover data from this archive on a new computer.
Therefore, we choose “External drive or USB device flash memory ".

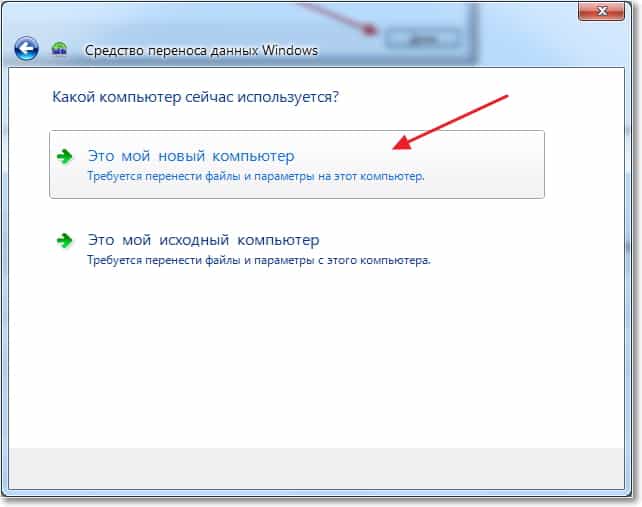
Then we need to select on which computer you ran the melon transfer wizard. In order to create a file of all settings and files, you need to select "This is my original computer"... We will choose the first option when we restore data on a new computer.

Now you need to wait while the program checks the portability.

After verification, we will most likely be able to transfer general and specific data account... You can cancel some items (by clicking on “Settings”) that you do not want to transfer, such as video or music, they take up a lot. Just uncheck unnecessary items and click "Next". See that the transfer file is not very large.
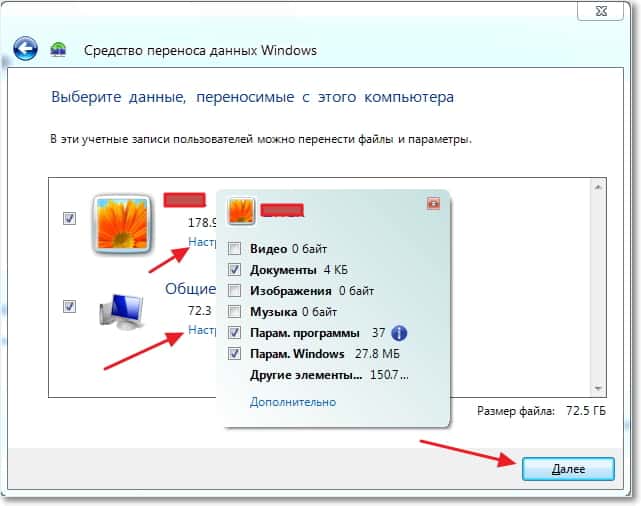
If you want to protect the data recovery file, then enter the password, if not, just click “Save”.

Now we just need to specify the location where we will save our file with a copy of the data. If it will be restored on another computer, then save it to a USB flash drive, or external hard disk. And if you just want, and then restore it on the same computer, you can save it to your hard drive.
Just do not save to the section where the operating system is installed, most likely it is local disk C. Because when you re-install Windows, this section will be formatted. Save it to local drive D, or E. In any case, this file can then be copied and moved wherever needed.

You need to wait until the file is saved. After saving the file, you can start recovering data on your new computer. Or after reinstalling the operating system.

Recovering data from a file
After the file has been saved and, if necessary, transferred, we need to restore data from it. There is nothing difficult here, we start again. Click "Next".

We choose the third option.

We choose.
Click "Yes".

Select the file that we saved. Click "Open".

We can customize the elements for transfer and click “Transfer”.

That's it, now our files and settings have been transferred to the new computer.
When and where to use data transfer?
Perhaps this should have been written at the beginning of the article. I also wanted to say a few words about when data transfer can come in handy. In the article I wrote that we are transferring data to a new computer. And this is probably the most common option, when buying a new computer in a few clicks you can transfer all the data, and this is very convenient.
But buying a new computer isn't the only reason for data transfer. This feature can be used, for example, when replacing hard disk, or when reinstalling the operating system. Good luck friends!
More on the site:
Windows 7: How do I transfer files and settings to a new computer? updated: January 12, 2015 by the author: admin
Consider a situation where your system has more than one hard drive. One of them already has the operating system installed, and on the second you have installed Windows 7. There was a need to remove the hard drive from the system, on which Windows 7 is not installed. But it turned out that without this disk your system does not want to boot.
This happened because one of the three conditions for a successful download was no longer met:
1. The disk from which the boot is performed must be active;
2. MBR must be compatible with bootmgr;
3. The active disk must contain the boot files for the operating system. For Windows 7, this is the bootmgr file and the Boot Configuration Data (BCD) store located in a hidden and system folder Boot.
Usage installation disk or disk Windows recovery 7.
With these disks, transferring the boot files is easy. Physically disconnect the "unnecessary" hard drive, boot from the disc with the CD-DVD drive installed in the BIOS as the first bootable device, enter the recovery environment. After scanning and searching for installed operating systems, execute "Startup Repair". The recovery program prepares the hard drive as needed and copies the necessary files to it. After a reboot, the boot capability will be restored. If you do not have an installation disc or a recovery disc, you can use the method described below.
Transferring Boot Files Using the bcdboot.exe Utility
Conventionally, the upcoming operation can be divided into three stages, corresponding to the three necessary conditions for a successful download.
1. Make the disk active. There are two ways to do desired section active.
First: go to the Disk Management snap-in (Win + R, in the Run line, type diskmgmt.msc and click OK) and see which letter is assigned to the first left partition of the disk that you plan to leave. It is this section that we will make bootable and active: click right click mouse over the selected section and select the "Make section active" context menu item. Please note that this section must have the attribute "main".
Second: Run Command Prompt as Administrator. All commands, which will be discussed below, will be executed sequentially without exiting the command line. DISKPART
list disk
sel disk X
list partition
sel part 1
active
exit
where X is the number of the disk that is supposed to be left in the list of disks (command list disk).
2. Overwrite the bootloader (MBR) (make it compatible with bootmgr):
To do this, you need the bootsect.exe utility, which, in the absence of an installation disk, can be taken here. Download and unpack it in advance, for example, to the root directory of the C: partition.
c: \ bootsect / nt60 All / force
Note: experience shows that if there are 2 or more HDDs in the configuration, the / force key is required.
3. We transfer the BCD and the bootmgr file to the new active partition:
bcdboot% Windir% / l ru-Ru / s С:
- switch / l - select the language parameters of the boot manager. If your system is not Russian, use other values of this key, for example, for English - en-Us, for German - de-DE, etc.
- switch / s - defines the volume letter assigned to the target system partition to which the boot environment files are copied. This is the section that we have made active. Since the command firmware uses the current system partition by default (before removing the hard disk, it is partition D :), using this key with the letter of the intended boot partition is mandatory!
Checking and editing BCD. Run the command: bcdedit / store C: \ boot \ bcd
Based on the results of the command, check the parameters:
1. in the "Windows Boot Manager" section, the device parameter must be equal to the letter of the new active partition, in our case - C :.
2.in the section " Booting Windows"the device and osdevice parameters must be equal to the letter of the partition where the Windows directories are currently located. In our case, this is also C :.
3.In case of discrepancy, make the necessary changes using the commands:
bcdedit / store C: \ boot \ bcd / set (bootmgr) device partition = C:
bcdedit / store C: \ boot \ bcd / set (current) device partition = C:
bcdedit / store С: \ boot \ bcd / set (current) osdevice partition = С:
Usually, you don't need to execute commands, but it doesn't hurt to check. Thus, transferring the download files to another drive is not such a difficult task.
Instead of a conclusion, or "Russian-language multiboot menu." Because the startup repair program that runs from the recovery environment uses the default settings, the boot manager language is set to English. In the presence of one bootable system, this is not noticeable, but in the presence of the multiboot menu, it is striking. If this does not suit you, do command line:
bcdboot% Windir% / l ru-Ru
You need to execute it after transferring the download files to the new section.