How to increase disk space d. Ways to expand memory on a disk with. Unlock free space
Editing partitions and volumes helps out with thoughtless disk partitioning at the beginning of the Windows installation. Defects made during the installation are easily corrected.
Why do I need to change hard disk partitions
Due to the large number of programs and games taking up almost all free space, Windows starts to slow down, and defragmentation of the C partition is performed with errors.
The main reason for changing hard disk partitions is the lack of space on the system C partition.
At this time, partition D is empty up to several hundred gigabytes, but moving some files to partition D forces many third-party applications to be reconfigured. In this case, it is easier to expand the C drive at the expense of D.
How to expand the C drive
Expanding drive C is possible using both Windows tools, and with the help of third-party programs.
Expanding the C drive directly in Windows 7
If you want to expand your drive with standard tools Windows, then do the following:
- Pressing the Win + R buttons, bring up the "Run" window. Enter the command "diskmgmt.msc" and click "OK". The "diskmgmt.msc" command will call the "Disk Management" utility
- Select partition D and in the context menu of the volume click on "Delete volume". Do not rush to edit hidden disks without a volume name, as deleting a partition will destroy all valuable files stored on it. The necessary information should be copied to another disk or removable medium in advance. You cannot remove the C drive on which the system itself is installed. Destroying drive D leaves unallocated space in its place.
 Select the volume and delete it
 - Select drive C and in the context menu give the command "Expand volume".
- Assign the number of megabytes that will fill up the C drive. The maximum value cannot be exceeded because the physical media itself is limited. Click Next.
 This amount will decrease the size of the previously obtained unallocated area.
 - The C drive will be enlarged. The size of the D drive will be reduced by the megabytes allocated to the C drive. Click on the free area of the drive and give the "Create a simple volume" command. When volume D is recreated, this partition will be automatically formatted (fast formatting using Windows tools).
 Click on the remaining unallocated area and click on "Create Simple Volume" in the context menu
There is now enough room in C for normal Windows work and your programs.
If you wish, you can use third party applications e.g. Acronis Disk Director or Partition Manager. But it should be remembered that in the hands of inexperienced users, alternative programs often become not a "magic wand", but a means of destroying user files, and only in a computer service center you will be able to recover lost data.
Video: Extend a Volume Using Windows 7 Tools
Expanding drive C when reinstalling Windows 7
When installing Windows, you will not pass by the stage of changing partitions on a disk. During the reinstallation process, the program will ask which partition to install the system into, and will offer to redistribute the hard disk space.
There are two types of Windows installations: update and full installation. The update is done over the existing system, saves everything installed programs but resets system parameters... Full installation - installation with formatting of the system partition, or installation on another partition of the hard disk. If you want to change partitions of the hard disk, then you need to choose the second type of installation.
If you really need a clean install of Windows, do the following:
- Insert installation DVD or a USB flash drive and restart your PC.
- Press the Del, F2, or Esc key during system startup to open the BIOS window (the choice of key depends on your computer manufacturer). In the window that opens, use the arrows to select "Boot".
 In the window that opens, use the arrows to select "Boot"
 - Next, use the arrows to open the "Boot Device Priority" tab and select the boot device from which you need to boot the system in the list. Close BIOS and save changes.
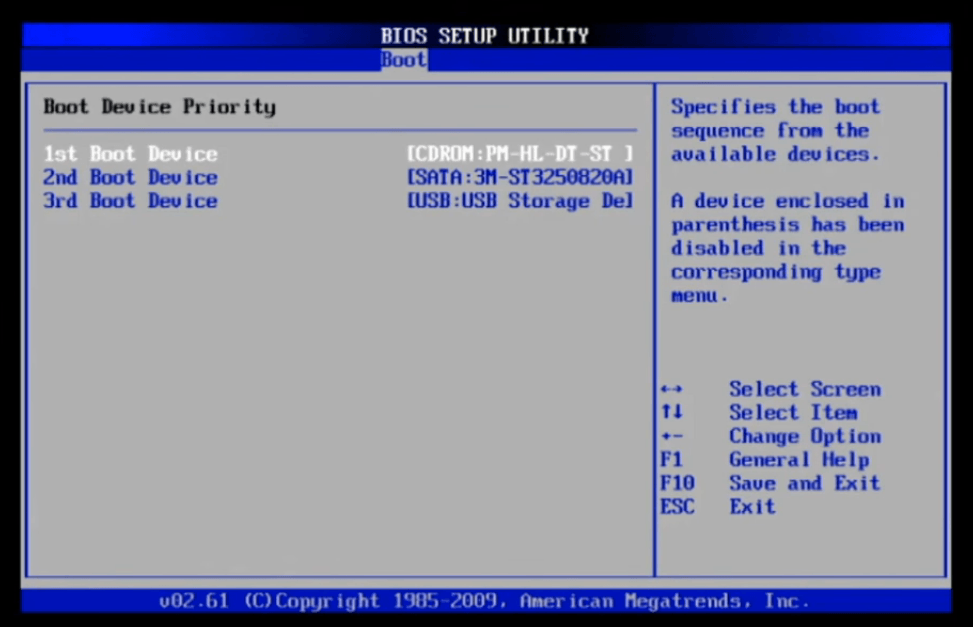 In the list, select the boot device from which you need to boot the system
 - Wait for the installer to load into RAM PC.
- Select type reinstall Windows.
 Choose a full Windows 7 installation
 - For example, one disk and one partition are taken. Select the drive and click "Drive Setup". All your files must be copied in advance to other drives.
 Select the drive and click "Drive Setup"
 - Additional links will appear - click the "Remove" link. A warning about data transfer will appear, click "OK" and delete the section. Do the same with adjacent sections (D, E, etc.), if any.
 Click "OK" if your personal files have been copied to other media
 - After deleting the existing partitions, you will have an unpartitioned (unformatted) disk zone, which is the full size of the hard disk. To create new sections, click the "Create" link.
 Windows 7 setup will help you create new logical drives
 - Specify the size of partition C, similarly create partition D. Go to partition C and format it. Fast formatting (clearing the disc's TOC) will be applied.
 The installer requires formatting partition C
After formatting, the reinstallation of Windows will continue. Section C changed successfully.
Video: Resize Partitions While Reinstalling Windows 7
Why can't I expand a volume in Windows 7
The situation when the "Expand volume" option is inactive is possible. For example, the expansion of the same C drive is taken.
 The situation when the "Expand volume" option is inactive is possible
 - a spanned volume was created as D, which includes, for example, disks D and E. Transfer the files from these partitions to other media. Delete this spanned volume;
- you forgot to delete all subsequent volumes, including drive D. Expanding the previous volume only works when you delete the next one.
How to delete a volume
Only an unallocated partition can be added to the disk, which appears after deleting a volume.
Removing a volume in Windows 7
To delete a volume:

You will have free space the size of this volume, which can now be attached to another partition.
Why can't I delete a partition or volume
In some cases, removal can be difficult.
The reasons are as follows:

How to remove the swap file
To make the volume deletion available, do the following to remove the Windows paging file:
- Go to the "Control Panel" through the "Start" menu.
 Through the "Start" menu go to "Control Panel"
 - Go to the "System" section.
 Go to the "System" section
 - Go to Advanced System Settings.
 Click on "Advanced system settings"
 - In the System Properties window, go to the Advanced tab and click on the Options button in the performance settings.
 Click this button
 - In the performance parameters window, select the "Advanced" section and click on "Change".
 Select the "Advanced" section and click on "Change"
 - In the virtual memory settings window, uncheck the auto-select paging file size option and check the box next to "No paging file". Click on the "Set" button.
 Uncheck the auto swap file size option and check the box next to "No swap file"
 - Click Yes when prompted to clear the paging file.
 Answer yes to the request to clear the paging file
 - Close all windows by clicking "OK" and restart your computer.
Return to Disk Management and try to delete the volume again. Check if connected this volume with the adjacent volume in the same section.
How to shrink a volume
You can also expand the disk by compressing it. The compression will provide free space that can be used to create a new partition or volume.
The specifics of volume compression in Windows 7 are as follows:
- compression works only for main and additional sections, as well as in file system NTFS. If the partition or volume is formatted in FAT32, transfer the data from it and reformat (or convert) it to NTFS. To do this, open the context menu of the disk and click "Format";
- if there are many bad sectors in the partition or volume, it will not be able to shrink;
- paging file, hibernation files, recovery point data present additional difficulties for compressing partitions and volumes. Compression will not go further than the second area of free space, counting from the beginning of the volume.
Shrinking a volume using Disk Management
If you want to shrink a volume using standard Windows tools, then:

Shrinking a volume using the command line
If the volume shrink option in Disk Management is no longer available, use the command Windows string... It can bypass the inactivity of some actions closed by the Windows graphical shell. The instruction is universal for Windows 7 / 8.x / 10.
- Find the "Command Prompt" application through the search in "Start" and run it with administrator rights. Windows often requires administrator privileges for tasks that go beyond using application programs.
 Run the "Command Prompt" application as an administrator This command displays a list of disks, partitions and volumes Command line reports the maximum available volume space for compression
 - Enter the "shrink desired = (number in megabytes)" that you want to compress. The "shrink" command is entered with parameters, and if they are missing, all available content will be compressed.
 The "desired" attribute is a variable corresponding to a value in megabytes
When the volume has been shrunk, the command line will display a message stating that the volume has shrunk by the specified megabytes successfully. Use the Disk Management application to make sure there is a free space in which to create a new volume.
Video: Shrinking a Volume Using the Command Line
Expand, shrink, delete, add new partitions and volumes using the standard Windows utilities- it's not difficult. The main thing is not to lose valuable data that you have collected and created for more than one year.
This article can be successfully applied if you have operating system Windows XP, Windows 7.
In this article, we will use the paid program Acronis Disk Director, but we also have another article that does the same thing in it. free program EASEUS Partition Master Home Edition, in the end you can choose what to work with.
So, here we will be using Acronis Disk Director. Resort to the help of this program, if necessary, split HDD into several partitions or you need to resize any partition. You can also use this program to find and restore a deleted partition. There are a lot of articles on our site describing how to work with this program, you can find them here. In our case, we partitioned the hard disk incorrectly when installing the operating system.
- Acronis Disk Director can be installed directly in Windows, but a lot of users work from the boot disk of the program, so there are fewer errors. Boot disk can be created in the Acronis Disk Director program itself.
When installing Windows XP, the disk (C :), on which we have the operating system, turned out to be only 20.8 GB in size, and the disk (D :) turned out to be large at 90.98 GB. Let's correct our mistake and increase the disk space (C :) at the expense of the disk (D :), we will make them almost equal, all our files will naturally remain intact, we will do this using a special program Acronis Disk Director 11, site http://www.acronis.ru, you can download a free demo version. This program is very serious, with skillful use it can help, and with inept use you will lose all your data, but I think you can do without it.
How to increase space on the C drive
- The first thing we will do is reduce the disk partition (D :) and we will have unallocated space.
- The second is to attach the unallocated space to the disk (C :)
- Friends, if someone in the process of working with Acronis Disk Director, after allocating free space at the expense of the disk (D :), this very space will disappear into nowhere and the disk (C :) does not increase in size, and the disk (D: ) becomes smaller, then firstly check the sections with which you are working for errors, or the two instructions at the end of the article will help you.
In general, for the future, it is better for you to perform the operation on partitioning the hard disk in the operating system installation program, immediately before installing Windows itself.
So here is our drive (C :), the full amount 20.8 GB
Disk management

We launch our program

Hover the mouse over the disk (D :) and click right click mouse once (select it), then resize the volume

We change the size of the selected volume (D :) downward so that the unallocated space is in front of the volume (D :), set it to 34 GB, then we add the freed up space to the disk (C :) and the two volumes will become approximately the same size.

We expose 34 GB and click OK

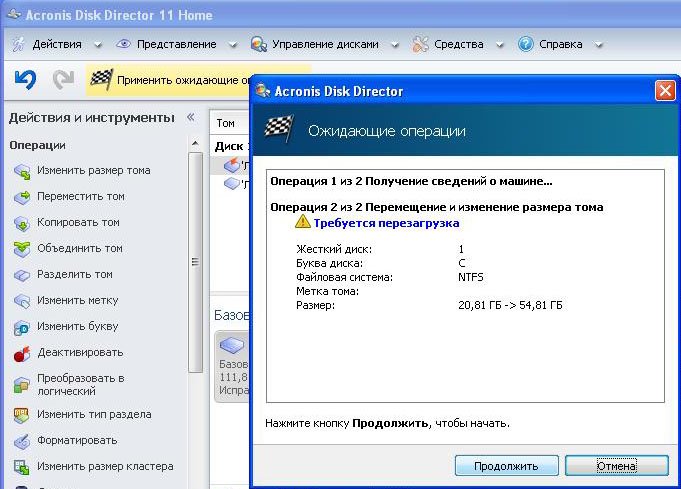
Our program works with you in the pending operation mode and all the changes we made will take effect when you click the Apply pending operations button


Continue

As we can see, there is a free space (Not used) of 34 GB. It's the turn to increase the size of the disk (C :), select it and click Resize the volume

We increase the size of the volume to 54.81 GB or to the maximum and put a tick in the box Add unallocated space to the volume

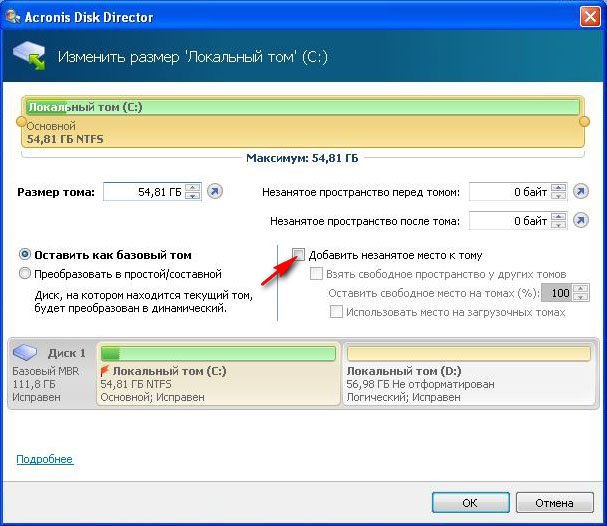
In the main window of the program, click Apply Pending Operations, a reboot request appears, continue and reboot
Before starting the operating system, we see the work of the program.

Windows boots, go to disk management and see an enlarged disk (C :)

Attention: Friends, if someone in the process of working with the Acronis Disk Director program, after allocating free space at the expense of the disk (D :), this very space will disappear into nowhere and the disk (C :) does not increase in size, and the disk ( D :) becomes smaller, then two small instructions will help you.
How does this happen. For example, if we take our case, then initially we had a disk (C :) with a size of only 20.8 GB and disk (D :) with a size of 90.98 GB.
In the Acronis Disk Director program, we pinch off 34 GB from the disk (D :), then attach this space to the disk (C :). After this operation, the disk (C :) should have a volume of 54 GB, and the disk (D :) 56 GB.
In fact, we get disk (C :) the same as it was 20.8 GB, and disk (D :) 56 GB. In other words, the disconnected space from the disk (D :) 34 GB goes nowhere.
In this case, once again you need to boot into the Acronis Disk Director and pinch off a small space from the disk (D :), about 1 GB and attach them to the disk (C :), then click the Apply pending operations button. After reboot, the missing space will be appended to disk (C :)
Another instruction from our reader:
ATTENTION: can anyone help my advice. I also wanted to increase the "C drive", and also suffered with the loss of GB. One thing helped: I tore off a small piece from the “D disk” (100 MB) once more and left them as “not busy”. After restarting the computer, I went to "My Computer" -> "Disk Management" and there I already added these 100 MB to the "C drive" (function: Expand the volume). Then he admired his missing GB.
Most users are accustomed to using two partitions on one hard drive, usually a drive called C and D. Many have become interested in the question of how to resize a disk in Windows 10 using the built-in system tools installing Windows or after) and third-party freeware.
Use the Disk Management utility
- Open the utility by right-clicking on the "Start" menu, select "Disk Management".
- In the search bar of the "Start" menu, type "Control Panel", open it.

Select "System and Security".
In the window that opens, in the "Administration" item, click on the "Create and format a hard disk" sub-item.

Shrink a volume, free up space to create a new partition in Windows 10
In order to create a new volume in the utility, you first need to take free space somewhere for this, it can be obtained by compressing the space on an existing volume. In Windows operating system, no more than 4 partitions can exist on one physical HDD, including system partitions (for example, the Recovery Partition). There are usually two local drives, C and D.

To create the third volume, you need to right-click on the partition with more free space, in our case it is disk D. An explorer window will appear, click on the "Shrink volume" item to free up free space, change it to unallocated space.

Section D for creating a new volume.
After that, the message “The volume is being polled to determine the available space for compression. Wait…". The process can last from a few seconds to several tens of minutes.
When the system finishes polling the volume, a window will appear, in the "Compressed volume size" column, you need to specify how much space must be separated from the donor disk to create free space for now. You will not be able to allocate more space for the new partition than specified. In the example in the screenshot, the limit is 78880 MB, a bit more than 77GB.

You can specify any other number less than the above, for example, by setting the value to 51200 MB, allocate exactly 50 gigabytes for the new volume. After selecting the "Compress" item, no result will be noticeable for some time. To check if the compression process is in progress, you need to hover the cursor over the utility window, a spinning blue circle should appear. When a black stripe with unallocated space appears at the bottom of the window, this will indicate that compression has occurred.

This freed up space for creating a new volume on the HDD in Windows 10. Now the unallocated space must be turned into a full-fledged hard disk partition.
- Create a hard disk partition from unallocated space
It is necessary to right-click on the area with the inscription "Not allocated", select the item "Create simple volume".

The "Simple Volume Wizard" will open, click "Next", in the next window you will need to specify the size of the new volume. You can leave the value unchanged or, if you want to create two sections or more, specify a value less. Click "Next".

After that, select the Latin letter, which will denote the disk, for example, F. Select the letter, click "Next".

You will then be able to format the new section as needed.

Continue by clicking "Finish".

After a few seconds or minutes, the partition is formatted and the new hard partition Windows disk 10 will be created. When choosing the amount of memory that you want to allocate for the formation of a new one, you must take into account that a small amount of compressed space will be taken by Windows for system needs.
So when choosing 50 GB of memory, we got a volume of 49.9 GB.

Partitioning when installing Windows 10
When installing Windows 10 on a computer from a flash drive or disk, you can divide disks into volumes. For those who reinstall the operating system, keep in mind that this will delete data from the system partition.
During Windows installation, after entering (or skipping entering) the activation key, select the "Custom installation" item, after which you will be able to select a partition for installation, tools for configuring partitions are available.

In our case, drive C is partition 4.
To make two partitions from one HDD, you need to use the "Delete" button to convert the partition into "Unallocated disk space" (point 4).
Then select an unoccupied space, click the "Create" button, set the size of the future "Disk C". After its creation, there will be free unallocated space, which will need to be redone in the same way into the second disk partition.

After creating the second partition, it is recommended to select it, click "Format" (otherwise it may not appear in Explorer after installing Windows 10 and it will have to be formatted and assigned a letter through "Disk Management"). Then select the volume that was created first, click the "Next" button to continue installing the operating system on the C drive.
Programs for partitioning disks into partitions
In addition to the built-in Windows tools, there are many programs for working with partitions on disks. Some of the best free software are Aomei partition Assistant Free and Minitool Partition Wizard Free.
First you need to download the Aomei Partition Assistant program from the official website, install it on your PC and run it. The application is in Russian, we select not the system drive, in our case it is "E".
Right-click on it, click "Resize Partition".


The selected amount of memory will appear, in our case - 15 GB.
Right-click on the system local drive C, select "Resize Partition" from the context menu.

Again, drag the slider to the right to the right size, or set the required space for expansion in the "Unallocated space after" field. Warnings will appear to make a Windows 10 system recovery image or a backup copy by third-party means, press "Ok". To save the changes, click "Apply" in the upper left corner.

A message will appear that there will be several reboots, during which drive C will merge with unallocated space, select "Go". A message will appear that the program will work in PreOs mode, click "Yes".
Windows 10 will restart.
On first boot, AOMEI Partition Assistant PreOS Mode will start.
The process of completing the task will begin.
It often happens that some hard disk is running out of space, while the other has plenty of it. Usually you run out of space on the C drive, because the least amount of memory is allocated for it initially when installing the OS. So what is the way out in this situation?
Let's consider two absolutely safe ways.
Method number 1
If you have an operating system on your PC Windows system 7 or 8, then everything is as easy as shelling pears for you. You can use the standard Disk Management utility, which is used to change and view hard disk partitions.
Method number 2
If you are still running XP or, even worse, Vista, then you need special programs. Personally, I advise - Acronis Disk Director or Partition Magic.
Now let's go through each method in more detail.
In the first case, the procedure is as follows:
Right-click (right mouse button) on the Computer icon on the desktop, go to the Control menu in the context menu. A window opens, we find and run the utility - Disk Management.


Next, let's assume the most common case when we will "expand" drive C at the expense of drive D. To do this, find drive D in the window, right-click and select - Shrink volume. A window will open where you will need to specify the size of memory that we want to transfer to the system disk. We drive it in the paragraph - Compressible space size (MB).


After that, a free area of memory will appear on our hard drive, which we can transfer to any other disk, in our case drive C. To do this, further click on the RMB on it and select - Expand volume. The Volume Expansion Wizard will open. In its window, select the expandable volume (disk) and the amount of space to add, click on and voila - after a short wait, we get disk C with an increased amount of memory. Well, after such manipulations with hard disk be sure to restart your computer.
.png)

The second method shouldn't scare you, in fact it is even easier. The only thing you need to do is download and install the Acronis Disk Director program on your computer. I recommend it, as it has great functionality, it allows you to do backups OS and hard drives and many other disk operations. But more on that later. In the meantime, we are interested in increasing the C drive at the expense of the D drive.
.jpg)
After installation, we launch the program, a rather understandable program interface opens, in which all the disks of our PC are displayed. To increase the C drive, click on it and select in "Operations" - Resize the volume. After that, in a new window that opens, put a checkmark in front of the items - Add unallocated space to the volume and Take free space from other disks. At the window with percentages, select how much space we want to borrow from other disks. After all the changes, click - OK. After that, as in the first case, the system will ask you to reboot for the changes to take effect.

In both cases, you will get the same result and no longer worry about running out of space on your drives.
I hope my article was useful for you and will help you when you need it!
Probably, every user has come across such a paradox that no matter how huge the volume of the C drive, the day comes when there is a catastrophic lack of space on it.
And then the question arises, is it possible painlessly for the system and for all stored data to increase the size of the C drive and how to do it correctly?
How to increase the size of the C drive is an actual problem for many users
This article is intended to answer this question. But first, let's take a look at why, after all, the space on the C drive starts to run out.
Why is there not enough space on the C drive?
The fact is that the Windows operating system has such an unpleasant feature as an increase in the size of its logical volume after a certain time.
At the same time, all files, both temporary and system ones, are susceptible to growth. And this happens with all versions of the OP - Windows 7, 8 and 10.
Of course, at first we try to free up space by deleting unnecessary files or cleaning the disk, but still there comes a time when there is nothing to delete, and the volume continues to be sorely lacking.
Disk C is full - an unpleasant but correctable situation
This situation has a very negative effect on our computer.
There is little disk space left - urgent action is needed
- it often starts to crash and glitch, bringing us a lot of inconveniences, such as slowing down the performance of the PC and slowing down its performance.
A full disk also affects the security of the system, the risk increases that at the most inopportune moment during intense work at the computer, the program we need will crash.
3 ways to expand your C drive
Method 1. Free up space on the C drive using the system utility
Windows 7, 8 or 10 operating systems have a standard Disk Management utility that allows you to view and modify partitions hard disk at our discretion.
Finding it is quite simple by following the instructions below:
- Right-click on the "Computer" icon and select "Control" in the dialog box that opens.
On the "Computer" icon, right-click and select "Management"
In the menu that appears, find the Disk Management utility and click on it with the mouse button.
Find and run the Disk Management utility
This program gives us the opportunity, at our discretion, to manage all devices designed to save data - logical drives, flash memory, CD-disk.
With this utility, we can easily transfer the amount of free space from local disk D to drive C, that is, to increase the size of the system drive on which we have the Windows 7 (8 or 10) operating system installed.
Before transferring free space, let's determine how much free space we have on drive D, how much we need for our local drive C and how much we can transfer.
Now, in order to transfer this vacated space to the system volume, right-click on it and select the "Expand volume" function in the menu that opens.
To transfer the freed space to our disk, select the item "Expand volume"
Now we press the "Compress" command, after the execution of which the system provides us with information about the freed up free space, which we redirect to the C drive.
We have information about the freed up space, which we can now transfer to the system drive C
In the field that opens, indicate the size in MB of the space that we intend to transfer. After this action, the system will poll the volume and provide you with the result in the following form:
Determine the size of the space required for compression and indicate this value in the appropriate field
In order to free up the volume of our disk, right-click on it and stop at the "Shrink volume" option.
Right-click on the D drive and select the "Shrink Volume" function
Thus, we run special program Volume Expansion Wizard. Click "Next" and in the proposed window determine the amount of space that we are going to add.
We launch the "Volume Expansion Wizard" and determine the size that we are going to add
After all the performed manipulations, we restart our computer.
Method 2. Increase the volume of the system disk using the Aomei Partition Assistant
One of the most versatile and well-proven programs for reliable and simple control partitions of our disks is the free program Aomei Partition Assistant.
Aomei Partition Assistant - universal program for working with hard disk partitions
This application allows the user to do the following:
Aomei Partition Assistant is a versatile and useful program for every user
- Create and delete hard disk partitions.
- Change the amount of free space.
- Perform formatting partitions hard disk.
- Combine, split and move or copy partitions, including to another hard drive or SSD.
Step 2. Installing Aomei Partition Assistant
After launch installation file, select the language (Russian) and follow the prompts of the installation wizard.
We install the Aomei Partition Assistant program, following the wizard's prompts
It should be noted that the program is distributed free of charge for private and commercial use.
Step 3. Launch Aomei Partition Assistant
After the installation is complete, a very convenient interface in Russian opens in front of us, where all the disks of our computer with all partitions are displayed.
Simple and user-friendly interface of Aomei Partition Assistant allows you to efficiently work with all disks on your computer
Step 4. Increase the size of the C drive at the expense of the D drive
Let's take a closer look at how you can increase the space on volume C with volume D without losing data.
So, we perform actions according to the instructions:
Right-click on the D drive and select the "Resize Partition" function;
Right-click on partition D and click the "Resize Partition" option
In the opened console, we can easily change the volume of the disk with just the mouse, hovering over the checkpoints, as shown in the photo;
Partition size can be easily resized using breakpoints
Click "OK" and open the system volume C in the same way and increase its volume due to free space;
By analogy with D, we work with disk C, changing its volume at our discretion
Upon completion of all manipulations with disks in the top panel of the main menu, click the "Apply" option;
After all the actions taken, click on the "Apply" function in the upper toolbar
- Next, you may need to perform, as a rule, two reboots, after which we get the desired result - an increased size of the system C-disk by reducing disk D without losing any data.
Method 3. Change the size of the disk with MiniTool Partition Wizard Free
Partition Wizard is a user-friendly and easy-to-use application
The program, like the previous application, is shareware and does not require any additional knowledge except skills regular user PC.
However, it has one small drawback - the lack of a Russian-language interface. Which, however, is offset by its simplicity and affordability. In addition, work in MiniTool Partition Wizard Free
is very similar to working with the Aomei Partition Assistant discussed above.
After installing Partition Wizard, we see the same simple interface that makes using easy programs even without Russian-language settings.
Simple interface makes it easy to work in the program even with the missing Russian interface
Changing the size of disks also occurs by analogy with the above program. In the same way, using checkpoints, we can easily resize the volume, at the expense of the available free space.
The regulation of the added space on the disks is the same in a simple way
After we complete all the operations to increase the volume of the system drive C at the expense of volume D, the result will be immediately available to us in Explorer.
I hope these simple methods will help you quickly and easily solve the problem of increasing the size of one disk at the expense of another without losing data.
Related Videos