Download a program for batch processing of photos. Batch processing of photos is the best way. Preparing images for online publication
When choosing optimal program to work with images from our selection, we advise you to determine the level of your needs and the main purpose of the potentially used software.
- Movavi Photo Editor doesn't sit you down for learning how to work with the editor, but gives you access to all the features you need. Now, in order to remove an unnecessary element from the photo, change the background, correct colors, apply an effect or redo the makeup, hair color of the character in the picture, you do not have to turn to the "insiders" for help. The simple and intuitive Movavi photo editor does everything in two clicks. Try it. it best program photo processing designed for semi-professional tasks. In fact, it is a convenient home photography studio.
- The photo master does not differ in the same advanced tools as Photoshop CC, Paintshop Pro and other famous counterparts, but it works faster and has all the necessary functions for high-quality photo processing at home. The program is designed for beginners and advanced users, contains detailed instructions for all the nuances of editing.
- Home Photo Studio is a symbiosis of Photo Master and FS Lightroom. It supports layers, knows how to save projects, works with Photoshop files, contains built-in tools for editing, cropping, correcting, printing wizard and creating collages. The program will be a good choice for photographers who are not ready to pay for a professional editor, but who want to learn how to work with high quality images.
- The GIMP will become a good free tool for image processing, but the utility does not contain the most accessible interface in terms of simplicity, so if you are a beginner, we recommend staying on the identical and more understandable Paint.NET or PixBuilder Studio, or be patient and learn how to process images in Gimpe ...
- Picasa will appeal to fans of the implementation of content for its further publication in social networks... If you are interested in a photo processing application that can bring amateur animation to life, try Photoscape.
- Krita will allow you to embody your creative ideas, but for its comfortable operation you will need at least minimal knowledge of similar software. Free version The image editor is especially popular among artists and illustrators along with other well-known Painttool Sai product and the commercial Corel Painter.
- ACDSee will provide you with a professional set of tools, the developer distributes these products for a fee with the opportunity to get acquainted with trial version... If you are solely interested in correcting red eye, applying filters, effects and other primitive retouching methods, it is better to download a simpler photo processing program. CorelDRAW is an equally advanced tool for advanced users. Both photo processing programs are demanding on computer resources, but at the same time they will endow you with extensive functionality with which free counterparts cannot compete.
- Lightroom will appeal to fans of creating albums from original images and viewing rich slides. Works both within the PC and online to speed up the uploading of your projects to various web resources.
- Adobe photoshop- the most popular software in its category, there are probably no professional photographers in the world who would not use Photoshop, here you can not only quickly improve the landscapes themselves, but also implement a full-fledged photo change: eliminate face defects, background errors and much more.
Unfortunately, within the framework of one review it is impossible to consider all the specialized software, so we also recommend reading ours. There you will find descriptions of popular tools such as Hornil Stylepix, Zoner Photo Studio, Photoinstrument 7.4, Lightbox Free Image Editor... Profile tools for processing presentations and photographs Adobe illustrator, Photo editor Photoshine 4.9.4, Photo Show Pro 7.0 are presented on the site as separate materials.
We often have to work with a lot of photographs. It is very difficult and time consuming to process 300-500 photos at a time. Thanks to a little Photoshop tutorial on batch photo processing, you will learn how to do several actions on images at a time, which will significantly reduce the time for work.
Let's consider a lesson using an example of such a concept as preview... It is extremely important for any photographer. Perhaps you will now say that only by enlarging the image you can realize its quality and mastery of shooting, but as practice shows, even the most nice photos are rarely placed in their original size. Most likely, they will remain within the framework of the preview. Then it is extremely important that, despite the small size, the user feels the quality of the photo.
The key to processing small photos is sharpness, especially if you have greatly reduced the original image size. In addition to resizing, sharpening is required when creating a preview.
If you have to process several hundred photos (batch processing), then the most appropriate option would be to seek help. In this case, you only need to record the course of actions once, and that's it, then the program will do everything for you.
Our action can be applied to photos of any size and subject. The main actions that we need from the action are to resize the photo, sharpen it and then save it in the desired format. To do this, we first need to study the command , it is in the tab File - Automation.
As opposed to just the command "Resize", which resizes the image, regardless of whether the photo was originally horizontal or vertical, recognizes the appearance of the photo and accordingly brings it to the desired form.
In order to visualize what the work of the team consists of, I will give an example. Imagine that through "Resize" we set the parameters to 400px, as a result, all horizontal photos will be processed correctly, but vertical ones will become much larger, since they should not have a width of 400px, but a length.
Through we simply put the two necessary numbers and the program itself recognizes which number relates to the length and which - to the width.

Now let's move on to the instructions for batch processing a photo.
Step 1
To begin with, it follows. We will carry out a series of operations on it, which we will record into an action.
Step 2
Let's start recording the action. To do this, open Palette Operations, create or select a folder in which it will be stored, click the small button at the bottom of the palette Create a new operation, give it a name. You can find out more detailed information About, . The recording has begun!
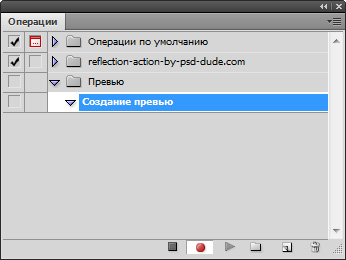
Attention! Everything the following actions already recorded in the action.
Step 3
It is necessary to convert the photo to sRGB format (only this standard is displayed correctly by all browsers, on any devices). To record an action, you must click Edit - Edit Profile... If all sources are already saved in the required format, then this step can be excluded.
Step 4
V parameter Change dimension set the value to 700px. Of course, you can put any number, but as practice shows, this is the ideal size for a preview.
Step 5
Now the main thing is the sharpness. For optimum sharpening, it is best to use a filter. So, let's go to the section Filters - Sharpness - Smart Sharpness... Set the optimal parameters.
Step 6
The last step is to save the image. The next step is to indicate the quality of the photo. For Internet sites, the optimal parameter is 9-10.
Step 7
Finally, close the photo if you don't want to end up with 300 open tabs.
Step 8
Click Stop. Everything! Our universal action is ready.
There is one thing that makes processing photos for the Internet even easier and more convenient. It . Thanks to this, you can create a file that will run the entire action.
How to create
It is created from an already recorded action.
Step 1
Go to File - Automation - Create Droplet

Step 2
Parameters should be configured:
- Select the folder where the photos are stored;
- Select an already recorded action;
- Select the folder where you want to save the received photos.

After clicking on the OK button, a droplet will appear in the folder you specified in the form of a blue arrow... You just need to transfer your photos to this arrow, and all the preset settings will be applied to them immediately.
Save your time and use batch photo processing!
If you spot an error in the text, select it and press Ctrl + Enter. Thanks!
In the age of digital cameras, there is nothing easier than taking tons of photos. In the blink of an eye, you can find yourself with a mountain of pictures that now need to be taken apart, edited, etc. It doesn't matter what you decide to do with, but before that, you probably have to do some extra work with them. Some of the most common image edits are resizing, renaming, format conversions, color corrections, etc. You might be intimidated by manually editing so many photos. Don't waste your time, just download one of the free tools below and start batch editing!
XnConvert (Windows, Mac, Linux)
The powerful tool XnConvert is not only a cross-platform product, but also cross-functional. What do I mean by this? While most of these tools only allow you to resize an image, or just batch rename files, XnConvert manages to do it all at the same time. However, for all its power, XnConvert remains a very easy-to-use application.
Drag your image to the Input tab and add actions located in the Actions tab. It can be anything from resizing an image, rotating it, watermarking it, to adding watermarks, filters, borders, and playing with a color palette. XnConvert does it all. In the "Output" tab, you can create new names for files (XnConver also does batch renaming), select a folder to save the processed images, set the file format, and much more. Download from office. site: www.xnconvert.com
PhotoMagician (Windows)

Although PhotoMagician is not as powerful as XnConvert, it does offer several unique features to its users. The main function of PhotoMagician is batch resizing, but you can also use it to add some basic effects and to files in some popular formats. You just need to select the start and destination folders and then apply one of the available resizing profiles or create your own.
PhotoMagician includes resizing profiles for many popular devices such as iPhone, iPod Nano, Sony PSP and a few others. In the Conversion Settings tab, you can add simple effects such as sepia or grayscale, change the angle of the image, and more. A nice feature of the program is the ability to select images by image size, file size and file modification date.
IrfanView (Windows)
IrfanView is an excellent image viewer and editor that I have been using for many years, including a very stylish batch editing tool for some time now. The batch editor from IrfanView can help you resize, rename images, convert and adjust multiple files at once. There is, however, one drawback. All of these features are not easy to find. Luckily, you have this article to turn to for help.
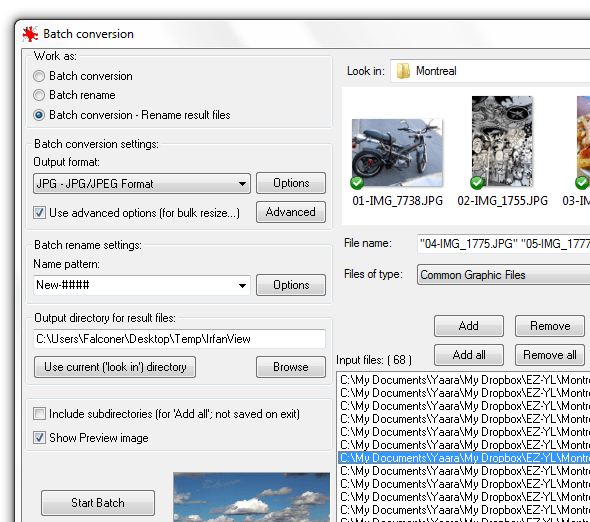
After installing and launching IrfanView, go to "File -> Batch Conversion / Rename ...". This will open an editor where you can start working right away. Look at your images at the top of the window and drag them to the bottom. You can also choose between batch conversion and batch rename, or you can apply both. Click on the "Advanced" button to access additional options. In general, the batch IrfanView tools are quite powerful, so you can use them to fine tune the color of your images. Of. website: www.irfanview.com
FastStone Photo Resizer (Windows)
I use FastStone Capture as my main one, now that FastStone Photo Resizer came out I am thinking of installing it on my work computer. Unlike Capture, Photo Resizer is completely free and, despite its name, can do a lot more than just resize a photo. Photo Resizer includes two main tabs: Batch Convert and Batch Rename. Unfortunately, you won't be able to force FastStone to do these two actions at the same time (at least I couldn't get it to do it), which makes communication with the program a bit awkward.
In the "Batch Convert" tab you can easily adjust the format of your final files, and by clicking on the "Advanced Options" button you will be taken to a menu with additional features... Here you can resize, rotate the image, adjust the color, add text and watermarks, and do just about anything else you can think of.
After selecting all the options, you can save the settings to a file in order to be able to use them again, without manual setting... If you want to rename the file, then you will have to reload your edited photos into the "Batch Rename" tab and already in it to carry out the process of changing names. website: www.faststone.org
Picasa (Windows, Mac)

If you are using Picasa as your photo viewer and downloader, then there is nothing easier than making some file edits, especially if you are already in it. There are several possibilities for batch editing, but not all of them come from one place.
To batch resize, quality and batch add a watermark, select the photos and select "Export" at the bottom. This will open a dialog box in which you can perform all the necessary operations. For some batch filters, like rotation or renaming, you need to click on "Photo -> Batch Edit". Anything you check here will be applied to all selected photos. Of.site: picasa.google.com
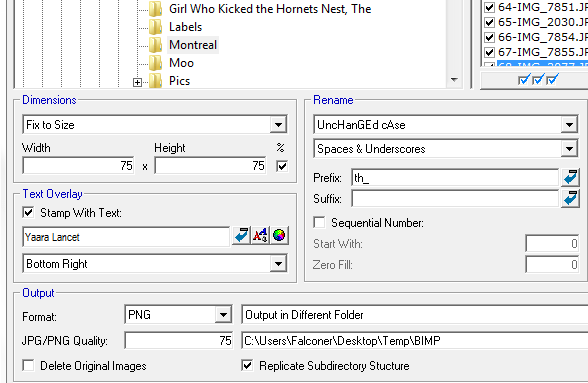
BIMP (Windows)
SunlitGreen BatchBlitz (Windows)

This is another program in a series of hidden installers, but unfortunately (or fortunately?) Hides a rather powerful batch processing tool inside it that you should definitely check out if you are. Windows user... When installing BatchBlitz, be very, very vigilant, as the installer will try to "push" the additional Babylon program and confuse you with the Registry Cleaner. Just dismiss all these extra "goodies" and get a clean image editor.
BatchBlitz is very comfortable to use: start work by opening a new Blitz session, via "File -> New", find the necessary image at the top and add it to the main window. Then switch to the Actions tab to make changes such as resizing, renaming, converting to another format, auto-contrast, rotating and many more. After adding actions, you can double-click on each one for additional customization.
Often, faced with the same type of work, we would like to save our time and do everything in one fell swoop. Batch processing is an indispensable assistant in this matter.
Graphic files undergo many transformations: from elementary ones performed even by novice users (resizing, formatting, etc.) to more complex ones, performed by professional designers, programmers (adding filters, applying effects). Simple transformations can be done in standard programs for viewing images, since many of them have the necessary functions built in. More complex processing is done in converters - programs for processing graphic images.
Below, in ascending order, methods of batch processing are described from simple to more complex, professional. The research results are summarized in comparative table 1. Test results in Diagram 1.
Image program Tuner
The most simple, not complicated by settings and filters, program for basic image processing. The list of its capabilities is limited to changing shades, sizes, image orientation, adding a watermark. The program works in the “one window” mode: files to be processed are loaded into the left half. The right one contains the conversion parameters.
The advantages of this program:
ease of use;
supports popular formats such as JPEG, BMP, PNG, GIF, TIFF, RAW, NEF and others;
there is a preview function. Fires when the image is clicked.
Minuses:
excessive simplicity of filters. Filters are so simple that I have no settings. Located in the "Resize" section of the menu;
a small number of formats for saving ready-made sketches: only 5;
flaws in the design of the program: some of the settings are in English, the rest is translated into Russian.
Thus, this program is intended for basic basic image processing.
The main function of this program is to view images.
Pros:
availability. The program is free to download;
functionality. Performs viewing and conversion functions. How the converter works through the "Batch Conversion / Rename ..." menu. Supports three mode options: batch rename, conversion and mixed mode;
compactness (small size);
an impressive number of formats (about 20);
test mode available for batch renaming of files.
Minuses:
not all parameters are available for complete list formats;
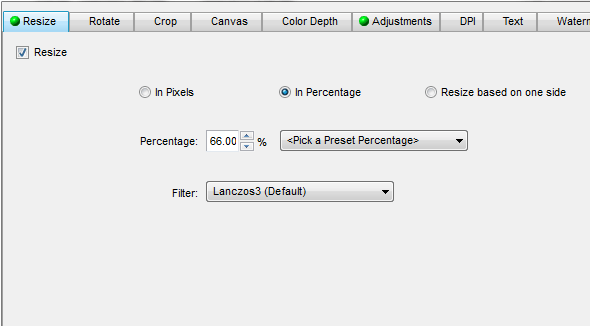
some transformations occur only when you activate Use advanced options ... ", by clicking the" Advanced "button. Otherwise, only the standard transformations for the viewer are available: resizing, cropping, horizontal / vertical reflection, watermark.
preview is assumed only for the original image. If, for example, we can specify the dimensions by pixel, then changing the color parameters, brightness, balance is a problem, since they are changed by the method of entering numbers. And we will be able to see the results of the transformations only after the end of the conversions and exit from "Advanced".
Thus, if you are satisfied with basic transformations that do not require a preview, this program will meet your requirements. But you cannot add it to the list of the most convenient converters.
AVS Image Converter
AVS Image Converter is a converter program. It is one of the AVS4You suite of programs designed to work with images. Feature of this program are auxiliary utilities Software Navigator and Update Manager. By the way, this explains the large size of the program: 27 MB.
Pros:
ease of use. A very simple interface, with simplified functions or presets, which makes it easy to work with the program even inexperienced users;
number of formats supported: 8 for writing, more than 20 for reading;
Internet connection: you can process photos imported from Flickr or Facebook accounts, and the program itself provides presets for photos intended for publication on the Internet;
separate tab "Watermark". It is used to overlay text or images on a photo.
Minuses:
few conversion settings. Generally, the settings aimed at color prevail: brightness, contrast, color temperature. There is a blur / sharpness effect, adding text. The entire list of effects can be found in the "Correction" tab.
FastStone Photo Resizer
In terms of functionality, this program resembles IrfanView, but, unlike the latter, it provides the user with a more convenient and extended choice of parameters.
Pros:
image control. By specifying the “Output Format” and the “Output Folder”, you can save time on performing these functions for each image separately;
function "Search and Replace". With its help, the name of the files is corrected without completely changing the name.
Minuses:
basic set of transformations. The list of available transformations: adjusting the size, texture, perspective, adding a water image, a selection of frames;
lack of preview mode (window);
irrational use of the interface area. Most of the workspace is an area for file selection.
XnConvert program
The XnConvert program is one of the components of the well-known XnView image viewer. Created on the same base, the programs perform almost identical actions, but still have a number of differences, which will be discussed below.
XnConvert is a converter program for converting images only and does not include a viewer function. On the one hand, this is an advantage of the program, since it strictly performs its functions. On the other hand, you need to use another viewer to work.
The basic principles of the program are as simple as possible. Images to be processed are added by drag and drop or using buttons. Further, conversion options are selected from the list. The lists are at the top and are displayed as thumbnails, which presents some inconvenience to users. The fact is that this kind of sorting does not allow viewing information about the source files, as it could be when sorting in the form of a table. Therefore, sorting is more conditional than functional.
Now in more detail about the conversion functions. The list of transformations is located on the main tab "Actions" and is divided into 4 groups:
image: work aimed at transforming a file, or related to file properties;
correction: processing of color gamut and levels;
filters: blur the image, adjust the sharpness, change the focus;
miscellaneous: other functions.
Output tab. In this tab, you work with files that have passed the conversion: you specify the parameters for saving (name, save path, format). There are additional options for saving, they apply to formats such as GIF, PNG, JPG, etc.
Load script button. Used to export images for use on the Internet. Packing or sending via FTP or e-mail, uploading images processed to a Picasa- or Flickr account - these are the functions above the specified button.
And in conclusion, it should be noted that the program supports more than 500 formats for reading. True, some of them are more specific and require additional resources. In this case, either GhostScript or a CAD plugin must be installed.
A simplified version of XnConver. The ease of operation lies in the fact that this program provides only two tabs. The first is for format and save options. The second contains a list of transformations. To select and apply a transformation, you need to add the half of the window on the right to the list. There is a function "Saving a script". The settings window is located in the "Tools - Batch processing ..." menu.
Photoconverter program
The program was created in several editions: home (minimal), standard, professional. Professional edition allows you to use the functions of Adobe Photoshop, supports more than 400 graphic formats, functions from command line... The standard version is simple and convenient step by step settings, supports only the most popular image formats (JPEG, TIFF, GIF, PNG, BMP).
The program interface is divided into two parts, so the first step of the transformation is to add an image to the right side of the window. The second step is the transformation itself, which takes place through the "add action" button. In the minimum version, in addition to the standard functions, there is a blur / sharpness effect, red-eye removal. The standard version allows adding a watermark. And the third and final step is preservation. At this stage, the format for saving is selected, in addition there is the option "Rename file by mask". Completion and saving is by pressing the "Start" button.
I would like to note in this program a more logical arrangement of transformation functions than in those discussed above. But, nevertheless, there are certain shortcomings: for example, the functions of correcting levels and cropping are related to editing, and in the program they are located in the "Automatic" settings group. However, over time, with frequent use of the program, this does not cause any difficulties.
One of the disadvantages of the program is the help in English, but you can see the answers to your questions on the website.
This program is one of the most popular among converters. Almost all the necessary tools for batch image conversion are built into this program. On this moment the current version is - CS6, in the meantime we are considering the version CS5. File processing is done using actions, Batch operation, or Image Processor script.
The first way to process images
To process graphic images, you need to create a Set. For this it is better to take a test sample. In the future, this set will be applied to all selected files. The set is created through the Actions palette, by recording the required actions. At this stage, only Photoshop tools are available. In the future, the list can be adjusted by adding or removing certain actions. Through the menu "File - Automate - Batch ..." go to the "Play" settings group, select the desired action, specify the source and folder for saving the processed files. This action leads to massive use of the kit.
Second method of image processing
The second way of processing is more acceptable, since it does not require creating an action. The method is based on the use of the Image Processor script. Changing the format or size of the image is done through the menu "File - Scripts - Image Processor ...". The rest of the settings can be done in the first way.
Processed images are saved in JPEG, PSD and TIFF formats.
Adobe Lightroom is based on bulk conversion of exported images or through the Library module. To work with images, the following settings are used, marked in the "File - Export ..." menu:
Export To - selection of image export. As options: HDD, e-mail, or burning a CD or DVD. Also, the Library module allows you to export images to the Internet: Facebook, Flickr, Adobe Revel and SmugMug;
Export Location - folder for saving images;
File naming - selection of file names by mask. The program has a large list of variables. Variables can also be taken from the image metadata;
File Settings - here you can select the format for saving images. You can leave the outgoing format or choose one of the following: JPEG, PSD, TIFF, DNG
Image Sizing - specifies the size and resolution of the saved image;
Output Sharpening - determination of the sharpness of the image;
Metadata - request to save file metadata;
Watermarking - an option to overlay a watermark.
If you are not satisfied with the standard presets provided in the left sidebar ("Preset"), you can add your own.
I needed a batch image processing utility. Before that, I did image processing only in Adobe program Photoshop, but putting Photoshop on that laptop would have been too much, so I installed XnConvert on it. I believe it is the best free program for batch processing of photos and images.
XnConvert is available for all three families of operating systems: Windows, macOS, Linux. It is noteworthy that among Windows operating systems, not only Windows 10, but also previous ones are supported. OS Windows 8.1, Windows 7, Windows Vista and Windows XP.
The main features of the program:
- Change of size
- Cropping
- Overlay watermark
- Overlay text
- Rotate images
- Removing EXIF and other metadata
- and much more...
Let's take a look at the main use case for XnConvert. For example, we have a folder with photos that need to be resized, added a watermark and shrunk a little. XnConvert lets you do all of this. You just select your folder with images, set the necessary settings and choose where you will save the files. I'll go into more detail about these features below.
XnConvert appearance.
The program interface is divided into tabs. Choose input images, choose actions, choose the folder where to save the data and choose the image quality in the settings.
In the program, you can make a chain of actions:

And here is a list of possible actions:

And this is without filters! The possibilities of the program are really endless for batch image processing.
In the end, if you need a simple utility for batch processing images, then feel free to choose XnConvert, you can't go wrong.