3 hard drives on one computer. How to connect a second hard drive to a computer: difficulties and recommendations. Connecting a hard drive inside the case to SAS connectors
Sometimes it seems that HDD even the largest volume will be filled within a short period of time. Perhaps you don't want to delete information from the old drive, or you need new disk to store certain data on it. However, keep in mind that the interior space of a computer case is not limitless. Below are methods to free up space and use an additional hard drive.
Steps
Connecting an external hard drive
- If you just need to connect and use an external hard drive, buy a disk without additional power.
- If you regularly back up your data, find a disk with special software that allows you to make backups.
- Pay attention to the speed of information transfer via the USB interface. The latest USB specification (USB 3.0) provides increased data transfer speeds, but your computer must have an appropriate USB port (remember that USB ports and cables are backwards compatible).
-
Connect an external hard drive. In most cases, external hard drives are connected to the computer via a USB cable, and some using a SATA cable. connected external drive will be automatically recognized by the system and you can start using it.
Make sure the system recognizes the external hard drive. To do this, open Windows Explorer(or the "Computer" window) and make sure that the external hard drive is in the list of all connected storage media. Now you can use your external hard drive.
Using a network drive
-
Consider whether you should use a network drive. Such a disk is necessary for storing and exchanging information with other users connected to the same network. Moreover, use a network drive if you want to get remote access to data from any computer.
Plug in the drive. The network drive is connected to the network, and you can access it at any time, as long as you are also connected to the network.
- If a network drive needs additional food, plug the adapter into an electrical outlet.
- Connect the drive to the network. To do this, use a router or modem and an Ethernet cable or USB cable.
-
Label the network drive with a letter. So when you connect to the network, you can easily access the network drive (just like any other hard drive). The following procedure is for Windows users 10 and may vary slightly in other versions of this system.
- Go to This PC > Map Network Drive.
- Select a drive letter and click Browse.
- Select a network drive from the list and click OK.
-
Open a network drive. To do this, open Windows Explorer and find the network drive in the list of all connected storage media.
Replacing the optical drive
- Internal hard drive and optical drive connected to motherboard via IDE cable or SATA cable. Some hard drives are sold with the necessary cable, while others are not, so in this case you need to buy a cable separately.
- A bay is a limited space inside a computer case where an optical drive, floppy drive, or hard drive is inserted. For installation of a hard drive in a larger bay, special adapters or brackets are used.
Buy an internal hard drive. If you have no external hard drive, nor free space inside the computer case, remove the optical drive from the computer. Installing a standard 3.5" internal hard drive is a good and inexpensive way to increase your computer storage.
ADVICE OF THE SPECIALIST
Gonzalo Martinez is the President of CleverTech, a tech repair company he founded over 5 years ago. CleverTech LLC specializes in repairs Apple devices, such as iPhone, iPad, Macbook and iMac. As a leader in environmental responsibility, the company recycles aluminium, displays and other parts down to motherboard micro-components for refurbishment. On average, 1-1.5 kg of e-waste is saved here compared to the average repair shop.
Apple Repair Specialist and President of CleverTech
Choose a hard drive that will keep your data safe. Gonzalo Martinez, an Apple repair technician, says: “When you delete information from a conventional hard drive, the areas occupied by it are overwritten with zeros. There is complex software that allows you to extract deleted files . SSD drives provide more data safety, since it is very, very difficult to remove previously deleted information from an SSD. ”
Buy the appropriate adapters. In most cases, the optical drive will fit into a 5.25" drive bay, which is large for a 3.5" hard drive. Therefore, read the documentation for your optical drive to find out its size.
-
-
Disconnect the power cable from the computer. Before working on computer components, be sure to de-energize them.
Open the computer case. Use a screwdriver to remove the side panel of the case (some cases open without a screwdriver). The type of screwdriver depends on the case model and manufacturer.
Disconnect the cables connected to the optical drive. In the vast majority of cases, two cables are connected to the optical drive: a power cable and a data cable.
- The power cable has a white plug and black, yellow and red wires.
- The flat ("ribbon") data cable is equipped with a wide plug.
-
Loosen the screws or release the latches that secure the optical drive. Once done, remove the drive from the case.
Install bracket or adapter (if needed). Fix the bracket or adapter with screws.
Insert the internal hard drive into the vacant bay. Insert the hard drive into the bay and secure it with screws.
Connect the hard drive to the motherboard. To do this, connect the power cable and data cable to the hard drive.
Connect the power cable to the computer. You must turn on your computer to set it up to use the new hard drive.
Enter BIOS. BIOS (Basic Input / Output System - basic input / output system) is software, which is required by the processor to determine installed components and hardware, such as an optional hard drive. The method to enter and make changes to the BIOS depends on the manufacturer and model of the motherboard. Read the documentation for your motherboard to find out how to enter the BIOS and open the "Hardware" section.
- Turn on the computer and immediately hold down the corresponding key.
- After entering the BIOS, find the section (or tab) "Hardware" (Hardware), "Setup" (Settings) or similar. Navigation within the BIOS is done using the keyboard.
- The list should show the installed hard drive. If it is not listed, turn off the computer and check that the appropriate cables are securely connected.
- Find and activate the "Auto-detect" option.
- Save your changes and exit the BIOS. For this you need to press certain key. The computer will automatically restart.
-
Format the hard drive. Before using a hard drive, you must format it with a file system that is compatible with your operating system. If you plan to install on a hard Windows disk, format it to NTFS system, and for simple data storage, the xFAT or FAT32 system is suitable. The following procedure is for Windows 10 users, but is likely to apply to other versions of that system as well.
- Press Win+R to open the Run window.
- Enter diskmgmt.msc and click OK. The Disk Management utility will launch.
- In the list, click right click click on the new hard drive and select "Format" from the menu.
- Choose the one you want file system and click OK. The disk formatting process will take some time (depending on the size of the disk). After the formatting process is completed, you can use the hard disk.
Choose the right one external hard disk. These discs come in different sizes and volumes. Make sure that your computer has a free slot where you can connect an external hard drive.
- An IDE cable has two or three plugs. One end of the cable connects to the motherboard and the other end to the device (hard drive or optical drive). A maximum of two devices can be connected to one IDE cable. If your motherboard does not have a free IDE connector, install an additional board with an IDE connector. If your motherboard supports the Serial ATA (SATA) interface, please use HDDs with this interface (data transfer speed will increase significantly). Many motherboard models support up to four hard drives SATA (in the case of an IDE interface, you can only connect two drives), which will allow you to create a RAID array.
- Any internal hard drive can be inserted into a special case and used as an external hard drive.
- Keep in mind that other users connect to the network drive, so take steps to protect your data.
- Instead of a 3.5" hard drive, you can use a 2.5" hard drive, which is usually found in laptops. In this case, you will have to buy the appropriate adapters or brackets.
- If you want to install an internal hard drive but cannot lose the hardware installed inside the computer case, consider purchasing a larger case.
Warnings
- Take care of safety! Before opening the computer case, disconnect it from the power source. Also, before handling computer components, touch an unpainted metal surface to eliminate static electricity.
What will you need
- Additional hard drive.
- Screwdriver. In order to open the computer case and remove the hardware, you will most likely need a screwdriver. The type of screwdriver depends on the case model and manufacturer.
- Appropriate adapters. To install a 3.5" hard drive in a 5.25" bay (instead of optical drive) you will need the appropriate adapter or bracket. When using a 2.5" hard drive, an appropriate carrier or adapter is required. . Gonzalo Martinez is the President of CleverTech, a tech repair company he founded over 5 years ago. CleverTech LLC specializes in repairing Apple devices such as iPhone, iPad, Macbook and iMac. As a leader in environmental responsibility, the company recycles aluminium, displays and other parts down to motherboard micro-components for refurbishment. On average, 1-1.5 kg of e-waste is saved here compared to the average repair shop.
In other languages:
This page has been viewed 4722 times.
Was this article helpful?
When you run out of hard drive space, you can either remove or add more space. While an external USB hard drive is easy to plug in and as an option for extra storage, it's not really suitable - they take up space on the drive, perhaps an additional power connector, you need to use a valuable USB port, and they tend to be slower than internal drives. Today let's look at a more complex option for adding a second internal drive.
It's time to get familiar with the basics of your computer. Today we'll only be focusing on the hard drive, but the guide will give you a great overview of all the random connectors and ports you'll see on the motherboard after you open the computer case.
Step 1: Determine if you can add another internal drive or not
Unfortunately, not all computers are built equal. If you have a laptop, or an all-in-one car, where internal systems hidden in the monitor - then your only option is to go to a USB drive and you don't have to open it. If you have a system unit, then read on, as there is a chance that you will have enough space to install a second drive. If you have a full tower size, then you can easily add a second drive, or 2, or 3! But, if you are not sure, refer to the table below.
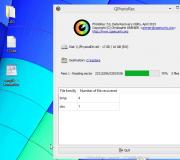
Step 2: Backup
While we do not anticipate any problems, it is good practice to create backup important data before making any changes to the equipment. Here we have looked at some options for Reserve copy.
The best backup software for Windows.
The best backup programs for Windows.
Your data is fragile - and it only takes one small accident to lose all data. The more copies you make, the better. Here we present the best free programs backup for Windows.
Step 3: Open the Case
Before continuing, turn off the power system block and all peripherals.

In most cases, the system unit may have covers on each side that need to be removed with just two screws. You need to remove the side cover that does not have the motherboard, so look at back panel systems, find USB ports/ mouse and remove the cover, so look at the back of the system, find the USB/mouse ports and remove the opposite side.
Step 4: Get Rid of Static Electricity
When touching the inside of a computer, technicians use a grounded wrist strap to reduce the risk of damage to any sensitive component from static electricity that remains in the human body. For our purposes, touching the heatsink will suffice.
Step 5: Find your hard drive and its slots
The internals of all computers are very similar. A hard drive is a fairly large piece of metal like this:
You have to find it, it is usually in some kind of metal box. Check now to see if you have a box to fit another hard drive in. The chassis tower usually has room for 3 or 4 drives, but a small desktop system may only have room for one drive, in which case you're out of luck and will either have to consider upgrading the case or using an external USB drive.
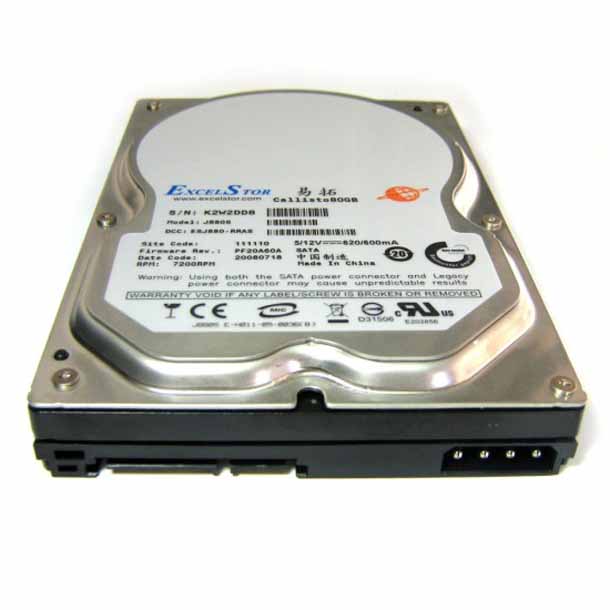
Step 6: Determine if you have a SATA or IDE drive
Take a look at the following image and compare it with your drive. If you have a disk type like the one at the top, a wide ribbon cable, then this is a very old type of connection called IDE. Ideally, your new drive will be SATA interface. If it turns out that you have an IDE disk, then you are completely out of luck, but this is already beyond the scope of this article. IDE drives are getting harder and harder to buy, which is a sign that your PC has really gotten old.

Check ALL connected devices. There are two possible types of power cables, and you will of course need to find a spare in your system that you can use. It might be hidden somewhere, so keep an eye on other power cables carefully and try to find a spare.

Some hard drives can accept any kind of cable, but the SATA type is easier to connect, so I use those if available. If you have a spare power cable, but it's not SATA, then you can still install a second drive, but you need to make sure it can accept the Molex type of power cable, or you can buy a Molex to SATA adapter.

Next, plug in the SATA data cable on the motherboard, and see where it's plugged in. Different motherboards have different SATA port numbers, and older machines may even only have one. Obviously if you can only find one SATA port, then only one drive can be connected SATA drive. If you can see some spare connectors, then congratulations - you can now go out and buy a second drive!
Step 7: Buying a Disc
There is very little difference between hard drive manufacturers. On the technical side, you should look for "3.5" SATA hard drive", and make sure you pick up another "SATA cable" while you're in the store, the salesperson should be able to help you with that if you can't find the right one. hard drive" and make sure you pick up another "SATA cable" while you're at the store and the salesperson should be able to help you with that if you can't find one.
Step 8: Installation
Putting the hard drive into the box is the hardest part, as it can sometimes get blocked by the graphics card or other cables. You'll need to identify the cables before you actually go any further, noting the side of the cable facing up (SATA data cable and power cables all have a notch on one end, which means it's nearly impossible to insert it incorrectly).
With the drive in place, use the screws that came with the drive to secure it - you'll need to align the holes on the drive with the holes in the box or tray. Next, find the spare power cables and SATA cable and connect them.
In my next article, I'll be covering software and configuration when adding a second drive - so stay tuned. As always, feel free to ask any questions in the comments and I will try to answer them quickly.
In the age of information in which we live, the area for storing this very information is almost a critical component. In this regard, many are faced with the need to get more free space on their laptop or computer. There are questions like “Do I need an additional hard drive? How to install it? We will try to answer these and other questions in this article.
How to install an additional hard drive on a computer?
PC or laptop
When installing a brand new hard drive, the first (and main) question will be the type of device whose memory is to be expanded. If you have a PC, the procedure will be a little faster and easier, but do not despair if you are the owner of a laptop: for laptops, things are not as bad as it might seem at first glance.
PC
If you have a full size PC and don't know how to install an additional hard drive on your computer, the following guide will help you:
- Determine the type of power your power supply supports. They come in 2 types: SATA (looks like a narrow flat cord, usually red, with an l-shaped connector) or MOLEX (has a massive 4-pin connector). Most likely you have SATA, since MOLEX is technically and morally obsolete. In any case, there are a great many adapters, and if necessary, you can use them.
- Define connection type with motherboard your computer. It can also be a SATA connector (similar to power, but has a different width) or IDE (a very wide and thin cable). The latter is also obsolete, but still found.
- Decide on the type of memory and amount you need. It can be HDD or SSD. The key difference lies in the speed of work, volume and price. So, HDDs are cheaper and much more capacious, while SSDs are an order of magnitude faster. Top Firms for HDD - Seagate and western digital, among the SSD - Samsung and Intel.
- Install a fresh purchase in a special connector on your computer, fasten it with screws that are usually included in the kit, and connect the necessary connectors. Of course, all manipulations must be performed with the power supply disconnected from the network.
After performing these manipulations, simply boot the computer as usual, format the additional hard drive (via My Computer) and use it like a regular hard drive.
Notebook
In case you want to know how to install an additional hard drive not on a PC, but on a laptop, you have to do the following:
- Choose and buy the storage device that suits you according to step 3 of the previous section. Please note that hard drive mobile computers has a smaller form factor.
- Buy a drive-to-hard drive adapter, they are sold at any computer store. Typically, these adapters have a standard size.
- Unscrew the screw securing the drive, carefully remove it from the laptop case. Then insert a brand new HDD (or SSD) into the adapter, aligning the power and interface connectors, insert the adapter and secure with a fixing screw.
- Turn on your PC, format the secondary hard drive and use it as intended
If the new hard drive does not appear
In the case when the new device could not be installed, that is, Windows simply “does not see” it, you must first of all check whether the device itself is included in BIOS settings. Also, in the BIOS, the memory configuration settings may be incorrectly set (should be AHCI). Correct your settings and try again. It is also possible that the root of the problem is poor cable connections. Check all joints, including adapters. In the presence of dirt and traces of corrosion, wipe the contacts with an eraser and connect again. If after the additional hard drive does not work, then most likely you are out of luck and you bought a marriage. Feel free to bring your purchase back to the store or to service center they will help you there.
How to take care of your memory
As with any thing, memory needs care. To avoid an early breakdown of a new device, it is recommended to regularly clean up temporary files and carry out no less regular defragmentation. Utilities for these actions, including free ones, are easy to find on the Internet. By giving your drive 10-30 minutes a month, you can extend its "life" for months and years.
Hello! Please tell me simple user computer to deal with hard drives and the possibility of their offline work ...
The point is the following. It became possible to install a second hard drive on your PC, so that the first one was exclusively under OS + necessary programs+ frequently used files and (documents, technical diagrams etc.), and the second for the home archive (videos, photos, movies, rarely used files.
I successfully installed the second hard drive myself (the OS sees and maintains it well) ... But there is one problem here. This hard drive should be used from time to time, but it turns out that every time the computer is turned on and off, the OS still starts it - and this, after all, affects the resource!
How to make sure that this, let's call it an "archival" hard drive, does not start up unnecessarily? Is it possible?
Nicholas | April 29, 2015, 08:40
" YUM wrote: as a matter of discussion: why not go mechanically? Well, for example, extend the power cord. Take dad / mom out and out of use, just open the pads. The cable, however, will stick out all the same in the "mom", but , I think, beyond the show: "unknown device", OSka will not go ... "
In fact, it was this option that I considered first, and here's why. Now I have a system unit (wide side) close behind the monitor and the back (free) side (for certain reasons) without a cover (i.e. there is free access to the hardware). The cables of both HDDs are easily accessible. In general, everything is predisposed to removing / inserting connectors. But realizing that everything would quickly become unusable, so I asked myself not a mechanical question, but software inclusion and turn off the HDD. Well, it turned out that this, unfortunately, is impossible.
So, YUM, I'll have to follow the path already discussed...
YUM | April 19, 2015, 03:32 pm
in the order of discussion: why not go the mechanical way? Well, for example, lengthen the power cord. Take out dad / mom outside and as unnecessary, just open the pads. The train, however, will stick out all the same in the "mother", but, I think, further than the show: "unknown device", Oska will not go. I remember sticking fans into free blocks on the PSU. For outdoor use. One to blow - on me, the second - in the body. For, it happened, both of us and the computer overheated ... :-)
Nicholas | April 8, 2015, 13:58
Nick Nick, thanks for the reply. From the answers, I realized that the second hard drive integrated into the PC will still be polled by the OS for any of its actions. And therefore, in order to eliminate "unproductive" inclusions and disconnections, it is necessary to exclude it from the direction of one OS. That is, it is either a PC with two motherboards (and different OS), or a second PC, or an external hard drive, or a NAS ...
Nick Nick | April 7, 2015, 14:47
I did it this way, in the system unit there is a 500 gb disk divided into two partitions on one partition, the system on the other, downloaded movies, etc. In a beautiful plastic case called an external HDD box, there is a second (standing right on the table) hard drive also for 500. Moreover, it has an autonomous power supply switch on the case. There are photos and archives on it, and it is connected with a switch when needed, and when not needed, it is turned off by a switch on the case. It is connected with USB computer(comes with a box included) The system sees the disk as a flash large sizes. I took this box and watch photos and videos DVD or wherever there is USB.
Nicholas | April 7, 2015, 08:19
Nick, maybe you are right about something. But then again, I do not need a backup disk (did I name it correctly?), which will be stored in a cabinet.
There were 2 hard drives available (500 GB and 2 TB). On the first one, I placed the OS with accompanying programs (which are not yet installed all the necessary ones). By the way, as Dima Svinkin mentioned, the system disk was divided into two logical ones - for the OS itself and for different files needed in everyday work. And the second HDD (2 TB) is gradually filled with "house stuff" (photos, videos, films, music, rarely used documents, drawings, etc.).
As a result, after turning on the PC, after a while (as you mentioned, Nick) the "dvuhterrabyte" "falls asleep", I don't even know when this happens. On the one hand, this is good - the hard drive is not used, and on the other hand, the problem I describe arises.
Nick, I can’t buy an external drive yet (especially now they are very expensive, and there are already 2 TB available). It's just that I have the opportunity to get a small system unit - I'll probably have to "dance" from this option.
By the way, Nick, I'm certainly not an IT specialist, but all the same, everywhere it is said that the hard drive should be treated with care, including for him it's better to "spin" all day than to start and stop.
So, in summary, we can say the following:
1) separate management on one computer, with one OS, two physical hard drives (without good system knowledge and access to BIOS) is almost impossible.
2) to solve the problem I am describing, it is proposed to either physically turn off the second HDD (which is unrealistic), or use an external HDD, or you can use the second system unit of a small form factor.
Is everything right?
Nick | April 6, 2015, 22:47
For Nikolai: "professor" on one of the IT sites - advised you correctly. It is best to have 2 disks in the system. But they are used for something completely different. For example, only the system is on one disk. And if the system crashes or needs to be restored from backup image six months ago, then your current documents will not be affected in any way, because they are on a different drive. You won't lose anything. Either you need to check for errors or defragment the system disk - the operation will be performed much faster in time on a small system drive(where only the system) than on a huge shared disk, where in addition to the system there is also a bunch of your documents, pictures, videos, etc. In short, 2 disks are used for data spacing - and this is necessary for the convenience of system maintenance.
I don't know what you are afraid of switching disks on and off. There's nothing wrong modern drives they are designed for this, they can even turn off and fall asleep if they are not accessed for a long time.
Well, if you want to turn off the drive yourself, then buy an external drive. For example, I use an external USB-3 drive. It works quickly to turn it off - you just need to remove the connector with a cord from the computer's socket (it is inserted into the USB flash drive connector).
Nicholas | April 6, 2015, 20:54
Thanks to everyone who answered my question. A separate "curtsey" for Alek55sandr5 - it seems that you immediately "caught" the essence of the issue.
Now it becomes clear that if two (3.4) hard drives are connected to one OS (which the system "sees" as separate physical drives), then every time you turn it on, turn it off or reboot, the system will always start them all (which, of course, reduces their resource, because for a hard drive one of the most difficult modes is start-up, when the spindle spins "pancakes" Right?)
It is strange that at one time, some "professor" on one of the IT sites, "advised" to have two separate hard drives in his PC (and not in some kind of ride array, namely two separate physical ones - one for OS and related programs, and another for home videos, photos, books, document archives and other relatively rarely used files). So I "bought" this "call".
That is, for me it will be right decision: a separate small-sized system unit, from which to make something like a NAS and connect it as needed? This is the only way I can save the second hard drive from unnecessary inclusions. Right?
Dmitry | April 6, 2015, 10:59 am
Put there a swap file and a folder for temporary files. The disc will give back.
Svinkin Dima | April 5, 2015, 04:43 PM
Strongly disagree with you! home archive must be created and stored on an external hard drive. What size is your system (physical disk)? For OS + various programs, 100-150 GB is usually enough, and for many users the system (logical) one is even several times smaller than these sizes. If you had one physical disk in your computer with a nominal size of 320 GB or more, then it is unreasonable to define this entire volume under OS + programs. It needs to be divided into two partitions (two logical drives) C:\ and D:\. Disk C is the system drive, and on drive D: \ you should place folders for temporary files of all programs, folders for downloading from the Internet, folders for saving files created in different programs and a temporary archive of the most popular files. Any extra physical device in a computer can turn into a headache at any time - this is a practice.
Alek55sandr5 | April 5, 2015, 15:50
As far as I know, unfortunately it is impossible to completely turn off the hard drive if it is connected to a PC. Each time you start the operating system, the hard drive will boot with it and its resource will slowly wear out. You can copy some files to this hard drive and remove the connected cables from its connector. Thus, it will be completely disabled and its resource will be larger. But of course, if this option suits you.
Every year the amount of information stored on the computer increases. As a result, the computer starts to boot for a long time and periodically freezes. And this is natural, because all data is stored on a hard disk, the memory of which is limited.
Users solve this problem in different ways. Someone transfers information to various media, someone turns to the master and asks to increase the computer's memory, and someone decides to connect a second hard drive to the computer. Therefore, let's figure out how, without the help of a specialist - on our own - to connect a second hard drive to a computer.
To get started, you need to completely shut down the system unit: disconnect all cables and power cable. Now you need unscrew the side covers sistemnik. Expand it back towards you and unscrew the four screws on the sides. Slightly pressing on the side parts, move them in the direction of the arrow and remove.
Hard drives in the system unit are installed in special bays or cells. Such bays can be located in the back of the system unit at the bottom or in the middle, some hard drives are installed turned on their side. If your system unit has several cells for hard drives, install the second one not right next to the first one - this will improve its cooling.

Depending on the method of connection to the motherboard, internal hard drives are divided into two types: with IDE and SATA interface. IDE is an older standard, now all system units are designed for connection of hard drives with a SATA interface. It is not difficult to distinguish between them: IDE has wide ports for connecting a hard drive and power supply and a wide cable, while SATA has both ports and the cable is much narrower.
Connecting a hard drive via SATA interface
If your system unit has a hard drive with a SATA interface, then connecting a second one will not be difficult.
Insert a second hard drive into a free slot and attach it to the case with screws.

Now we take SATA cable, through which data will be transferred, and connect it to the hard drive by either side. We connect the second plug of the cable to the SATA connector on the motherboard.

All system units have at least two SATA connectors, they look like the one shown in the picture below.

To connect to the power supply, a cable is used, the plug of which is slightly wider than that of a SATA cable. If only one plug leaves the power supply, you need to buy a splitter. If the power supply is not equipped with a narrow plug, you will need to buy an adapter.

Connect the power cable to the hard drive.

The second hard drive is installed on the computer. Replace the side covers of the system unit and secure them with screws.
Connecting a hard disk via an IDE interface
Although the IDE standard is outdated, IDE-based hard drives are still found. Therefore, we will further consider how to connect a second hard drive via the IDE interface.
To get started, you need install jumper on the hard drive pins to the correct position. This will allow you to determine in which mode the hard drive will work: master (Master) or slave (Slave). Usually, the hard drive that is already installed on the computer works in Master mode. It is he who is the main one and is loaded from it. operating system. For the second hard drive that we are going to install, we need to select the Slave mode. On the hard drive case, the pins are usually signed, so just put the jumper in the right position.

The IDE cable through which data is transferred has three plugs. One is located at the end of a long piece, blue, connected to the motherboard. Another one is in the middle, white, connected to the slave drive (Slave). The third, at the end of a short segment, black, is connected to the master disk.

Insert hard drive to an empty cell. Then secure it with screws.

Choose free power supply plug and insert it into the appropriate port on your hard drive.

Now insert the plug which is located in the middle of the plume, to the hard disk port for data transfer. In this case, one end of the cable is already connected to the motherboard, the other - to the previously installed hard drive.

Connecting a second hard drive via the IDE interface is now complete.
As you can see, we did nothing complicated. Just be careful, and then you will definitely be able to connect a second hard drive to your computer.
And also watch the video